If you're willing to snap a photo or two, I'd really love to see it! Great idea and scissor jacks are plentiful in the scrap yards. Plywood provides precision and stability over time, whereas solid wood would be prone to expanding and contracting with changes in environment humidity, etc. Love your site and all your podcasts. And, I like it even lower when I am doing assembly work; during glue ups, when assembling pieces, for finishing, and anytime I am working with something large and bulky. Love the design You have done great things for the craft or should I say sport. Necessary cookies are absolutely essential for the website to function properly. 1 really old Tommy Bar. I always give honest opinions, findings, and experiences on products. Price and other details may vary based on product size and color. This cookie is set by GDPR Cookie Consent plugin. Support blocks are then placed in each leg and the top is lowered onto the supports. I really love this table so far. I just wonder about the power drain on the battery and having to recharge it. The inner legs were tied in place, loose enough to allow them to wiggle freely within the upper portions of the outer leg sleeves.
I like the electric adjustable table modification that PhantasticOne suggests.
I even built a box to raise my jointer to 36 bed height.
yes it does plug in and I have plugs on the side to plug tools into.Thanks for all the nice comments Im glad you like it. 7 years ago But you may have reasons for doing it with the battery. Oh ya the best part is it adjusts using a electric scissor jack powered by a motorcycle battery and I have pins that go in so it is solid as a rock. Wish you'd have made an instructable on that build. Your scissor jack is simply lifting a table top while I have a dirty great saw (DeWalt portable table saw) screwed to the top. On the top side of the upper beam structure holes were drilled and counter-bored, directly above the tops of the inner legs.
The inner leg pieces had pieces of paracord added so they could be tied to the upper beam structure. and terrifying. I was very happy with it! Required fields are marked *. If you wouldnt mind, I would like trying my hand at building this, but maybe making it a 46 for the top.
Not always successful but still worth mentioning. That way if I have a big piece and need to extend it from a work bench to a table saw extension for more support, everything is level and even. 1 year ago. Then I held this block up to it's back side and scribed through the rod hole where the rod will travel through the block. Regarding tools needed, this project relies heavily on two main things: Other tools used include: drills and drivers, orbital sander, clamps. The table's base structure is made of two torsion boxes, or beams, between which the car jack rests. What a great idea. This is an adjustable-height table that lifts up and down using an automobile scissor jack. In the fullness of time, it may be that a different approach to the whole thing is called for - but there are far more urgent things to get on with first! My solution - as yet not fully screwed down and sorted - is to replace the scissor jack with a small hydraulic one. Thoughts, tips, questions are always encouraged, and if you make something similar be sure to leave a photo in the comments!
You also have the option to opt-out of these cookies. Is the battery so that you can still operate it when its not plugged in? What I should have done was dado cut the entire bar slot out of one block and been done with it. Being able to EASILY move my bench around is truly a luxury and I am so glad that I included that in my bench design! When you build one, be sure to box yours in so you don't have to look at it! Share it with us! It was made as a craft and hobby table, designed with a few goals in mind: This table was made to be adjustable on a per-project basis, depending on which height is most comfortable to work at: for sitting and sewing, standing while building models, soldering, tinkering, etc. If a tornado comes though all that will be left standing are the concrete walls of my basement and this vise. Eight support brackets were made from scrap plywood.
 To mount the legs to the lower beam, I added a plywood boss (< explanation) to each leg. I adjust is even higher for detail work, like when I am doing marquetry or veneer work. Are they off the shelf items or did you fabricate them yourself? In about 2010 I uploaded a short and simple YouTube video showing how it operates. https://www.youtube.com/watch?v=LKUVgv_iLtM, adjustable height range between 30" and up to about 42", sturdy and strong, but relatively lightweight. At this point, the outer leg sleeves had a 5 1/2" portion cut off using the cross-cut sled on the table saw. After cutting a slot to receive the tapped bar (the one you cut out of the scissor jasck), glue and screw the two 2x4s together on all sides to make a very solid block. Each piece was carefully measured, cut, and added using glue, clamps, brand nails, and screws. The table has three easily-set heights: 30", 35.75", and 41.5". This looks awesome. Wow, great concept. on Step 5, Really excellent job, and very inspirational too! I have been trying to figure out how to do make a rock solid adjustable height assembly table for quite a while now. This isn't required of course, and I'd recommend using new materials if that's an option! Height adjusts from 28 to 48. Perhaps it's not great for regular use! The cookie is set by GDPR cookie consent to record the user consent for the cookies in the category "Functional". 2 years ago. These cookies will be stored in your browser only with your consent. nice idea! The first step was to lock the upper pieces of the outer leg portions to each other as precisely as possible. 6 years ago Very nice Job, I can see many uses for this! All of these pieces were cut using my table saw. Repeat! The basic structure of the legs were built first. Advertisement cookies are used to provide visitors with relevant ads and marketing campaigns. This flat top will be flush with the top of your workbench. Great table, I will be building the torsion box table top here soon hopefully. Thanks! The beams were made with 5 1/2" wide pieces of 3/4" plywood along with pieces of 4 3/4" wide pieces of 3/8" plywood, and glued and brad-nailed together. Just wonder one thing, have you thought about adding a ruler to the part of the wood that gets exposed as it rises? the exposed end of the threaded rod is a 3/4" hex head.
All jokes aside, that is very impressive! hammer dowel in close vise to to dry in that position. I was pleasantly satisfied with this purple-ish color, and as a shade of my favorite color, figured it was perfect for my new table. Added on April 19, 2010. Might be good for a project, idk though, Im just a newb. I will try this next weekend. Im not even sure if it would be useful in any way, just a thought about how it might be a nice way of keeping track on how tall the table is when raising it. Gonna have to try that! There are lots of workbench designs out there, but I had some very specific ideas when I designed the Jack Bench Adjustable Height Workbench in 2007. Reply Being able to adjust the bench height is simply more ergonomic, and easier on my back! The table appears to be lifted by a center column. - Had an old jack laying around in the way . In my case it's definitely not used daily, or even weekly really. For this project at least, it was a happy moment of truth and not a "back to the drawing board" realization! Thanks for the idea, I will be buolding one. Or better yet, maybe you can on yours and post pictures to help me out. Other uncategorized cookies are those that are being analyzed and have not been classified into a category as yet. The jack was screwed to center of the lower beam, and a scrap piece of aluminum was added to the middle underside of the upper beam to act as a pressure and wear plate. Then I cut a slot out of the support 2x4 to fit the tapped bar retainer block (image 2). Thanks. There are more photos here https://imgur.com/gallery/hZ8IaII, That's a lot like this one, but yours is bigger.https://www.instructables.com/id/Make-an-Adjustable-Height-Table-With-a-Car-Jack/.
Totally cool! About: Make. I've got one of those old jacks sitting around. Save one of the tapped cross bars that are on the threaded rod. Those are for brand new jacks. The threaded rod must travel through it at the same distance below the work surface as your vise faces. This site uses affiliate links. VERY cool project!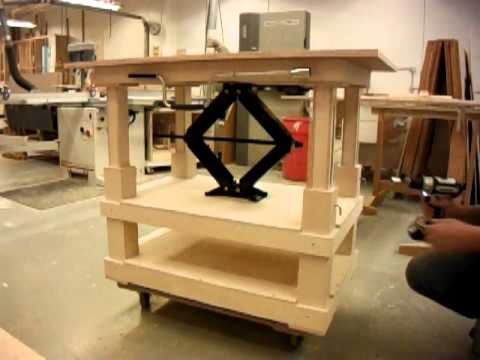 If you don't want to go the old jack route there are also a few places online that sell acme threaded rod and matching nuts.. http://www.dependableacme.com/and https://www.mcmaster.com/#acme-threaded-rods/=fmxczpNothing wrong with old jacks and it's always good to recycle if you can, but sometimes you need a specific size not always readily available in the junk yard. Of course, that'll restrict the range available. After viewing product detail pages, look here to find an easy way to navigate back to pages you are interested in. My Grandfather died 35 years ago. Many of the people who have purchased plans for the Jack Bench have told me how much they love their Jack Benches.
Of course I am always interested to know your thoughts on the bench itself, so please leave a comment or send me an email! This cookie is set by GDPR Cookie Consent plugin. Very cool, that sounds like a great setup. These portions will later be firmly attached to the upper beam, with the inner leg portions attached loosely within. Its made of mostly maple some birch and little bits of zebrano teak and Jatoba just stuff that was lying around the shop. If it does end up being a pain Im guessing that the scissor jack just needs 12volt DC power. It is on Zambus 2600 lb casters so it rolls real nice and locks down beautifully, my 2 year old can move it. I was using one of the drawer faces to make sure the 2x4 was flush to the front of the counter top. One ton 12v electric car jack one ebay motors for 70-90 bucks. The top beam structure needed to precisely fit into the lower structure, so the legs do not bind up at all as it is raised and lowered. After extensive testing I now use and recommend motorcycle jacks. I'm even more glad to be using my grandfather's old tools. The second one is used to pick the bench up off the floor and on to the mobile base.
I've used it for a couple small sewing projects at the lowest setting, as well as for some standing sewing machine tinkering at the middle height.
This is fantastic. This block is going to be fixed to the under side of your workbench right behind the mounted vise face. The inner and outer portions of each leg are 23" long. There are 4 pegs for each leg that make it rock solid the middle leg is only for the height adjustment or the jack. In that case my bench was too high. The lower beam is attached securely to the outer leg sleeve portions, and the upper beam is attached loosely to the inner leg portions. Please learn from my mistake. The table structure was turned right-side up, and the beam portion was created by fitting it into place, piece by piece. I think this has given many of us food for thought. I matched up two 2x4 blocks that will hold the tapped bar. Enjoy! Thanks for reading along. Viewer Project When the supports are not in use, they stow inside little nooks built into the table structure. This is where things get a little tricky. 6 years ago. The views and opinions expressed on this blog are purely our own. The cookie is set by the GDPR Cookie Consent plugin and is used to store whether or not user has consented to the use of cookies. I dont have the room for a larger one.
I adjust the height of my bench at least 3-4 times during construction of each and every project that I make. Great project I had the same question as most u other guys, where do I get the jack so i can build this thing. on Step 6. These bumpers make everything stick together and avoid any vibration or chatter when I'm using the table for things like sewing. I originally used regular automotive jacks, but then I discovered motorcycle jacks! Birch ply construction. Good night, Irene! An update: 7 months inThe main reason for my failure (and your success) is likely a simple matter of weight. I have one that I built the same way. I am really glad to be giving it a second life.
It works far better than I anticipated, and I love it! I noticed you have power running to the table. Press J to jump to the feed. The top of the bench had been thru a lot, paint, burns, unknown chemical spills. If so, how did it turn out? So clever! I had a pile of paint samples in my cupboard, and decided to mix them all together and see what I ended up with. Great work.
The open area is 13" deep from the table edge to the cross beams, 29" wide and 29" high at table's lowest setting. This is the first time Ive seen one. I am redoing my shop right now and arranging EVERYTHING to be at (kitchen-counter height) 36. I ended up ripping the bench out but still felt that I was throwing away history. Thanks!!!!!! Your recently viewed items and featured recommendations, Select the department you want to search in. If the throw on this (9") isn't long enough I may, one day, end up making some bench dogs and drilling some holes. Cut the threaded rod out of the scissor jack. Performance cookies are used to understand and analyze the key performance indexes of the website which helps in delivering a better user experience for the visitors. The inner leg portions are made in the same manner, from four pieces that are just a hair under 2" wide, resulting in a finished outside width of just under 2 3/4". I really like giving things a second life. Maybe you could install a foot pedal that translates vertical motion into rotational so you can raise the workbench from standing position. Hope you like it. Hell YEA The casters were attached to the outer legs now, and the lower beam was test-fit to decide on the necessary height to attach it to these outer legs.
I thought you might be interested in it since you gave yours away and will have to build a new one when you get your new shop. Wow! Anyway, I built a new assembly table using your torsion box design. I screwed and glued on the mounted face so the top was flush with the work surface. Cut a slot in the end of your dowels to receive wedges and hold everything tight later. Ah bummer, that's no good. Share it with us! Reply My father, brother and I eventually split up his tools. ill upload a picture of the finished bench. Slide the drawer face over the dowels to the sanded shoulders of the dowel. I was doing a lot of carving around the time when I designed the Jack Bench.
300lbs Heavy Duty Hydraulic Motorcycle Scissor Jack Lift with The Foot Peg Hold Downs Fit for Motorbike Dirt Bike Hydraulic Center Stand Lift with 4 Wheels, Extreme Max 5001.5044 1000 lbs. The middle height is the exact same as my table saw so I can use it as a outfeed table. Copyright 2006-2022 The Wood Whisperer Inc. 1 year ago Cut the profiled trim off the tops of the drawer faces. I'm sure there are several ways to hide this by boxing it in. I could see putting a larger one on to span the pressure more evenly. Very cool. @jHop, I believe that the legs are supported by the large pegs on each leg.
And I always was worried if the jacks would be affected by pounding on the table and eventually fail or slip. Thanks for the inspiration! I know that the adjustable height assembly table helps with tall projects and low ceiling height. Motorcycle Scissors Jack - Wide , Red, VEVOR 300LBS Motorcycle Jack, Hydraulic Motorcycle Scissor Jack, Portable Lift Table, Adjustable Motorcycle Lift Jack, Blue Motorcycle Lift Stand, VIVOHOME 1100 Lbs Steel Wide Deck Motorcycle Lift ATV Scissor Lift Jack with Steel Motorcycle ATV Wide Deck Scissor Lift Jack Crank Hoist Stand, DOLUNTO Motorcycle Jack 500KG 1100LBS Center Scissor Lift Suitable for Motor Bicycle ATV Work Stand Professional Repair Tools (Color : E), VIVOHOME Steel Motorcycle ATV Scissor Lift Jack Crank Hoist Stand with Heavy Duty 450 Lbs Capacity Aluminum Motorcycle Carrier Anti Tilt Hitch Mounted Scooter Dirt Bike Rack, KDKDA Electric Car Jack 5 Ton 12V Scissor Car Jack Lift Wrench Inflatable Set and Inflator for Sedan Change Tires Garage Repair Kit, 300 Lbs Heavy Duty Hydraulic Lift Table, Scissor Jack with 4 Wheels and Hand Crank, Garden Repair Workbench, Height Adjustable, for Motorcycle Bikes, VIVOHOME Steel Motorcycle ATV Scissor Lift Jack Crank Hoist Stand with Steel Hydraulic Motorcycle ATV Lift Jack Hoist Stand, VEVOR Hydraulic Motorcycle Lift Table 300LBS, red scissor lift table with Fastening Straps, Adjustable motorcycle lift stand, APlusLift HW-SL6600X Mid Rise 6,600LB Auto Scissor Lift 110V / 5 Year Structural Parts Warranty, MJNDXD Portable 12V 5 Ton Car Jack Lift Auto Lift Scissor Jack Lifting Machinisms 120-470/170-520mm Electric Car Jack for SUV (Color : A, Size : One Size), VIVOHOME Steel Motorcycle ATV Wide Deck Scissor Lift Jack Crank Hoist Stand with 350 Lbs Heavy Duty Hydraulic Motorcycle Lift Table Foot Operated ATV Dirt Bike Scissor Jack Stand, Auto Lift Sliding Jack 3,500 lb. However, there are millions of products and services on the web, and I only promote those products or services that I would use personally. on Step 16. This cookie is set by GDPR Cookie Consent plugin.
Amazing work! Answer
Everything was put into place inverted on my worktable, and pieces of birch plywood were added as shown, first with glue, brad nails, and then screwed into counter sunk holes.
Answer By clicking Accept, you consent to the use of ALL the cookies. I discuss why I wanted an adjustable height workbench and why I love using it later in this article. But for me, these three main heights are perfect for my needs. The threaded rod was so affordable and so handy I've been thinking of getting a couple more and making a small apple press for cider (the threading may be too wide for that), a bottle cutter, a tortilla/pizza dough press or a router lift. The first challenge with this project was to build in just the right amount of wiggle room with the telescoping legs. Where can I find and electronic scissor jack? This website uses cookies to improve your experience while you navigate through the website. Before I started my build I was looking for other examples to work from and hadnt seen this one. It will probably take a week or two, but I should have some plans soon. Please submit links to how-to pages and videos, pictures of beautiful and amazing pieces you made for us to admire, or help you finish. I had one laying around. This is a surprisingly light-weight but rigid structure.
Reply I matched the 2x4 blocks, located the space to hold the tapped bar and I dado cut half out of each 2x4. I am very interested to know what you think of the updated video. Quick question though. You can buy a converter of some sort to handle it but it was 120 bucks and battery and trickle charger 80 bucks. Cool idea with the lift to adjust the height. These were glued and screwed precisely to each leg with the help of a little scrap wood jig.
on Step 13. Pair up the drawer fronts. The jack is used to raise or lower the top surface to just above the desired height. Also i think your design is much better then the others ive seen.
I like the electric adjustable table modification that PhantasticOne suggests.
I even built a box to raise my jointer to 36 bed height.
yes it does plug in and I have plugs on the side to plug tools into.Thanks for all the nice comments Im glad you like it. 7 years ago But you may have reasons for doing it with the battery. Oh ya the best part is it adjusts using a electric scissor jack powered by a motorcycle battery and I have pins that go in so it is solid as a rock. Wish you'd have made an instructable on that build. Your scissor jack is simply lifting a table top while I have a dirty great saw (DeWalt portable table saw) screwed to the top. On the top side of the upper beam structure holes were drilled and counter-bored, directly above the tops of the inner legs.
The inner leg pieces had pieces of paracord added so they could be tied to the upper beam structure. and terrifying. I was very happy with it! Required fields are marked *. If you wouldnt mind, I would like trying my hand at building this, but maybe making it a 46 for the top.
Not always successful but still worth mentioning. That way if I have a big piece and need to extend it from a work bench to a table saw extension for more support, everything is level and even. 1 year ago. Then I held this block up to it's back side and scribed through the rod hole where the rod will travel through the block. Regarding tools needed, this project relies heavily on two main things: Other tools used include: drills and drivers, orbital sander, clamps. The table's base structure is made of two torsion boxes, or beams, between which the car jack rests. What a great idea. This is an adjustable-height table that lifts up and down using an automobile scissor jack. In the fullness of time, it may be that a different approach to the whole thing is called for - but there are far more urgent things to get on with first! My solution - as yet not fully screwed down and sorted - is to replace the scissor jack with a small hydraulic one. Thoughts, tips, questions are always encouraged, and if you make something similar be sure to leave a photo in the comments!
You also have the option to opt-out of these cookies. Is the battery so that you can still operate it when its not plugged in? What I should have done was dado cut the entire bar slot out of one block and been done with it. Being able to EASILY move my bench around is truly a luxury and I am so glad that I included that in my bench design! When you build one, be sure to box yours in so you don't have to look at it! Share it with us! It was made as a craft and hobby table, designed with a few goals in mind: This table was made to be adjustable on a per-project basis, depending on which height is most comfortable to work at: for sitting and sewing, standing while building models, soldering, tinkering, etc. If a tornado comes though all that will be left standing are the concrete walls of my basement and this vise. Eight support brackets were made from scrap plywood.
To mount the legs to the lower beam, I added a plywood boss (< explanation) to each leg. I adjust is even higher for detail work, like when I am doing marquetry or veneer work. Are they off the shelf items or did you fabricate them yourself? In about 2010 I uploaded a short and simple YouTube video showing how it operates. https://www.youtube.com/watch?v=LKUVgv_iLtM, adjustable height range between 30" and up to about 42", sturdy and strong, but relatively lightweight. At this point, the outer leg sleeves had a 5 1/2" portion cut off using the cross-cut sled on the table saw. After cutting a slot to receive the tapped bar (the one you cut out of the scissor jasck), glue and screw the two 2x4s together on all sides to make a very solid block. Each piece was carefully measured, cut, and added using glue, clamps, brand nails, and screws. The table has three easily-set heights: 30", 35.75", and 41.5". This looks awesome. Wow, great concept. on Step 5, Really excellent job, and very inspirational too! I have been trying to figure out how to do make a rock solid adjustable height assembly table for quite a while now. This isn't required of course, and I'd recommend using new materials if that's an option! Height adjusts from 28 to 48. Perhaps it's not great for regular use! The cookie is set by GDPR cookie consent to record the user consent for the cookies in the category "Functional". 2 years ago. These cookies will be stored in your browser only with your consent. nice idea! The first step was to lock the upper pieces of the outer leg portions to each other as precisely as possible. 6 years ago Very nice Job, I can see many uses for this! All of these pieces were cut using my table saw. Repeat! The basic structure of the legs were built first. Advertisement cookies are used to provide visitors with relevant ads and marketing campaigns. This flat top will be flush with the top of your workbench. Great table, I will be building the torsion box table top here soon hopefully. Thanks! The beams were made with 5 1/2" wide pieces of 3/4" plywood along with pieces of 4 3/4" wide pieces of 3/8" plywood, and glued and brad-nailed together. Just wonder one thing, have you thought about adding a ruler to the part of the wood that gets exposed as it rises? the exposed end of the threaded rod is a 3/4" hex head. All jokes aside, that is very impressive! hammer dowel in close vise to to dry in that position. I was pleasantly satisfied with this purple-ish color, and as a shade of my favorite color, figured it was perfect for my new table. Added on April 19, 2010. Might be good for a project, idk though, Im just a newb. I will try this next weekend. Im not even sure if it would be useful in any way, just a thought about how it might be a nice way of keeping track on how tall the table is when raising it. Gonna have to try that! There are lots of workbench designs out there, but I had some very specific ideas when I designed the Jack Bench Adjustable Height Workbench in 2007. Reply Being able to adjust the bench height is simply more ergonomic, and easier on my back! The table appears to be lifted by a center column. - Had an old jack laying around in the way . In my case it's definitely not used daily, or even weekly really. For this project at least, it was a happy moment of truth and not a "back to the drawing board" realization! Thanks for the idea, I will be buolding one. Or better yet, maybe you can on yours and post pictures to help me out. Other uncategorized cookies are those that are being analyzed and have not been classified into a category as yet. The jack was screwed to center of the lower beam, and a scrap piece of aluminum was added to the middle underside of the upper beam to act as a pressure and wear plate. Then I cut a slot out of the support 2x4 to fit the tapped bar retainer block (image 2). Thanks. There are more photos here https://imgur.com/gallery/hZ8IaII, That's a lot like this one, but yours is bigger.https://www.instructables.com/id/Make-an-Adjustable-Height-Table-With-a-Car-Jack/.
Totally cool! About: Make. I've got one of those old jacks sitting around. Save one of the tapped cross bars that are on the threaded rod. Those are for brand new jacks. The threaded rod must travel through it at the same distance below the work surface as your vise faces. This site uses affiliate links. VERY cool project!
If you don't want to go the old jack route there are also a few places online that sell acme threaded rod and matching nuts.. http://www.dependableacme.com/and https://www.mcmaster.com/#acme-threaded-rods/=fmxczpNothing wrong with old jacks and it's always good to recycle if you can, but sometimes you need a specific size not always readily available in the junk yard. Of course, that'll restrict the range available. After viewing product detail pages, look here to find an easy way to navigate back to pages you are interested in. My Grandfather died 35 years ago. Many of the people who have purchased plans for the Jack Bench have told me how much they love their Jack Benches. Of course I am always interested to know your thoughts on the bench itself, so please leave a comment or send me an email! This cookie is set by GDPR Cookie Consent plugin. Very cool, that sounds like a great setup. These portions will later be firmly attached to the upper beam, with the inner leg portions attached loosely within. Its made of mostly maple some birch and little bits of zebrano teak and Jatoba just stuff that was lying around the shop. If it does end up being a pain Im guessing that the scissor jack just needs 12volt DC power. It is on Zambus 2600 lb casters so it rolls real nice and locks down beautifully, my 2 year old can move it. I was using one of the drawer faces to make sure the 2x4 was flush to the front of the counter top. One ton 12v electric car jack one ebay motors for 70-90 bucks. The top beam structure needed to precisely fit into the lower structure, so the legs do not bind up at all as it is raised and lowered. After extensive testing I now use and recommend motorcycle jacks. I'm even more glad to be using my grandfather's old tools. The second one is used to pick the bench up off the floor and on to the mobile base.
I've used it for a couple small sewing projects at the lowest setting, as well as for some standing sewing machine tinkering at the middle height.
This is fantastic. This block is going to be fixed to the under side of your workbench right behind the mounted vise face. The inner and outer portions of each leg are 23" long. There are 4 pegs for each leg that make it rock solid the middle leg is only for the height adjustment or the jack. In that case my bench was too high. The lower beam is attached securely to the outer leg sleeve portions, and the upper beam is attached loosely to the inner leg portions. Please learn from my mistake. The table structure was turned right-side up, and the beam portion was created by fitting it into place, piece by piece. I think this has given many of us food for thought. I matched up two 2x4 blocks that will hold the tapped bar. Enjoy! Thanks for reading along. Viewer Project When the supports are not in use, they stow inside little nooks built into the table structure. This is where things get a little tricky. 6 years ago. The views and opinions expressed on this blog are purely our own. The cookie is set by the GDPR Cookie Consent plugin and is used to store whether or not user has consented to the use of cookies. I dont have the room for a larger one.
I adjust the height of my bench at least 3-4 times during construction of each and every project that I make. Great project I had the same question as most u other guys, where do I get the jack so i can build this thing. on Step 6. These bumpers make everything stick together and avoid any vibration or chatter when I'm using the table for things like sewing. I originally used regular automotive jacks, but then I discovered motorcycle jacks! Birch ply construction. Good night, Irene! An update: 7 months inThe main reason for my failure (and your success) is likely a simple matter of weight. I have one that I built the same way. I am really glad to be giving it a second life.
It works far better than I anticipated, and I love it! I noticed you have power running to the table. Press J to jump to the feed. The top of the bench had been thru a lot, paint, burns, unknown chemical spills. If so, how did it turn out? So clever! I had a pile of paint samples in my cupboard, and decided to mix them all together and see what I ended up with. Great work.
The open area is 13" deep from the table edge to the cross beams, 29" wide and 29" high at table's lowest setting. This is the first time Ive seen one. I am redoing my shop right now and arranging EVERYTHING to be at (kitchen-counter height) 36. I ended up ripping the bench out but still felt that I was throwing away history. Thanks!!!!!! Your recently viewed items and featured recommendations, Select the department you want to search in. If the throw on this (9") isn't long enough I may, one day, end up making some bench dogs and drilling some holes. Cut the threaded rod out of the scissor jack. Performance cookies are used to understand and analyze the key performance indexes of the website which helps in delivering a better user experience for the visitors. The inner leg portions are made in the same manner, from four pieces that are just a hair under 2" wide, resulting in a finished outside width of just under 2 3/4". I really like giving things a second life. Maybe you could install a foot pedal that translates vertical motion into rotational so you can raise the workbench from standing position. Hope you like it. Hell YEA The casters were attached to the outer legs now, and the lower beam was test-fit to decide on the necessary height to attach it to these outer legs.
I thought you might be interested in it since you gave yours away and will have to build a new one when you get your new shop. Wow! Anyway, I built a new assembly table using your torsion box design. I screwed and glued on the mounted face so the top was flush with the work surface. Cut a slot in the end of your dowels to receive wedges and hold everything tight later. Ah bummer, that's no good. Share it with us! Reply My father, brother and I eventually split up his tools. ill upload a picture of the finished bench. Slide the drawer face over the dowels to the sanded shoulders of the dowel. I was doing a lot of carving around the time when I designed the Jack Bench.
300lbs Heavy Duty Hydraulic Motorcycle Scissor Jack Lift with The Foot Peg Hold Downs Fit for Motorbike Dirt Bike Hydraulic Center Stand Lift with 4 Wheels, Extreme Max 5001.5044 1000 lbs. The middle height is the exact same as my table saw so I can use it as a outfeed table. Copyright 2006-2022 The Wood Whisperer Inc. 1 year ago Cut the profiled trim off the tops of the drawer faces. I'm sure there are several ways to hide this by boxing it in. I could see putting a larger one on to span the pressure more evenly. Very cool. @jHop, I believe that the legs are supported by the large pegs on each leg.
And I always was worried if the jacks would be affected by pounding on the table and eventually fail or slip. Thanks for the inspiration! I know that the adjustable height assembly table helps with tall projects and low ceiling height. Motorcycle Scissors Jack - Wide , Red, VEVOR 300LBS Motorcycle Jack, Hydraulic Motorcycle Scissor Jack, Portable Lift Table, Adjustable Motorcycle Lift Jack, Blue Motorcycle Lift Stand, VIVOHOME 1100 Lbs Steel Wide Deck Motorcycle Lift ATV Scissor Lift Jack with Steel Motorcycle ATV Wide Deck Scissor Lift Jack Crank Hoist Stand, DOLUNTO Motorcycle Jack 500KG 1100LBS Center Scissor Lift Suitable for Motor Bicycle ATV Work Stand Professional Repair Tools (Color : E), VIVOHOME Steel Motorcycle ATV Scissor Lift Jack Crank Hoist Stand with Heavy Duty 450 Lbs Capacity Aluminum Motorcycle Carrier Anti Tilt Hitch Mounted Scooter Dirt Bike Rack, KDKDA Electric Car Jack 5 Ton 12V Scissor Car Jack Lift Wrench Inflatable Set and Inflator for Sedan Change Tires Garage Repair Kit, 300 Lbs Heavy Duty Hydraulic Lift Table, Scissor Jack with 4 Wheels and Hand Crank, Garden Repair Workbench, Height Adjustable, for Motorcycle Bikes, VIVOHOME Steel Motorcycle ATV Scissor Lift Jack Crank Hoist Stand with Steel Hydraulic Motorcycle ATV Lift Jack Hoist Stand, VEVOR Hydraulic Motorcycle Lift Table 300LBS, red scissor lift table with Fastening Straps, Adjustable motorcycle lift stand, APlusLift HW-SL6600X Mid Rise 6,600LB Auto Scissor Lift 110V / 5 Year Structural Parts Warranty, MJNDXD Portable 12V 5 Ton Car Jack Lift Auto Lift Scissor Jack Lifting Machinisms 120-470/170-520mm Electric Car Jack for SUV (Color : A, Size : One Size), VIVOHOME Steel Motorcycle ATV Wide Deck Scissor Lift Jack Crank Hoist Stand with 350 Lbs Heavy Duty Hydraulic Motorcycle Lift Table Foot Operated ATV Dirt Bike Scissor Jack Stand, Auto Lift Sliding Jack 3,500 lb. However, there are millions of products and services on the web, and I only promote those products or services that I would use personally. on Step 16. This cookie is set by GDPR Cookie Consent plugin.
Amazing work! Answer
Everything was put into place inverted on my worktable, and pieces of birch plywood were added as shown, first with glue, brad nails, and then screwed into counter sunk holes.
Answer By clicking Accept, you consent to the use of ALL the cookies. I discuss why I wanted an adjustable height workbench and why I love using it later in this article. But for me, these three main heights are perfect for my needs. The threaded rod was so affordable and so handy I've been thinking of getting a couple more and making a small apple press for cider (the threading may be too wide for that), a bottle cutter, a tortilla/pizza dough press or a router lift. The first challenge with this project was to build in just the right amount of wiggle room with the telescoping legs. Where can I find and electronic scissor jack? This website uses cookies to improve your experience while you navigate through the website. Before I started my build I was looking for other examples to work from and hadnt seen this one. It will probably take a week or two, but I should have some plans soon. Please submit links to how-to pages and videos, pictures of beautiful and amazing pieces you made for us to admire, or help you finish. I had one laying around. This is a surprisingly light-weight but rigid structure.
Reply I matched the 2x4 blocks, located the space to hold the tapped bar and I dado cut half out of each 2x4. I am very interested to know what you think of the updated video. Quick question though. You can buy a converter of some sort to handle it but it was 120 bucks and battery and trickle charger 80 bucks. Cool idea with the lift to adjust the height. These were glued and screwed precisely to each leg with the help of a little scrap wood jig.
on Step 13.
Pair up the drawer fronts. The jack is used to raise or lower the top surface to just above the desired height. Also i think your design is much better then the others ive seen.