For reference, the seahorse I used has 4 layers, the octopus has 3 layers, and the number has 2 layers. This was SUPER helpful!! I love baking and creating all types of custom cakes and crafts. One thing to note is that for extra adhesive ability, I added hot glue to the foam squares. Lastly, you can use paper straws which can be easily trimmed to size and glued to the back of your cake topper. Insert your DIY glitter cake topper into the cakeand enjoy! If you are creating your own designs, I recommend adding a stroke to the lettering or underscoring slenderfonts with a thick line to make sure that the toppers can hold their rigid shape.
You will add these to the back of the glitter cardstock.  Once you have your cake topper design cut out, you will need a hot glue gun to assemble it. Check out this post about how to make custom shape shakers. We use cookies to ensure that we give you the best experience on our website. You can use wooden skewers that you can find in the grocery store or at your local craft store. Lastly, customize the topper with a name and voila! If you use a card stock paper that is too light weight, it will be too flimsy and will flop over unless you double up the paper. Once this step is done, cut all your pieces! I added a video to my Instagram account as well if youd like to see how that version came to be. Here are a few fonts that work well for cake toppers. For reference, this cake was 7, so I made the cake topper about 6.5 in width. I had a lot of fun creating these designs for a chic and modern weddingcake topper! Beyond a Cricut machine, there are other tools that make a big difference with paper crafts in general: brayer and Cricut basic tools with reverse tweezers and spatula. This post was sponsored by CRICUT, a Hey Wedding Lady Partner. Just take your image and trace it onto a sheet of cardstock. A precision tip glue is helpful for tiny pieces or for areas that looks best flat. There are several options for cake topper sticks that you can use for this project. First, though, assemble your pieces on one of the precut backing pieces. A good quality paper glue will dry clear, not wrinkle your paper and spreads easily. A complete review of my favorite glitter card stocks, and where they can be purchased, can be found here. It does not store any personal data. Insert a square shape onto your canvas. Theyre fun, easy, and, most importantly, super inexpensive. Then the package gets added to a hard backed large envelope for the best protection. Ashleigh only adds a back to her cake toppers when requested by the customer. Now you have a precut space for your cake stick to go!
  Once the design is fully cut out, carefully turn the mat over face down. This cookie is set by GDPR Cookie Consent plugin. The glitter cardstock offers a good base for a free standing topper, but adding poster board backing ensures a firmer and longer lasting design! Unlock the dimensions and make the square a long, thin rectangle. Could you tell me the thickness of the micheals glitter card stock, im from the UK so dont have one over here and would be good to have a look around for one with the same thickness, as hobbycraft glitter card stock is so thin! I do wish we had more time in the day, more sunlight that is! Im so excited to finally share my DIY cake topper tutorial! Cricut Project: Etched Monogram Champagne Flutes, Easy Fall Cricut Project: DIY Pumpkin Ice Bucket, How to Make Your Own Wedding Welcome Sign.
  And the. Next, assemble your octopus, seahorse, and number. Thanks!ReplyCancel, I created all of the topper designs using InDesign! Now, pull one of the backings to the side so its separate from the other items on your canvas. I know I kind of glazed over the design part, so please let me know if you have any questions or concerns about this Fathers Day cake topper tutorial (or any of my others).
Copyright 2022 Modern Flower Creation | Powered by Astra WordPress Theme, Click to share on Facebook (Opens in new window), Click to share on Pinterest (Opens in new window), Click to share on WhatsApp (Opens in new window), Click to email a link to a friend (Opens in new window). Also consider the height of your cake topper and if you want the stick to be fully hidden it the cake or some of it showing. This will allow you to rearrange each independently, Arrange the images and letters so each are slightly overlapping, Click the weld tool to weld the objects into a single layer. Once youve chosen a font, type the text (Happy Fathers Day, Happy Birthday, Mr and Mrs so-and-so, etc) and adjust the line height so that the words are practically right on top of each other. Do you double side the topper? I allow the paint to dry before removing the painters tape, creating a perfectly clean line around the skewer. Click to share on Twitter (Opens in new window), Click to share on Facebook (Opens in new window), Click to share on Pinterest (Opens in new window), You Make Everyday Brighter Free Printable Rainbow Class Valentines, Pot of Gold Saint Patricks Day Printable Favors , Quirky Script (which is a Cricut Design Space font), Type your wording using the font of your choice, and add any images you would like to include in this layer, Select the unattach tool to un-weld your images and letters. Cake topper creator, Ashleigh ships out her custom cake toppers by backing them onto study board and securing with bubble wrap. 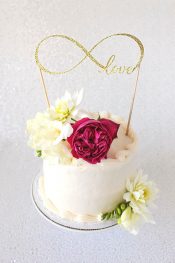 You will be included in my email newsletter with helpful Cricut ideas, tips and FREE cut files. I would love to see them. Hot glue dries quicker and adds more stability to the skewer and topper than regular craft glue. The next few steps are totally optional as you do not have to add all the extra layers like I do. A brayer makes a noticeable difference for how well your cardstock sticks to the Cricut mats, which then leads to better cuts especially for the most difficult little pieces and the most textured glitter cardstock. They make the perfect cake topper sticks! Dont forget to share your finished product with me and tag Modern Flower Creation! jennifermaker Cut glitter cardstock using material settings of glitter cardstock with more pressure and the fine point blade (which is the blade included with all Cricut machines). If you want to design your own cake topper, though, its all about choosing the right font. The other one is glitter cardstock, also from Joanns. topper fortnite cake byba llama cardstock using You need a font thats thick enough to survive the cut, is legible, and can easily interlock words, preferably at three or four different spots. Take a look around.
And the Cricut Explore Air 3 and Maker 3 can cut 11.7 inches by 12 feet with smart materials like smart Paper Sticker Cardstock. I used October Twilight for this project, mainly because its thick and easy to overlap letters. cardstock 1dogwoof Finally, insert your DIY glitter cake topper into the cakeand enjoy! I interviewed my crafty friend Ashleigh from @ashleighelliottdesigns to learn more about Cricut cake topper materials, tips and tricks. Both the Cricut Explore Air 2 and the Cricut Maker models have a max cut size of 11.5 by 11.5 inches. I would love to see how your cake toppers turn out! Use left/right arrows to navigate the slideshow or swipe left/right if using a mobile device, How to Make A Paper Cake Topper Like An Expert, choosing a selection results in a full page refresh, press the space key then arrow keys to make a selection.
Here are some ideas for holiday Cricut projects with Cardstock.  We also use third-party cookies that help us analyze and understand how you use this website. Cricut.
  Once you have selected your cake topper font and wording, its time to start welding. As far as experience level goes for Cricut projects with cardstock, this glitter cake topper DIY is for everyone from beginner Cricut users to expert crafters. I hope that helps!ReplyCancel, What fonts are you using? Regular non-glitter card stock is not think enough on its own to create a cake topper. Heres all you need to make your own DIY cake topper-. Not only is it extra thick, it adds that extra sparkly pop that every good cake topper needs, especially for holiday occassions. This length works well for tall multi-layered cakes. I have a Cricut Maker, however, you can also use other type Cricut cutters like the Cricut Air for this project. If you are making a Cricut cake topper for cupcakes, it may be necessary to size down the design to around 3 or 4 inches and reduce the length of the cake topper stick. DIY blogger Stephanie Ziajka shares her step-by-step process on how to make a cake topper with a Cricut Explore Air 2 (or any smart cutting machine), gold glitter cardstock, adhesive spray, and wooden skewers in this tutorial! Attach your assembled characters on top of your seaweed using more 3D foam adhesive. For more Fathers Day dinner/dessert inspiration, check out this years simple Fathers Day tablescape. You can see a small cake I decorated with flowers for Mothers Day here! I have an Air Pro and not a Maker so Im not exactly sure but I think as long as the thickness of the two pieces of material doesnt exceed the Makers depth settings, you should be able to cut them together! I have made some slender fonts in the past and I always get frustrated when it would bend during the event. Tips for welding your design in Cricut Design Space and also which supplies create the best cake toppers. By using this form you agree with the storage and handling of your data by this website. I try to review all email submissions in 2-3 weeks - I will be in touch soon! If any of my instructions are confusing and/or youd just prefer a video tutorial, scroll down to the printable how-to card at the bottom of the post. So follow along with me and let's get creative together! And Ill also show you a few tricks in Cricut Design Space to perfectly space, attach and weld your letters together. Script fonts are helpful for making cake toppers with Cricut because the letters can be connected together within Cricut Design Space using the Weld tool. Your favourite reason seemed to be on the web the easiest thing to bear in mind of. All rights reserved. These work great for cake toppers because you can attach the letters easily and you have a solid space to glue the cake topper stick to when youre ready. Links may contain affiliate content, which means I receive a small percentage of sales generated from clicks, Your email is never published or shared. The offset feature is now available on both the desktop and mobile app version of Cricut Design Space. Pumpkin Spice Macarons with Pumpkin Ganache Filling, HOW TO MAKE SANDWICH BREAD AT HOME (EASILY), How to Make THE PERFECT Cheesecake (That Doesnt Crack). Please try again.
Choosing the right paper makes a difference in the quality of the personalized cake topper. Choosing the right font for your cake topper is super important. As an Amazon Associate and member of other affiliate programs, I earn from qualifying purchases. Hello, thank you for sharing your tips and tricks on cake toppers! In this tutorial, I am going to show you how to make a DIY cake topper with your Cricut cutting machine. If Im selling a cake topper, I always go the extra mile and spray paint the top part of the skewer to match the glitter card stock. Thin fonts are more likely to rip and make the overall cake topper more flimsy. Oops, something went wrong!
Cakes with less layers or sheet cakes may need shorter sticks. Foam adhesive can be cut down easily with scissors to fit very small areas.  As for cake topper sticks, I use the wooden, food-grade skewers found at Hobby Lobby in the baking aisle. Check out my step by step tutorial below! Next, you will reverse your cake topper so you can add hot glue to the backside of the decal before adhering the clear stick to the cardstock. Thicker cardstock helps make cake toppers made with Cricut sturdy, however, small details are easier to cut with thinner paper. You also have the option to opt-out of these cookies. It was fun incorporating more blues and gender-neutral tones into my table settings for a change. It will ultimately flop over or break. Any Cricut machine that can cut cardstock can be used to make cake toppers. I only use the Paper Studio brand for embellishing cake toppers, but not for the cake topper itsself. buntings imprimibles Reverse tweezers are designed with a reverse grip feature allowing them to grab material and stay secure without constant pressure applied. Cake decorating has become somewhat of a surprising hobby for me lately! Where to find FREE fonts for the perfect cake topper design. Lets be craft besties and stay in touch.
This site is full of Cricut project ideas and inspiration. These cookies ensure basic functionalities and security features of the website, anonymously. Thank you for sharing! This post may contain affiliate links, which means Ill receive a commission if you purchase through my links, at no extra cost to you. Its August!
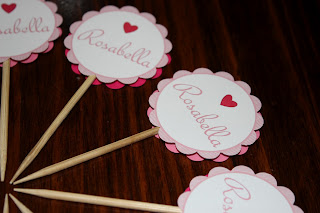
How would I go about creating the actual worded design? Glue your small seaweed on top of your number. And, what is the name brand of the Hobby Lobby skewers that you use?  You want to glue the skewers as far up the back of the topper as you can without being visible. Its also important to make sure that all dots above letters, such as is and apostrophes are, sliced and reattached by welding. If you find this a bit confusing, go to my Instagram account @Pineandpartyco and go to my 12x12 tab. A glue gun with a small tip is helpful to control the amount of glue and not flood your DIY cake topper with gobs of glue. Unsubscribe anytime and your email will never be shared. From Cricut, I used Seahorse #M3841D, Starfish #M39229, Octopus #M43A67, Bubble #M3E3FB, Banner #M8DB16E6, Seaweed #MB34FCFF, Coral Silhouette #MC19C23B, Equinox Font and Glowworm Font. Do you only work with cricut? cake topper cricut diy tutorial poster backing again cut support No, I dont make it double-sided. Youll want to glue down your larger seaweed cut outs first because these are meant to be displayed in the background. Please note, comments must be approved before they are published. toppers cupcake cardstock plain dark simple heart pink name light And thats it making your own glitter cake toppers is super duper easy! However, you may visit "Cookie Settings" to provide a controlled consent.
 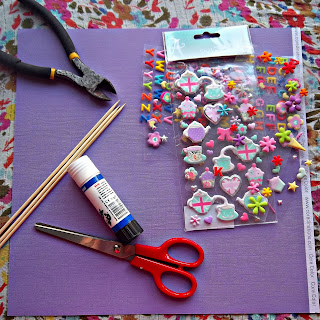 cupcake toppers wrappers own cupcakes cake topper birthday organize cute First, lets talk about card stock paper. Today Im sharing tips for creating the perfect cake topper with Cricut.
  Ive been wanting to get into more Cricut cardstock projects lately anyway, so I played around in Cricut Design Space and came up with something that worked perfectly. Reverse tweezers are designed with a reverse grip feature allowing them to grab material and stay secure without constant pressure applied. Thanks for all the tips. Hobby lobby has a similar brand called Paper Studio, but the weight is slightly lighter. I hope this tutorial on How to make a DIY cake topper with your Cricut was helpful to you.
.jpg)