 In the picture below I used a joiner and a planer to mill this board. If you want to build a beautiful dining table and you look an unique design, this trestle table might be what you are looking for. Made this of scalded maple top natural finish with black gloss, Handmade Furniture :: Shanty2Chic's clipboard on, Trestle table plans | HowToSpecialist - How to Build, Step by Step DIY Plans, Table Plans I think would be a good look for the SCA but not very period looking, Custom Made Live Edge Walnut Slab Trestle Dining Table, Ana White | Build a Simple Small Trestle Desk | Free and Easy DIY Project and, Great details, including supply list, for a DIY table with plumbing pipe legs, A trestle table with some lighter Shaker type stylings. It comes with diagrams to guide you through each and every step of the project. 7 Woodworking Projects Perfect For Gift Giving, 10 DIY Wood Stains That are Homemade Easily. The table top especially can be hard to handle at times. Each one is 16 long and uses two boards glued together. Build It | Rustic Dining Table with Jimmy DiResta, The 5 Best Upholstery Cleaners (2022 Review). Use a circular saw to cut both ends as described in the diagram. So you will need to adjust your biscuit depth differently for each piece. The first thing you will want to do is get all of your boards ready to be glued together and worked with. Center the leg plate you made in the first step on top of the newel post. Apply a coat of waterborne polyurethane to the tabletop for more protection. This is fine, and you can even flatten the boards later on. (adsbygoogle = window.adsbygoogle || []).push({}); CERTAIN CONTENT THAT APPEARS COMES FROM AMAZON SERVICES LLC. Repeat for all corbels. Copyright 2022 This Old House Ventures, LLC. Drill pilot holes through the pieces of lumber and secure them to the base using 1 1/4 screws and glue. Smooth the cut edgesand drill pocket holes along the straight edges. Just follow my awesome flow chart I made here: These three pieces go between the legs to add strength to the table.
Join us on Instagram and Pinterest to keep up with our most recent projects and sneak peeks! I used some stainable wood putty to fill some obvious cracks and holes. Fit a drill/driver with a -inch paddle bit. To make the entire project a breeze, make sure that you have all these necessities ready! If you have high quality wood (hardwood or wood without knots), then you may not need to fill any holes in your table top. With a dry fit you are looking to see how well everything lines up, and to make sure that once you add glue that you will not have trouble putting it together. 4. Drill pilot holes through the newel posts and ends of the handrail. Corbels and staircase parts helped us craft a handsome table with plenty of room for a family crowd. PLEASE READ MY DISCLAIMER FOR MORE INFO. It can be a little stressful, but as long as you are prepared then the glue drying too quickly will not be a problem. Depending on your woodworking skills, you can choose which one you prefer to DIY. But plunge pools fill the middle ground, give a splash of fun, and offer relaxation in smaller yards. Once you start spreading glue the clock will start ticking. I like this method because not only do you have a spot to put the top once you have it made, but it gives you an idea of how the top should look.
You can choose to start from the lumber milling to painting. Dont forget to SHARE and LIKEour projects with your friends, by using the social media widgets, if you want to help us keep adding free woodworking plans. However, we recommend you to insert the screws after fitting the stretcher to the side legs. beautiful diy farm table Farmhouse Table | Do It Yourself Home Projects from Ana White, Beautiful Cypress Counter Height "X" Leg Farmhouse Table, Ana White | Build a Chunky X Base Table Featuring Killer b. I made sure to set out my clamps and prepare them for glueing the top together. If you dont have either of those machines then dont worry, they arent vital to your table. In order to enhance the look of the dining table, we recommend you to build decorative trims out of 28lumber. The products included in this article are available at various home improvement stores, local home centers, and online retailers like Amazon. If you love Pottery Barn but cant spend the money, this website will give you tons of inspiration. Also, add glue to enhance the bond of the components. Making the boards square and flat is a great start, and I generally recommend doing it this way.
These plates will give you a bigger, more stable surface for attaching the leg assembly in the last step.
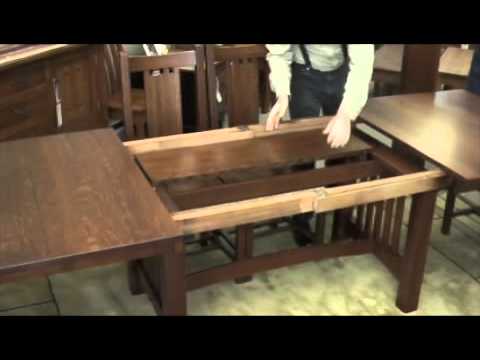
Secure them by driving 2-inch finishing nails through the apron and into the cleats. Pine is economical and readily available, albeit usually lower quality. Next, I cut the biscuits for the trestle supports: This part is a little more difficult because the supports are not as wide as the rest of the leg. I used Walnut Minwax Gel Stain for this project. (I plan to add a separate post that describes how I mill 2x4s). Also, be sure to measure the distance from the top to the bottom of the leg on the left side and the right side when clamping. This is important for a table top like this one that could expand across its width. Use a drill/driver and 3-inch deck screws to secure the plate to the post. In addition, fit pieces of 14 lumber under the base, as shown in the diagram. If you have done a really fine job milling your boards and glueing the table top up, then this part should be short and sweet or maybe not even necessary. In this step you can choose to use your own method of building the trestle legs. There is plenty of room for artistic creativity, mistakes, and cool designs with a farmhouse table. Next I added the two top stretchers (64 long 1x6s) with 1-1/4 pocket hole screws. Insert 2 1/2 screws to lock the components together and add glue to the joints. For the gel stain I simply rubbed it on with a cotton cloth and made sure I got full coverage. Im going to list them out here, from easiest to most difficult: This means you leave the rounded edge on the 2x4s and glue them together as is. Dining tables are typically 28 to 32 inches high. This step is where we create thicker boards for the legs and stretcher. It is mostly sanding and staining and finishing. Get the latest This Old House news, trusted tips, tricks, and DIY Smarts projects from our expertsstraight to your inbox. 2013-2021 The Basic Woodworking. Last but not least, we recommend you to take care of the finishing touches. No matter how flat you have made the surface for this big table, I would always use some clamping cauls, at least 2 for one on each end. I really like to finish the base up before I even begin the top. This step is fairly simple, but important to mention. I dont like to do this because my whole strategy is to use cheap lumber and make it look expensive. After assembling the tabletop, you need to lay it on a level surface. French Farmhouse Dining Table Free Plans for the home kitchen #diningtable #farmhouse, Farmhouse Table | Do It Yourself Home Projects from Ana White, Fancy X Farmhouse Table | Do It Yourself Home Projects from Ana White. Download the diagram and cut list to build a trestle table. To glue these supports pieces on, you can either use clamps, or simply drive screws through the support into the leg. The stretcher supports are made in the same fashion as the trestle supports. Set two 2x4 stringers on edge between the spots where the legs will be installed so that their ends butt against the long sides of the apron. When the glue was dry I cut the dowel flush with the support and sanded it smooth. It is a life saver for a knotty pine table top. The plan is simple and comes with colored illustrations and clear instructions. Next, you have to fit the legs to the supports. The best way to run the belt sander is to use a straight edge across the top of the table and find the high spots. Use the slots that we cut in step 5 to slide the fasteners into. As for the materials, you would need circular saw, plate joiner, hand drill, router, plane, mallet, chamfer bit, and the usual woodworking tools you commonly use in your table-making projects. Check if there are protruding screws and fix this issue, if necessary. But unlike modern trestle table plans, ancient trestle tables were simple. Mark these areas with a pencil so you can tell where to sand. Build the stretcher for the trestle table out of 26 lumber. The black works well when filling in knots, and it flowed smoothly into the smaller cracks. This generally takes out any grooves or scratches that the belt sander may have made. The cuts are straightforward, but moving the cumbersome pieces may require a helper. De massieve picknicktafel douglas Forreest is een blikvanger. Aside from wood, some designers also use metal or other synthetic material. This 40-inch deep, 7-feet long dining table plan should be an easy project. Im back to share the new benches that I built for my new dining {Read More}. I did this when I glued up the table. Some come with very ornate and complicated forms. even with the biscuits. Work your way up to 220 grit, sanding the entire table. There will be 8 supports total, 4 for each leg. Attach the legs to the tabletop, making sure they are centered. Follow the instructions and pay attention to the diagrams, if you want to build the wooden table in just one weekend. But mainly because it is a great piece of furniture to build. You can see this difference in the image below: Add the extra space to your biscuit cutter when you cut the biscuits in the top, bottom, and middle portions of the leg. DIY Shaker Dining Table Plans PDF Download garage cupboard plans. There are various ways of doing this; the key is to get it centered and then start attaching the table top fasteners. Now spread wood glue along the edges of the boards and on the biscuits, and squeeze it all down together.
Trestle tables have been around since the Middle Ages. To prevent cupping on the table top it is best to alternate the grain direction of each board. Work from 150-220 grit sandpaper with the random orbital sander. This way you know where to cut your biscuits and where to align it when you add glue. Build a farm table with this easy DIY tutorial from Jen of City Farmhouse.