Kitchn is a source of inspiration for a happier, healthier life in your kitchen. We independently select these productsif you buy from one of our links, we may earn a commission. If you haven't sprayed the adhesive to the edges of the fabric, that's okay. For more tips, like how to choose the right fabric for your lampshade, read on!
Cotton and linen are good choices for the cover. Reattach your lamp shade to the lamp base, plug it in, and admire your beautiful lamp shade makeover! If you're happy with the results, cover any adjacentsurfaces and spray your newly covered shade. The pink of the original lamp shade and the busy design was just too garish for my current room. Does anyone know where I can buy the stretch lining for lampshades? I appreciate your support of Salty Canary. Very helpful and well explained.". Last Updated: May 20, 2022 8. Leave to dry. Gradually roll Did you know that it is possible to take an old lampshade and completely recover it while keeping the lining intact? When you get to the end, fold the edge of the fabric over twice (so no rough edge is showing) and glue it in place using super glue. If the fabric is wrinkled, iron it before you lay it out. On a health and safety note Ive used an energy saving blub in the light as it gives off less heat than a regular one and made sure it doesnt touch the inside of the shade. This article has been viewed 177,129 times.
Does anyone know how best to treat this? Start and end at the lamp shades original seam so you know where to start and stop. Tamara is always ahead of the curve when it comes to interiors trends and is great at seeking out designer dupes on the high street. 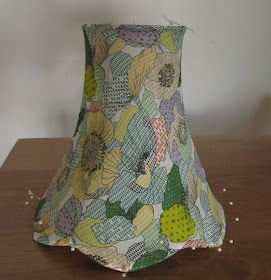 Check out some of my other DIYS! A similar process was repeated with the lining. Cut the fabric following along the outer dimensions with the extra 1-2 added. For more tips, like how to choose the right fabric for your lampshade, read on! Attach the fabric to the corresponding bottom edge of the frame by the same method while stretching the fabric tight. (LogOut/ England and Wales company registration number 2008885. Pin the template at the corners. Drum and rectangular lampshades will look great in any fabric. When you purchase through links on our site, we may earn an affiliate commission. Fill in your details below or click an icon to log in: You are commenting using your WordPress.com account. My shade looks similar to yours. I did NOT do a good job. Cut out the template and make sure it fits the lamp shade. 11. Attach the fabric to the lamp shade along the lampshades original seam using super glue. I love the finished lamp gorgeous.
 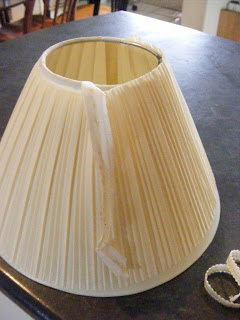 I am going all out and covering mine in silk w a lining. I just used some curtain lining, but made sure I only used a lower energy bulb to reduce the fire risk. Change). I hope everyone had a fabulous Mothers Day weekend full of pampering and relaxation. I had purchased the lamp shade almost 10 years prior when I was living alone and had an apartment full of bright pinks, teals, and purples. Ideal Home is supported by its audience. (To be honest, I cut mine a little too short, so make yours a bit longer than the photo below.). All tip submissions are carefully reviewed before being published. If you have a drum shade you will end up with a Heres why you can trust us. Slowly roll the shade one full rotation running your marker alongside, tracing the movement of each side (top and bottom) of the shade. 9. Once the light is turned on, the beauty of the lampshade is revealed. Do you have a lamp shade with a design you no longer love, but the size and shape of the lamp shade are still perfect for the lamp base? Continue alternating adding glue in 2-inch lines to the inside top edge and inside bottom edge of the frame and pressing the fabric into it while stretching the fabric tight. Carole. And then add an inch to both the top and bottom as well as two inches to the right side to give you enough fabric to make a seam. Secure the fabric overlap with craft glue or fabric fusion tape. Then, use your pattern to cut out your new fabric, and spray the underside with adhesive. I secured the end with a little stitch then wound it round and round the wire and secured the other end with a little stitch. I brought a roll of the binding so Im not sure how much I used. Cut out thefabric. If you click on an affiliate link and make a purchase, I receive a small commission at NO additional cost to you. Clear a large work space and then remove any decorations from the old shade. To find out more, as well as how to remove or block these, see here: Our Cookie/Privacy Policy. Change), You are commenting using your Twitter account. I have just found a bell shaped one at my local charity shop, I cant wait to get started! The size and shape of the lamp shade work well with the lamp, but the color and design no longer work with the colors and design in my main bedroom, so Im sharing an easy tutorial on How to Makeover a Lamp Shade Using Fabric! Well done, I would love to be able to do that! 4. Several years ago in college, I recovered a lamp shade with fabric in order to make it match the rest of my tropical, tiki-themed room. I love a bit of upcycling and knowing how much Laura Ashley charge I can only say that yours is far better and must have cost less!
By knocking down walls and reconfiguring the layout, this home is transformed without the need for an extension, Create a better sense of flow in any bedroom layout by being savvy with your planning, Walk-in wardrobes are the epitome of stylish storage - and they can fit in smaller spaces too. Spread out the fabric on a flat surface. I have a vintage lamp in my bedroom that I love love love, but I no longer like the lamp shade. Make a pattern to cut your fabric by laying the shade on its side, make a small mark on the shade at your starting point. wikiHow is where trusted research and expert knowledge come together. Privacy Policy. 1) To make a template for your fabricyou will need to create a marker on your existing shade. Template paper (butcher paper, wrapping paper, newspaper, etc. Some posts may contain affiliate links. Sorry. How to make a fabric lined lampshade cover; the stitch sharer; how to up-cycle recover repair a fabric lined lampshade; how to make a traditional vintage fabric lampshade, Recovering Lampshades | Mostly Knitting Blog. The stitches wereunpickedto remove the lining. There you have it! 3. 2. Cant wait to get started! Mustve taken you ages! Then spray the backside of the rest of the fabric with spray adhesive and begin attaching the fabric to the lamp shade, making sure to pull the fabric taut, ensuring there are no air pockets, and following along the top and bottom traced template lines so the fabric fits accurately when you get to the end. Try to match the seam of the border to the seam of the fabric for an even look. x, Your informative site has inspired me this wet weekend to get started on a large old lampshade I bought from the UK to NZ this year after finding it in a charity shop. All prices were accurate at the time of publishing. Silk sounds a beautiful covering. Thank you, I loved making it! 1. Lay out your fabricface up and place the template on top, shifting it around until you arehappy with the position of the fabric pattern underneath. Plug in a hot glue gun and let it warm up for about 5 minutes. Another thing to keep in mind is the pattern of your fabric. Just in case youre curious, yes, the original lamp shade does bleed through the new purple velvet lamp shade when the lamp is turned ON, so if youre recovering an old lamp shade with a bold design, be aware that this is likely to happen, even with a heavy, dark upholstery fabric like the purple velvet that I used. Next, lay your lampshade on its side on a piece of tracing paper, and roll it along the paper as you trace the path it makes at the top and bottom of the lampshade. Cut out the paper pattern with scissors on the marking lines. I love the way you can see theframe shape and howit reflects the delicate Magnolia treebranches. Markthis stopping point. If you're looking for ways to update your living space, or just want to update a garage-sale find, consider recovering old lamp shades. 2) Take a sheet of newspaper and place the shade onits side at one end of the paper so that the wool is touching the paper. It depends on what shape it is. Ignoreor strip the plastic off and spray the frame or is thereanother option? Lovely! Next, trace the template onto the fabric. As I wanted to up-cyclethelampshade in a traditional way, the top and bottom edges were firstbound with fabric seamtape to provide a surface which I could stitch into. Simply recover the lamp shade using fabric and my How to Makeover a Lamp Shade Using Fabric Tutorial! Trace the lamp shade onto the paper with a pencil to create your template. % of people told us that this article helped them. Change), You are commenting using your Facebook account. http://www.sixsistersstuff.com/2012/09/diy-fabric-lampshade-recover-tutorial.html, http://www.shanty-2-chic.com/2010/01/recover-lamp-shade-diy.html, https://www.apartmenttherapy.com/how-to-recover-an-old-lampshade-apartment-therapy-tutorials-213919, http://www.idealhome.co.uk/project-advice/how-to-cover-a-lampshade-with-fabric-craft-ideas_1-61229. 10. After years of decorating my own homes, I've learned a few tricks on how to create a classic home on a budget. A discolored, damaged or boring lampshade can be re-covered with a no-sew technique using a hot glue gun. For more decorating inspiration, craft ideas and cleaning hacks don't miss our dedicated DIY guide. How do you measure a lamp shade that is not round? 4) With the fabric face down, turn up 1cm alongboth long edges and one short edge and press - you will need to do thisslowly and carefully if the long edges are curved. As long as the ends of the top left and bottom left lines are connected, and the top right and bottom right lines are connected, the angle will be fine. Once the side seams were sewn it was stretched into place.
You should also remove the old fabric if it's a darker color than the fabric you're using to recover the lampshade.
Make cuts at the joints in the top of the lamp shade frame to allow the fabric to lay flat. The old lining and fabric panels were used as templates. Finally the lampshade frame could be seen. Visit our corporate site. Your good-as-new, recovered shade is complete! When youre ready to cut your fabric, youll want to be sure you leave a 1 border surrounding the pattern. Alittle notch (orfabricmarkwould work) was made into the top and bottom edgeso I knew roughly where the frame should sit. How much did you use? We use cookies to make wikiHow great. It is very important that you do this in a well-ventilated area, as spray adhesive can make you very ill if you breath in too much of it. ), How to Turn a Potting Bench into a Party Cart, DIY Teething or Nursing Necklace Tutorial, Freezer-Friendly Hard-Boiled Egg Quesadillas. Leave adhesive to dry completely. You can also test the fabric by holding it up to a light and making sure enough comes through. Sign up for wikiHow's weekly email newsletter, A simple, stylish way to jazz up your lampshades. Follow our step-by-step guide on how to cover a lampshade with beautiful fabric, * Plain white or cream lampshade (we used a range of shades from Lighting works (opens in new tab)), * Main fabric (to cover our lampshades we used, clockwise from top left in the picture: Toile Carreaux, ref 6138-12, col Noir, 33 a metre, Marvic Textiles (opens in new tab); Sea Urchin, ref GWF-2809, 61 a metre; Daisy Daisy, ref GWF-2746, 65 a metre, both Groundworks at GP & J Baker (opens in new tab); Meander Granite, ref ED75009, 65 a metre, Threads at GP & J Baker (opens in new tab); Nirvana, ref B6026-001, 109.40 a metre, Charles Burger at Turnell & Gigon (opens in new tab)), * Fabric spray adhesive (4.99 for 500ml, Fabric UK) (opens in new tab), * Fire-retardant fabric spray (try MSL, 14.99 for 750ml, Fabric UK) (opens in new tab). Blog Design by Little Blue Deer Get my FREE Email Series How to Decorate in Classic Timeless Style.without breaking the bank! X. Hold the fabric in place with clothespins. As always your photos and explanation are so clear. This time with some clips (pegs would work too) as I had enough ofpin pricks! If it is a rectangle or square, multiple the length by the width. When you're choosing your fabric, stick to thin fabric like cotton. Mark this starting point on the newspaper with a pen. I would describe itasa barrel shape frame with a slightly sculpted top and bottom edge. Isn't it gorgeous? Squirt a thin, 2-inch-long line of glue on the inside top edge of the lampshade frame. Place the paper lampshade pattern on top of the fabric and pin it in place with straight pins. Thanks Rita, thats really King of you. You don't want to put the fabric on upside down! With your fabric face down, trace the pattern. Heres the original lampshade which I brought off an on-line auction site. document.getElementById( "ak_js_1" ).setAttribute( "value", ( new Date() ).getTime() ); If you are following my blog or have left a comment on my posts the information you provide will be used in accordance with wordpress protocols which can be found here, details of the information collected can be found here. "Now I understand how to cover a tapered shade! Our trained team of editors and researchers validate articles for accuracy and comprehensiveness. Lamp stand has been stripped and repainted this week and now your project has given me the confidence to go for it with the shade. Your welcome, Ive just repainted the base of mine too! I cant find it anywhere. The edges of the shade should be parallel to the edges of the fabric, too, no matter the shape of your shade. Its the same as my piped cushions! Did you wrap it around and around overlapping or sew it on? wikiHow's Content Management Team carefully monitors the work from our editorial staff to ensure that each article is backed by trusted research and meets our high quality standards. Looking for other crafts? Smooth the pressedvertical edge into position over the sprayed edge for a neat and evenfinish. Pull off any remaining fabric from the frame with your fingers. Making one of your sick monkeys right now. Spread out a large piece of newspaper on a large flat surface such as a table. This allowance will make it possible for you to pull the fabric over the shade and adhere on the inside. 10. Single seam binding? Thank you. This article was co-authored by wikiHow Staff. The fabric cover was then turned the right way out and stretched tight onto the frame by pinning it into the fabric seam tape on the frames top and bottom edge. How To Paint a KitchenAid Mixer a New Color, How To Make Cyanotype Textiles and Fabrics, The Ultimate First Time Homeowner's Guide, 1 yard of fabric (if you are working with a very large shade you may need more), Large sheet of blank paper (tracing paper or wrapping paper work great! Copyright 2022 Salty Canary | Birch on Trellis Framework by Mediavine, How to Makeover a Lamp Shade Using Fabric Tutorial, How to Makeover a Lamp Shade Using Fabric Tutorial, I have a vintage lamp in my bedroom that I. , but I no longer like the lamp shade. No problem! Be sure to leave an allowance at the seam as well. Press one side edge of the fabric under 1/4 inch for a hem and iron it in place. If you're covering a plastic lampshade liner, you don't need to remove anything.
Its with these award wining interiors teams that she's honed her skills and passion for shopping, styling and writing. The plastic coating is quite damaged in some places which I tried to ignore. If the original fabric is thick, keep in mind that light might have a hard time getting through 2 layers of fabric. On any given day you might find her working on a freelance photo or blogging gig, wrangling her little darling, or walking Chuck the boxer. Wash the lampshade fabric with laundry soap and dry and iron the fabric to remove all wrinkles. I am currently enjoying making soft shades and finding lining tricky in terms of ensuring getting it very tight with no pulling so was interested in your helpful article. Ideal Home is part of Future plc, an international media group and leading digital publisher. Spray your adhesive on the fabric, then slowly roll the shade over the fabric, smoothing out any wrinkles along the way. Posted on Published: December 3, 2019- Last updated: February 9, 2022 Categories DIY & Crafting, How To Guides, Home / How to Makeover a Lamp Shade Using Fabric Tutorial. She has a bachelor's degree in journalism from Oakland University and received the Michigan Press Association award for journalism. How to Upholster a Non-Removable Chair Seat, How to Make Your Own Wall Art for a Glamour Bedroom, How to Drape Window Scarves Over Valances for Vertical Blinds, 17 gardening gifts for the plant-lovers in your life. Choose fabric that will allow light to pass through the fabric lampshade. By popping the lampshade cover over the frame inside out, I was able to adjust the side seams to make sure the cover fitted well. What a beautiful lamp! Also, please be sure to use a face mask and work in a well-ventilated area when using super glue and spray adhesive. Add super glue along the groove of where the wire meets the frame and using a craft stick or flat head screwdriver, tuck the fabric into the groove to give it a finished look. Ashley traded the quiet life of a small town in a big house for the hustle and bustle of the Windy City. Make sure the loop of wool is sitting squarely in position. Turning out badly, Thank you Hannah, Im really pleased how it turned out. 6) Repeat to spray the top and bottom edges of thefabric, fold them over the frame of the shade and press into position(see illustration). You can finish the seam however you like just be sure it is secured to the lamp with an adhesive. Would love to see a photo of how your lamp turns out. No sewing machine? So much better with the new lampshade! 5. If you do, please share a photo of the finished lampshade with me! After tracing each side of the lamp, connect the top and bottom lines by drawing a line with a yardstick. I notice that you did not cut your fabric on the bias, did it make fitting the fabric to the fame tricky? To recover a lampshade, start by removing any old fabric from the frame. This barrelframe has four arms on the gimbal (thats thepart that attaches to the light fitting), so I undidthe side seams a little and made a few extra slits in the lining to allow for the arms. It just means I made it easier for you to find something, so I earn a few a few cents from the sale. Future Publishing Limited Quay House, The Ambury, Bath BA1 1UA. The lining and fabric cover for this lampshade are made in 2 pieces, so once cut the side seams were sewn on the machine.
Your email address will not be published. By using our site, you agree to our. Every time the light was turned on, you could see the crappy cut and paste job I did with the leftover fabric on the inside of the lamp shade. First, if youre recovering a tapered lamp shade, youll need to make a paper template. I am loving lampshade making / recovering! So, when I decided to give the lamp shade in my main bedroom a makeover using fabric, I knew I needed to cut and glue the fabric with precision in order to make it look professional. Now, Im married and living in my forever home and I like the luxe feel of the velvet and the jewel tone colors! End with the folded edge of the fabric overlapping the unfolded edge. All rights reserved. 2. I cut a largeseam allowance at the top and bottom edge to make the fabric easier to stretch. Cut the old lampshade fabric from the lampshade frame with scissors. 6. Include your email address to get a message when this question is answered. ). To do this,wrap a length of wool around the shade from top to bottom and tie inplace. and then whip stitched into place onto the fabric seam tape. Avoid striped or plaid fabric for a cone-shaped shade. so I could remember how it wasconstructed. By signing up you are agreeing to receive emails according to our privacy policy. Before I started the makeover, I tested to see if it was see-through, but decided that even though it does show through, I like it! How do I recover the frame on my lampshade? Remove any decorative trims or ribbons on the shade that could interfere with the fabric adhering to the shade. X, Love this! If the fabric is old or you've repurposed it from another project, consider washing it first. It actually doesnt bleed through as much as the photo below shows, its probably 50% of that in real life. 7. 3. Bedroom Makeover, part 9: Mood lighting & 4 tips. Look for a fabric that will coordinate with the rooms dcor or add a bright punch of color. Finally, roll your shade onto your fabric, and fold any extra material under the edges. Thanks. Roll the frame on the newspaper, following the trail with a pen at the top and bottom of the shade. 8. can you tell me what fabric you used for the lining, please? 6. Wash hands thoroughly after handling. You also cant put a price on the pleasure of creating something beautiful yourself x, Thank you. The exact angle you need to draw for a tapered shade will vary depending on the size of the shade and the angle of the taper. Thank you! Instead, use a hot glue gun to secure the edges to the inside of the lampshade. The home of great ideas for more than 100 years, See how reconfiguring the layout created more space in this family home, Bedroom layout ideas - tips and tricks to make the most of every square inch, 10 Small walk-in wardrobe ideas to create your dream dressing room, Explore the most stylish and well decorated homes in the UK, Expert tips and practical solutions for a smoother running home, Issues deliveres direct to your door or device. As I wanted to keep my lampshade plain and simple withouttrim (which is often used to hide stitching on the outside edge), the fabrics were stitched together on the lining side. Your information will *never* be shared or sold to a 3rd party. Can I cover the inside of a lampshade with fabric? You can have a brand-new look in no time! As this is the first lampshade I have ever made, I carefully unpicked theoriginal fabric layers(and took lots of photos!) Cut out the fabric 1 inch past the paper pattern edges, with scissors. Ive got so many ideas for my next one too.
If you're worried about the template staying in place, you can use straight pins to secure the template to the fabric. Got a tip, kitchen tour, or other story our readers should see? (LogOut/ The size and shape of the lamp shade work well with the lamp, but the color and design no longer work with the colors and design in my main bedroom, so Im sharing an easy tutorial on How to Makeover a Lamp Shade Using Fabric! Peeling off the bias binding trim revealed the whip stitched lining and cover. (If youre recovering a drum lampshade with no tapered sides, youll just need the measurements and can use a ruler to make a template.) The quickest, no-sew method for recovering an old lampshade. I think cutting the fabric on the bias would of been better for stretch I used mine on the straight grain as I wanted to pattern to match by curtain direction. Will you try making over an old lamp shade using fabric? Use the template to cut out your fabric. {"smallUrl":"https:\/\/www.wikihow.com\/images\/thumb\/8\/84\/Recover-Lampshades-Step-1-Version-5.jpg\/v4-460px-Recover-Lampshades-Step-1-Version-5.jpg","bigUrl":"\/images\/thumb\/8\/84\/Recover-Lampshades-Step-1-Version-5.jpg\/aid1359415-v4-728px-Recover-Lampshades-Step-1-Version-5.jpg","smallWidth":460,"smallHeight":345,"bigWidth":728,"bigHeight":546,"licensing":"
License: Creative Commons<\/a> License: Creative Commons<\/a> License: Creative Commons<\/a> License: Creative Commons<\/a> License: Creative Commons<\/a> License: Creative Commons<\/a> License: Creative Commons<\/a> License: Creative Commons<\/a> License: Creative Commons<\/a> License: Creative Commons<\/a> License: Creative Commons<\/a> License: Creative Commons<\/a> License: Creative Commons<\/a> License: Creative Commons<\/a>
\n<\/p>
\n<\/p><\/div>"}, {"smallUrl":"https:\/\/www.wikihow.com\/images\/thumb\/b\/b3\/Recover-Lampshades-Step-2-Version-5.jpg\/v4-460px-Recover-Lampshades-Step-2-Version-5.jpg","bigUrl":"\/images\/thumb\/b\/b3\/Recover-Lampshades-Step-2-Version-5.jpg\/aid1359415-v4-728px-Recover-Lampshades-Step-2-Version-5.jpg","smallWidth":460,"smallHeight":345,"bigWidth":728,"bigHeight":546,"licensing":"
\n<\/p>
\n<\/p><\/div>"}, {"smallUrl":"https:\/\/www.wikihow.com\/images\/thumb\/9\/9d\/Recover-Lampshades-Step-3-Version-5.jpg\/v4-460px-Recover-Lampshades-Step-3-Version-5.jpg","bigUrl":"\/images\/thumb\/9\/9d\/Recover-Lampshades-Step-3-Version-5.jpg\/aid1359415-v4-728px-Recover-Lampshades-Step-3-Version-5.jpg","smallWidth":460,"smallHeight":345,"bigWidth":728,"bigHeight":546,"licensing":"
\n<\/p>
\n<\/p><\/div>"}, {"smallUrl":"https:\/\/www.wikihow.com\/images\/thumb\/c\/c3\/Recover-Lampshades-Step-4-Version-5.jpg\/v4-460px-Recover-Lampshades-Step-4-Version-5.jpg","bigUrl":"\/images\/thumb\/c\/c3\/Recover-Lampshades-Step-4-Version-5.jpg\/aid1359415-v4-728px-Recover-Lampshades-Step-4-Version-5.jpg","smallWidth":460,"smallHeight":345,"bigWidth":728,"bigHeight":546,"licensing":"
\n<\/p>
\n<\/p><\/div>"}, {"smallUrl":"https:\/\/www.wikihow.com\/images\/thumb\/8\/80\/Recover-Lampshades-Step-5-Version-5.jpg\/v4-460px-Recover-Lampshades-Step-5-Version-5.jpg","bigUrl":"\/images\/thumb\/8\/80\/Recover-Lampshades-Step-5-Version-5.jpg\/aid1359415-v4-728px-Recover-Lampshades-Step-5-Version-5.jpg","smallWidth":460,"smallHeight":345,"bigWidth":728,"bigHeight":546,"licensing":"
\n<\/p>
\n<\/p><\/div>"}, {"smallUrl":"https:\/\/www.wikihow.com\/images\/thumb\/b\/bb\/Recover-Lampshades-Step-6-Version-5.jpg\/v4-460px-Recover-Lampshades-Step-6-Version-5.jpg","bigUrl":"\/images\/thumb\/b\/bb\/Recover-Lampshades-Step-6-Version-5.jpg\/aid1359415-v4-728px-Recover-Lampshades-Step-6-Version-5.jpg","smallWidth":460,"smallHeight":345,"bigWidth":728,"bigHeight":546,"licensing":"
\n<\/p>
\n<\/p><\/div>"}, {"smallUrl":"https:\/\/www.wikihow.com\/images\/thumb\/f\/ff\/Recover-Lampshades-Step-7-Version-5.jpg\/v4-460px-Recover-Lampshades-Step-7-Version-5.jpg","bigUrl":"\/images\/thumb\/f\/ff\/Recover-Lampshades-Step-7-Version-5.jpg\/aid1359415-v4-728px-Recover-Lampshades-Step-7-Version-5.jpg","smallWidth":460,"smallHeight":345,"bigWidth":728,"bigHeight":546,"licensing":"
\n<\/p>
\n<\/p><\/div>"}, {"smallUrl":"https:\/\/www.wikihow.com\/images\/thumb\/a\/a3\/Recover-Lampshades-Step-8-Version-5.jpg\/v4-460px-Recover-Lampshades-Step-8-Version-5.jpg","bigUrl":"\/images\/thumb\/a\/a3\/Recover-Lampshades-Step-8-Version-5.jpg\/aid1359415-v4-728px-Recover-Lampshades-Step-8-Version-5.jpg","smallWidth":460,"smallHeight":345,"bigWidth":728,"bigHeight":546,"licensing":"
\n<\/p>
\n<\/p><\/div>"}, {"smallUrl":"https:\/\/www.wikihow.com\/images\/thumb\/9\/9d\/Recover-Lampshades-Step-9-Version-5.jpg\/v4-460px-Recover-Lampshades-Step-9-Version-5.jpg","bigUrl":"\/images\/thumb\/9\/9d\/Recover-Lampshades-Step-9-Version-5.jpg\/aid1359415-v4-728px-Recover-Lampshades-Step-9-Version-5.jpg","smallWidth":460,"smallHeight":345,"bigWidth":728,"bigHeight":546,"licensing":"
\n<\/p>
\n<\/p><\/div>"}, {"smallUrl":"https:\/\/www.wikihow.com\/images\/thumb\/a\/a1\/Recover-Lampshades-Step-10-Version-5.jpg\/v4-460px-Recover-Lampshades-Step-10-Version-5.jpg","bigUrl":"\/images\/thumb\/a\/a1\/Recover-Lampshades-Step-10-Version-5.jpg\/aid1359415-v4-728px-Recover-Lampshades-Step-10-Version-5.jpg","smallWidth":460,"smallHeight":345,"bigWidth":728,"bigHeight":546,"licensing":"
\n<\/p>
\n<\/p><\/div>"}, {"smallUrl":"https:\/\/www.wikihow.com\/images\/thumb\/6\/60\/Recover-Lampshades-Step-11-Version-5.jpg\/v4-460px-Recover-Lampshades-Step-11-Version-5.jpg","bigUrl":"\/images\/thumb\/6\/60\/Recover-Lampshades-Step-11-Version-5.jpg\/aid1359415-v4-728px-Recover-Lampshades-Step-11-Version-5.jpg","smallWidth":460,"smallHeight":345,"bigWidth":728,"bigHeight":546,"licensing":"
\n<\/p>
\n<\/p><\/div>"}, {"smallUrl":"https:\/\/www.wikihow.com\/images\/thumb\/2\/21\/Recover-Lampshades-Step-12-Version-5.jpg\/v4-460px-Recover-Lampshades-Step-12-Version-5.jpg","bigUrl":"\/images\/thumb\/2\/21\/Recover-Lampshades-Step-12-Version-5.jpg\/aid1359415-v4-728px-Recover-Lampshades-Step-12-Version-5.jpg","smallWidth":460,"smallHeight":345,"bigWidth":728,"bigHeight":546,"licensing":"
\n<\/p>
\n<\/p><\/div>"}, {"smallUrl":"https:\/\/www.wikihow.com\/images\/thumb\/4\/4b\/Recover-Lampshades-Step-13-Version-5.jpg\/v4-460px-Recover-Lampshades-Step-13-Version-5.jpg","bigUrl":"\/images\/thumb\/4\/4b\/Recover-Lampshades-Step-13-Version-5.jpg\/aid1359415-v4-728px-Recover-Lampshades-Step-13-Version-5.jpg","smallWidth":460,"smallHeight":345,"bigWidth":728,"bigHeight":546,"licensing":"
\n<\/p>
\n<\/p><\/div>"}, {"smallUrl":"https:\/\/www.wikihow.com\/images\/thumb\/2\/29\/Recover-Lampshades-Step-14-Version-5.jpg\/v4-460px-Recover-Lampshades-Step-14-Version-5.jpg","bigUrl":"\/images\/thumb\/2\/29\/Recover-Lampshades-Step-14-Version-5.jpg\/aid1359415-v4-728px-Recover-Lampshades-Step-14-Version-5.jpg","smallWidth":460,"smallHeight":345,"bigWidth":728,"bigHeight":546,"licensing":"
\n<\/p>
\n<\/p><\/div>"}, {"smallUrl":"https:\/\/www.wikihow.com\/images\/thumb\/3\/3c\/Recover-Lampshades-Step-15-Version-5.jpg\/v4-460px-Recover-Lampshades-Step-15-Version-5.jpg","bigUrl":"\/images\/thumb\/3\/3c\/Recover-Lampshades-Step-15-Version-5.jpg\/aid1359415-v4-728px-Recover-Lampshades-Step-15-Version-5.jpg","smallWidth":460,"smallHeight":345,"bigWidth":728,"bigHeight":546,"licensing":"