Since Im on a budget I have a few DIY projects to do in the bedroom. AND YOUR WALL IS DONE! If you use 1/4" plywood that should be close to the same thickness as the top of a tapered base board trim. Now send me a pic on Instagram @angelarosehome. RELATED: 9 Ways to Dress Up a Room with Molding. The step by step tutorial and a video is below! When doing the shaker style design, the goal is to have every box perfectly square and all of the boxes measure the same. 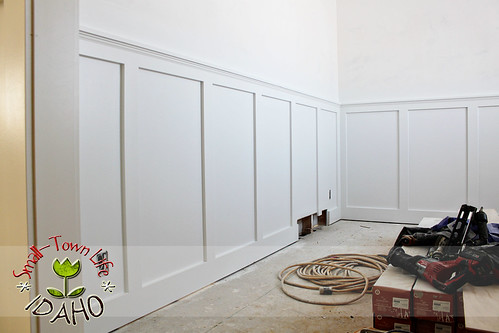 1 hour 10 minutes When doing the shaker style design, the goal is to have every box perfectly square and all of the boxes measure the same. First, in order to DIY a board and batten wall, youll want to make sure you have all of the right tools and materials to do this project. Prybar and Hammer Overall, the project took my husband and I a day to complete, then a few extra hours over the course of the next week to finish caulking and painting. DI, Replace front door It is dark brown and one side is super smooth. If you didnt use pre-primed boards, make sure to prime first.
Real Homes is part of Future plc, an international media group and leading digital publisher. Real Homes is supported by its audience. I had to use 3 of my scrap boards to make the 131 1/2 ledge. Thank you for your support! If you decide to purchase from one of the links, I will receive a small commission at no additional cost to you. You should be proud too! Finally, you're ready to paint. But, it doesnt look as nice or professional in my opinion as baseboards that are the same thickness as the vertical batten boards. STEP 2:NOW you can go and buy your materials! They come in 48 foot sheets and the home improvement store can cut them for you too. We did 5 squares by 5 squares. Once all of the boards are in place its time to sand using an electric power sander. For this tutorial, I did 16.5 between each board.
1 Dont forget a trim piece to go on the very left, right, top and bottom of your wall to frame out the space, if youd like. (Tip: If it's a tricky measurement, like 42 3/8" long, round down or up to a nice even number to make cuts a little easier, and adjust the height of your horizontal pieces accordingly. Primer (if boards arent pre-primed) Disclosure: BobVila.com participates in the Amazon Services LLC Associates Program, an affiliate advertising program designed to provide a means for publishers to earn fees by linking to Amazon.com and affiliated sites.
","position":4,"name":"Determine the batten (vertical board) spacing.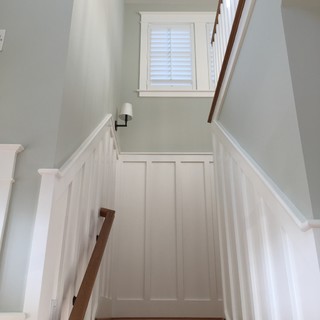 Miter saw Utility Knife Here's the measurements for our wall design. For your horizontal trim, measure the width of each wall you'll be paneling in inches. If youre a visual person like us, you can also use SketchUp or Illustrator to mock up your design. I used Behr paint in the color Creek Bend. Also, if you are just doing one accent wall like us, cut the adjacent wall molding corners (if needed) with a Dremel, jig saw, or wood chisel and hammer in order to fit the new board. Yeah, i think that would work as long as it is secure. Construction adhesive I used this coolest tape with plastic already attached to it.
Then, use a prybar and hammer to remove the baseboard from the wall. This is the length of your vertical trim pieces, or batten. Jamie uses a laser level so he can see the light and follow it perfectly along for a straight line. Easy DIY Board and Batten Wall It was a really easy and affordable project that didnt take much time at all! We also have a great tutorial for a custom stair rail like you see above. And here is the final reveal with the board and batten accent wall all painted! Thats why we replaced our baseboard with the same style boards as the rest of the board and batten pieces. Around the mid-1900s, board and batten became a desirable look, particularly in bungalows, Arts and Crafts, and Country style homes. We also placed wood glue on the ends and adhesive on the backs of all of the boards to help hold it into place as Jamie moved and nailed along. We added a piece of trim in each corner of our wall to make it look more finished, which meant accounting for two extra pieces of trim per wall. ","position":5,"name":"Cut each 1\u00d74 batten to size using a","url":"https:\/\/angelamariemade.com\/diy-board-and-batten-wall\/#mv_create_9_5"},{"@type":"HowToStep","text":"Add the top 1x2 board on top of the middle board to create a ledge. Because most walls arent perfectly straight, the measurements may be slightly different for each. Next up we will be adding wallpaper above it which Im super excited about doing! As an Amazon Associate I earn from qualifying purchases.\n\n\u2022 Brad Nailer - https:\/\/amzn.to\/2sxeXwR\n\u2022 Dremel Tool - https:\/\/amzn.to\/2nKFAzV\n\u2022 Miter Saw - https:\/\/amzn.to\/2sxxyZQ\n\u2022 Spackle - https:\/\/amzn.to\/2TYQUHz \n\u2022 Utility Knife - https:\/\/amzn.to\/2zqiwvR\n\u2022 Liquid Nails - https:\/\/rstyle.me\/+cyrV0osE4Cs2WgcyB--toQ\n\u2022 Prybar - https:\/\/amzn.to\/2A5So6d\n\u2022 Paintable Caulk - https:\/\/amzn.to\/3bkbGXR\n\u2022 Small Paint Roller - https:\/\/amzn.to\/2RIcsWH\n\nWEATHERED WOOD RECIPES EBOOK:\nhttps:\/\/angelamariemade.com\/weatheredwoodrecipes\n(Use code YOUTUBE for 20% off! Install with 1 1/4 brad nails and some construction adhesive.Fill nail holes with spackle and caulk all the seams.Prime the board and batten if boards aren't pre-primed.Paint the board and batten with two coats of paint. 'An accent wall is a beautiful addition to your decor. This is super important because in the end you will want to have your backer boards seams all covered by the trim pieces. Use construction adhesive (we used Liquid Nails) and 1 1/4 brad nails to attach the battens to the wall. For more info see my disclosures here. 'If you plan on installing exterior board and batten siding, you must use wood that is both insect and moisture resistant. I took the same sand paper to lightly go over every board before painting.
Keep spacing between trim batten boards the same. (Experts recommend anywhere from 12"-24".). Attach to the wall with constuction adhesive and 1 1/4"brad nails.Add the top 1x2 board on top of the middle board to create a ledge. 'For interior projects, the standard wood choice is pine since it does not need to withstand outdoor elements. Whats up homies!! The spacing will all be slightly different since ceilings and floors are not perfectly level. Occasionally, measure from the floor and step back to make sure its not gradually creeping up or down. Expert advice from Bob Vila, the most trusted name in home improvement, home remodeling, home repair, and DIY.
Best sofas 2022: our tried and tested favourites, 7 flowers you don't have to deadhead according to gardening experts, Two-foot level (available from Home Depot), Inspiring real homes, expert project advice and on-trend shopping, Try a single issue or save on a subscription, Issues delivered direct to your door or device, Measure the width of the wall between the two corner trim pieces you just installed, Multiply the trim width by the number of pieces of trim you have left for the wall.
Then youll want to choose which wall youre doing your accent piece on and measure the wall so you can figure out your full wall design. Im so proud of you! So much better than before! (A laser level would be very helpful here, but I didnt have one!). Then, measure the exact height needed for each batten based on where they will be attached to the wall. Then, you'll want to border your edges with the wood. This fills in any gapping and will make the painting process a lot easier. This fills in any gapping and will make the painting process a lot easier. You would follow the same process listed in the tutorial regardless of wall length!
Make sure to tag @construction2style so we can see your awesome work and show you some love! Brad nailer Note, this post contains some affiliate links. Fill nail holes with spackle and caulk all the seams.
There are a lot of ways you can customize this project to make it your own and fit your own space. Draw a rectangle for the outlet and drill a hole in each corner. If you're using pre-primed MDF, you can skip this step and go straight to the paint. Note the measurements in your phone for when you go to the hardware store. There's a few options you could do. To get the exact spacing, I then did the following math: 7 batten boards x 3.5 (actual width of 14 boards) = 24.5, 99 / 6 (the # of spaces between 7 boards) = 16.5. Cut each 14 batten to size using a miter saw. The sides, bottom and top are probably not going to be perfectly straight or level/plum. After thinking about installing DIY board and batten siding in my own home for over a year, and reading up on how to DIY a board and batten wall, I finally took the plunge and hung the paneling in my entryway. Glenda Taylor, Bob Vila, 11 Ways to Make the Most of Your Towns Curbside Cleanup Day, All You Need to Know About Popcorn Ceilings, Know Your Moldings: 10 Popular Trim Styles to Spiff Up Any Space, 10 Ways to Unleash the Potential of Your Blank Walls. Once it's level, use a brad nailer to secure it to the wall, adding a nail every 3-4". For all the interior seams I didnt use tape because it will all be painted over anyway. Attach it 48\u2033 up from the top of the baseboard. Or if the gaps are too big then use caulk to fill the gaps. I,too, wish I could post a picture!
I had to notch out a rectangle for the outlet on our wall. This past weekend we installed a classic, DIY board and batten wall in our soon to be nursery! Board and batten may seem intimidating, but by following simple instructions you can add this striking statement to your bedroom or any other room in your home.'
Trim is sold in 8-12' lengths, so you'll need to cut it to fit in your car. Then, we made the final exact cut with our miter saw at home. So, living in a home that I love plays a huge role in my happiness. The last option is to do an accent wall and replace the trim with something simple like a 1x4 or 1x6 on just that wall. Interior board and batten trim is much easier to install, however, because less work is involved, so its better suited to the newbie do-it-yourselfer. With the arrival of sawmills to 18th Century America, home construction began moving away from whole logs (as in cabins) and masonry towards lumber. So, to figure out the math and see about how many battens that would be, I took our total wall length of 123.5 and divided by 17, which equaled roughly 7 boards.
Once you know your measurements, its time to make your design plan. how do you deal with existing baseboard that may be thinner at the top, the vertical boards will sit on thop of the base board and look a little weird, I dont want to have to change the baseboard in the whole house just to make one or two walls look good any ideas?
The large flat boards had a tendency to warp, however, and by the late 1800s, horizontal lapped siding (narrow horizontal boards installed from the bottom up, with each subsequent board lapping the one below) proved more efficient at shedding rain and so became the norm. A skeletal frame would be constructed, over which long flat boards were attached to form a weather-resistant barrier. He was a one man show when doing this part of the process. Helpful tip: if you are doing this by yourself, put one nail in the middle, make sure its level, and then nail up and down the board. Please refresh the page and try again. Get a vertical measurement from the baseboard to the top board (all of your vertical boards may have slightly different measurements).
","position":2,"name":"Install the new baseboard with a 1x4 cut","url":"https:\/\/angelamariemade.com\/diy-board-and-batten-wall\/#mv_create_9_2"},{"@type":"HowToStep","text":"Attach the middle 1x4 board to the wall into the wall studs. If you have basic carpentry skills, including the ability to measure and cut the boards precisely, and youre comfortable using a circular saw, a caulking gun, and a nail gun or screw gun, you can install either type of board and battenthe exterior siding or the interior trim. Use a good amount of liquid nails on the back of your 1/8 hardboard, place it on the wall and distribute weight all over the panel so the glue adheres. ","position":1,"name":"Remove existing baseboards from the wall using a","url":"https:\/\/angelamariemade.com\/diy-board-and-batten-wall\/#mv_create_9_1"},{"@type":"HowToStep","text":"Install the new baseboard with a 1x4 cut to size and 1 1\/4\" brad nails into the wall studs. Which we just talked about over in their construction update blog. STEP 8:Youre ready for painting! I had Home Depot cut my hardboard panels to size. Use your level to make sure the panels are level on your wall.
I love it because is an affordable way (only$150!) If you're using bare wood as I did, you'll want to prime your wood first. 1 hour Then, youll want to border your edges with the wood. A good rule of thumb is to space them roughly 18" apart, give or take a few inches depending on the dimensions of your wall and the look you're going for. For this statement wall, we painted it in Graphic Charcoal by Behr. Install with 1 1/4 brad nails and some construction adhesive. Also, we added our original shoe molding (quarter round) back to the baseboard to match our other side wall molding and cover flooring gaps. We did it on four small walls, and it looks incredible (if I do say so myself). This wall was 133" wide and 108" tall. What TO do, and what NOT to do for the most professional-looking board and batten wall! This may have been the, I wanted to share another angle of the coffee tabl, I took a little break from the dining table projec, I spent HOuRs trying to find the perfect dinnerwar, This view will never get old.. and now its even, 1 x 3 x 8 (Vertical supports/top horizontal trim & ledge), 1/8 Hardboard 4 x 8 sheet (To cover textured walls), @ 131 1/2 (Baseboard-put two boards together to make 131 1/2), @ 131 1/2 (Top horizontal trim & ledge-put two boards together to make 131 1/2), @ 58 (7 vertical boards, I utilized all of my scrap wood to minimize cost). Attach it 48 up from the top of the baseboard.
To remove the existing baseboard, score the top and corner caulk lines with a utility knife. Level However, he measured twice before running out into the garage, on the job site, to cut before putting into place. Start by installing a piece of vertical trim at each of the far edges (or in the corners) of the wall (see image below). Check out my board and batten bathroom DIY tutorial for photos and details on how to cut around outlets, pipes, light switches, etc! ****If you have smooth walls, SKIP TO STEP 5*****.
Make sure they are level, and attach with liquid nails and finishing nails. I now want one in every room in my house :). Remove existing baseboards from the wall using a utility knife, prybar and hammer.Install the new baseboard with a 1x4 cut to size and 1 1/4" brad nails into the wall studs.Attach the middle 1x4 board to the wall into the wall studs. wall. Then, add a squiggly line of liquid nails to the back of the trim, and stick it on the wall, using a level to make sure the trim is even. This wall was 133 wide and 108 tall. Paint your wall, and you're done. Its totally up to you on what you prefer to do though for the baseboard! Common spacing includes anywhere between 12 20. Cut your 12 board to size (this will be the top board) and install it on top of the middle 14 board with 1 1/4 brad nails and some construction adhesive to create a top ledge. says Drew Scott aka Lone Fox (opens in new tab). ","position":9,"name":"Paint the board and batten with two coats","url":"https:\/\/angelamariemade.com\/diy-board-and-batten-wall\/#mv_create_9_9"}],"video":{"@type":"VideoObject","name":"Easy DIY Board and Batten Wall | How to Install Wainscoting","description":"Learn how to easily install a DIY board and batten wall in any room! Future Publishing Limited Quay House, The Ambury, Bath BA1 1UA.
Im a professional DIYer, full time YouTuber and wannabe interior designer. The 4 x 8 hardboard panels were only about $8 each from Home Depot. The wall turned out so smooth, and I was very happy with the sprayer. Another option is to do an angled cut with the thicker baseboard, but I am not a huge fan of but you may like the look. )\n\nSUBSCRIBE TO MY CHANNEL:\nhttps:\/\/www.youtube.com\/c\/AngelaMarieMade\n\nFOLLOW ME AT:\nBlog - https:\/\/angelamariemade.com\nInstagram - https:\/\/instagram.com\/angelamariemade\nPinterest - https:\/\/www.pinterest.com\/angelamariemade\/\nFacebook - https:\/\/www.facebook.com\/AngelaMarieMade\n\n#boardandbatten #homeimprovement #diy #wainscoting","thumbnailUrl":"https:\/\/i.ytimg.com\/vi\/1iEc_wRmuy4\/hqdefault.jpg","contentUrl":"https:\/\/www.youtube.com\/watch?v=1iEc_wRmuy4","duration":"PT7M2S","uploadDate":"2020-04-17T14:03:07.000Z"},"keywords":"diy board and batten, board and batten wall, board and batten wainscoting, board and batten accent wall, how to install board and batten, DIY wainscoting, board and batten, ","aggregateRating":{"@type":"AggregateRating","ratingValue":"4.9","reviewCount":14},"url":"https:\/\/angelamariemade.com\/diy-board-and-batten-wall\/"} Make sense? If you have baseboards like us that are thinner than the molding being used, you can technically cut the battens with a mitered angle at the bottom if you dont want to remove the original baseboard. He was a one-man show when doing this part of the process. Stud finder Use a level and mark 48 up from the top of the baseboard on each side of the wall. Caulk around every square inside and out. That price includes the boards, caulk, and 1 gallon of paint.
Today, board and batten siding is kiln-dried to reduce warping, and its installed over framing, sheathing, and a vapor barrier to lend greater structural integrity. Prime the board and batten if boards aren't pre-primed. With a smooth wall it very easily shows imperfections, so this sprayer solved all of my problems and gave me a professional look. Once all of the boards are in place it's time to sand using an electric power sander. The resulting number is how far apart you'll space your trim pieces from edge to edge. to give a space character, add a focal point, and elevate your space. Trim work of any kind adds visual interest and gives a space character in a way not many other design elements can.
Get your level out and pencil in your design. We decided to do a board and batten accent wall and make it a very classic board and batten wainscoting style since we plan on adding wallpaper above it and making the wall a statement feature! Prime and paint your board and batten wall your color of choice and enjoy!!
Get the best home decor ideas, DIY advice and project inspiration straight to your inbox! Find trusted local pros for any home project. The verdict: I'm not sure what took me so long. Optional: I used this $99 paint sprayer that made the finish soooooo smooth! Here are the measurements for our wall design.
Going off of the design plan, he knew the accurate measurement of the length of each board should be cut too. First you would determine how far apart you want the battens (common spacing includes anywhere between 12 20 and I did 16.5 between each board) and then follow the equation in step 4 to determine your spacing! Mark on the wall where they should go, and make sure they are level. Kaitlin Madden Armon is a writer and editor covering all things home.
Add another $1.00 to $1.50 per linear foot for paint or enamel, plus the nails and glue required toinstall the boards. Once the horizontal boards were all in place, he moved on to cut, fill, and nail the vertical boards into place. Make sure to remove any leftover nails as well. 'Many people have asked the question, Is board and batten out of style? To which my response is, never.,' says Sarah Symonds aka @graceinmyspace (opens in new tab). I used wood boards for my board and batten bathroom. I found it easiest to get even spacing by measuring and marking on the top trim pieces where our vertical boards should go.
This ensures a smooth to the touch finish. Its all here! Grey board and batten with white walls adds a fun decor twist on traditional board and batten wainscoting!\n\nGET THE FULL TUTORIAL & MATERIALS HERE:\nhttps:\/\/angelamariemade.com\/diy-board-and-batten-wall\/\n\nSEE THE FINAL NURSERY REVEAL WITH THE BOARD & BATTEN WALL HERE:\nhttps:\/\/angelamariemade.com\/blue-and-gray-nursery-reveal\/\n\n\nMATERIAL & TOOL LIST:\nThis post contains affiliate links, which means I make a small commission at no extra cost to you.
You also can cut a board to your desired spacing, and use it as a spacer between vertical boards to get even spacing. This was such a fun, quick and easy project and were excited to share the full process of how to DIY a board and batten wall. Let the caulk dry, then sand the caulked spots smooth. Determine how high up you want your DIY board and batten wall to be. That said, any type of wood used outdoors should be resistant to moisture and insect damage. Attach to the wall with constuction adhesive and 1 1/4"brad nails. Next, you add the horizontal batten trim pieces. First, decide how high you want the board and batten to go up the wall (we did ours about 2/3 of the way up). Paintable Caulk Prep Time: ","position":8,"name":"Prime the board and batten if boards aren't","url":"https:\/\/angelamariemade.com\/diy-board-and-batten-wall\/#mv_create_9_8"},{"@type":"HowToStep","text":"Paint the board and batten with two coats of paint. Not sure if that makes sense or not. Discover the best sofas for your living room; stylish, comfortable, and affordable, we've tried and tested bestselling designs from multiple retailers to compile the ultimate guide, Avoid deadheading these flowers, because it won't do your floral display any favors, By Camille Dubuis-Welch You may have to notch around an outlet or light switch. I used pre primed boards, so I only needed to prime the brown hardboard. ), Once you have the height of your vertical trim, you'll want to determine how many trim pieces you'll need for the wall. And then get your painting on! Then, divide by the number of trim pieces you're installing (in our case, again, this was 3). Instructions
Measure your walls from side to side and top to bottom. Once your vertical boards are cut, dry fit them in place to verify they fit. Stay tuned on the blog and Instagram for updates of the Trista, walnut grove home, and heritage valley home, all of which will completed soon! Subtract this number from the width of the wall.
This ensures a smooth touch to finish. By Glenda Taylor and Bob Vila | Updated Oct 20, 2020 11:50 AM. Im giving our guest bedroom a makeover under $500!! *priming first is always a good idea! Before you head to the hardware store, measure your walls so you know how much trim to buy for your feature wall. I also used this coolest tape with plastic attached to make painting prep easier. 1 1/4" brad nails
To make sure your trim pieces are evenly spaced: Again, in our case, we started with a 58" wall, and added two, 2.25" trim pieces in the corners, so: 46.73" 3 = 15.58" of spacing between each trim piece, edge to edge. He also uses that to trace along.
', 'While this decision is largely up to your aesthetic preference, you should definitely take into consideration the scale of the room.'. Once your border edges are nailed in place its time to hang all of your horizontal boards. Our wall was about 10ft long, so we bought the 12ft long pre-primed board and had Lowes cut the board to just a bit longer than 10ft so it would fit in our car. Make sure to remove any outlet or light switch covers. If you want your space to look professional, dont skip this step. Difficulty: You can definitely roller the wall, but I wanted the smoothest finish possible, so I used this paint sprayer. I was not that lucky on the day I went, so I used a hand saw to trim them to a length that would fit in my car.
You may want to replace your baseboard depending on the type of baseboard you have. If you have a really textured wall though (thats super noticeable) and want to make the wall totally smooth for your board and batten spacing, then I would attach a 1/8 panel board (such as hardboard or plywood) cut to size on the wall. Follow your pencil markings and hang and nail them into place. Lightweight Spackle
Locate studs and nail into them if possible for a more secure installation. When you purchase through links on our site, we may earn an affiliate commission.
I installed in my master bedroom and absolutely love the results! If you will be installing trim at the bottom of your board and batten wall as well (I prefer this look whether or not you have a baseboard), you'll want to double the amount of trim you buy. Check out the #runningbrookeshakerstylebedroom to see more of this board and batten wall. If you prefer a DIY shiplap wall, we've got a tutorial for that too. For my backerboard (only if you have textured walls and want a smooth look) I got a 48 sheet of the Eucaboard at Home Depot (see pic of tag below). You'll need both board (the horizontal trim pieces) and batten (the vertical trim pieces).
Repeat for the rest of the walls and/or the bottom trim piece. STEP 7:Tape off walls in preparation for painting. She graduated from Northeastern University with a degree in journalism and currently lives in Connecticut with her husband, two sons, and black lab.
Measure the distance between the top and bottom pieces of trim (or your baseboard/floor) so you know how long your pieces should be. For example, to install a board and batten wainscoting (32 inches high), using 14 boards (spaced 12 inches apart, for instance) and installing a horizontal top board and a baseboard (of the same dimension), youd pay approximately $3.00 to $4.00 per linear foot. If your walls arent as tall or as wide or are even larger, the number of horizontal boxes and the number of vertical boxes do not have to be the same.
This post contains affiliate links. It was a lot thinner than the other trim, about .75".
{"@context":"http:\/\/schema.org","@type":"HowTo","name":"Easy DIY Board and Batten Wall","author":{"@type":"Person","name":"Angela Marie Made"},"datePublished":"2020-04-20","yield":"1","description":"Learn how to easily install a DIY board and batten wall in any room!
1 hour 10 minutes When doing the shaker style design, the goal is to have every box perfectly square and all of the boxes measure the same. First, in order to DIY a board and batten wall, youll want to make sure you have all of the right tools and materials to do this project. Prybar and Hammer Overall, the project took my husband and I a day to complete, then a few extra hours over the course of the next week to finish caulking and painting. DI, Replace front door It is dark brown and one side is super smooth. If you didnt use pre-primed boards, make sure to prime first. Real Homes is part of Future plc, an international media group and leading digital publisher. Real Homes is supported by its audience. I had to use 3 of my scrap boards to make the 131 1/2 ledge. Thank you for your support! If you decide to purchase from one of the links, I will receive a small commission at no additional cost to you. You should be proud too! Finally, you're ready to paint. But, it doesnt look as nice or professional in my opinion as baseboards that are the same thickness as the vertical batten boards. STEP 2:NOW you can go and buy your materials! They come in 48 foot sheets and the home improvement store can cut them for you too.
We did 5 squares by 5 squares. Once all of the boards are in place its time to sand using an electric power sander. For this tutorial, I did 16.5 between each board. 1 Dont forget a trim piece to go on the very left, right, top and bottom of your wall to frame out the space, if youd like. (Tip: If it's a tricky measurement, like 42 3/8" long, round down or up to a nice even number to make cuts a little easier, and adjust the height of your horizontal pieces accordingly. Primer (if boards arent pre-primed) Disclosure: BobVila.com participates in the Amazon Services LLC Associates Program, an affiliate advertising program designed to provide a means for publishers to earn fees by linking to Amazon.com and affiliated sites.
","position":4,"name":"Determine the batten (vertical board) spacing.
Miter saw Utility Knife Here's the measurements for our wall design. For your horizontal trim, measure the width of each wall you'll be paneling in inches. If youre a visual person like us, you can also use SketchUp or Illustrator to mock up your design. I used Behr paint in the color Creek Bend. Also, if you are just doing one accent wall like us, cut the adjacent wall molding corners (if needed) with a Dremel, jig saw, or wood chisel and hammer in order to fit the new board. Yeah, i think that would work as long as it is secure. Construction adhesive I used this coolest tape with plastic already attached to it. Then, use a prybar and hammer to remove the baseboard from the wall. This is the length of your vertical trim pieces, or batten. Jamie uses a laser level so he can see the light and follow it perfectly along for a straight line. Easy DIY Board and Batten Wall It was a really easy and affordable project that didnt take much time at all! We also have a great tutorial for a custom stair rail like you see above. And here is the final reveal with the board and batten accent wall all painted! Thats why we replaced our baseboard with the same style boards as the rest of the board and batten pieces. Around the mid-1900s, board and batten became a desirable look, particularly in bungalows, Arts and Crafts, and Country style homes. We also placed wood glue on the ends and adhesive on the backs of all of the boards to help hold it into place as Jamie moved and nailed along.
We added a piece of trim in each corner of our wall to make it look more finished, which meant accounting for two extra pieces of trim per wall. ","position":5,"name":"Cut each 1\u00d74 batten to size using a","url":"https:\/\/angelamariemade.com\/diy-board-and-batten-wall\/#mv_create_9_5"},{"@type":"HowToStep","text":"Add the top 1x2 board on top of the middle board to create a ledge. Because most walls arent perfectly straight, the measurements may be slightly different for each. Next up we will be adding wallpaper above it which Im super excited about doing! As an Amazon Associate I earn from qualifying purchases.\n\n\u2022 Brad Nailer - https:\/\/amzn.to\/2sxeXwR\n\u2022 Dremel Tool - https:\/\/amzn.to\/2nKFAzV\n\u2022 Miter Saw - https:\/\/amzn.to\/2sxxyZQ\n\u2022 Spackle - https:\/\/amzn.to\/2TYQUHz \n\u2022 Utility Knife - https:\/\/amzn.to\/2zqiwvR\n\u2022 Liquid Nails - https:\/\/rstyle.me\/+cyrV0osE4Cs2WgcyB--toQ\n\u2022 Prybar - https:\/\/amzn.to\/2A5So6d\n\u2022 Paintable Caulk - https:\/\/amzn.to\/3bkbGXR\n\u2022 Small Paint Roller - https:\/\/amzn.to\/2RIcsWH\n\nWEATHERED WOOD RECIPES EBOOK:\nhttps:\/\/angelamariemade.com\/weatheredwoodrecipes\n(Use code YOUTUBE for 20% off! Install with 1 1/4 brad nails and some construction adhesive.Fill nail holes with spackle and caulk all the seams.Prime the board and batten if boards aren't pre-primed.Paint the board and batten with two coats of paint. 'An accent wall is a beautiful addition to your decor. This is super important because in the end you will want to have your backer boards seams all covered by the trim pieces. Use construction adhesive (we used Liquid Nails) and 1 1/4 brad nails to attach the battens to the wall. For more info see my disclosures here. 'If you plan on installing exterior board and batten siding, you must use wood that is both insect and moisture resistant. I took the same sand paper to lightly go over every board before painting. Keep spacing between trim batten boards the same. (Experts recommend anywhere from 12"-24".). Attach to the wall with constuction adhesive and 1 1/4"brad nails.Add the top 1x2 board on top of the middle board to create a ledge. 'For interior projects, the standard wood choice is pine since it does not need to withstand outdoor elements. Whats up homies!! The spacing will all be slightly different since ceilings and floors are not perfectly level. Occasionally, measure from the floor and step back to make sure its not gradually creeping up or down. Expert advice from Bob Vila, the most trusted name in home improvement, home remodeling, home repair, and DIY.
Best sofas 2022: our tried and tested favourites, 7 flowers you don't have to deadhead according to gardening experts, Two-foot level (available from Home Depot), Inspiring real homes, expert project advice and on-trend shopping, Try a single issue or save on a subscription, Issues delivered direct to your door or device, Measure the width of the wall between the two corner trim pieces you just installed, Multiply the trim width by the number of pieces of trim you have left for the wall.
Then youll want to choose which wall youre doing your accent piece on and measure the wall so you can figure out your full wall design. Im so proud of you! So much better than before! (A laser level would be very helpful here, but I didnt have one!). Then, measure the exact height needed for each batten based on where they will be attached to the wall. Then, you'll want to border your edges with the wood. This fills in any gapping and will make the painting process a lot easier. This fills in any gapping and will make the painting process a lot easier. You would follow the same process listed in the tutorial regardless of wall length!
Make sure to tag @construction2style so we can see your awesome work and show you some love! Brad nailer Note, this post contains some affiliate links. Fill nail holes with spackle and caulk all the seams.
There are a lot of ways you can customize this project to make it your own and fit your own space. Draw a rectangle for the outlet and drill a hole in each corner. If you're using pre-primed MDF, you can skip this step and go straight to the paint. Note the measurements in your phone for when you go to the hardware store. There's a few options you could do. To get the exact spacing, I then did the following math: 7 batten boards x 3.5 (actual width of 14 boards) = 24.5, 99 / 6 (the # of spaces between 7 boards) = 16.5. Cut each 14 batten to size using a miter saw. The sides, bottom and top are probably not going to be perfectly straight or level/plum. After thinking about installing DIY board and batten siding in my own home for over a year, and reading up on how to DIY a board and batten wall, I finally took the plunge and hung the paneling in my entryway. Glenda Taylor, Bob Vila, 11 Ways to Make the Most of Your Towns Curbside Cleanup Day, All You Need to Know About Popcorn Ceilings, Know Your Moldings: 10 Popular Trim Styles to Spiff Up Any Space, 10 Ways to Unleash the Potential of Your Blank Walls. Once it's level, use a brad nailer to secure it to the wall, adding a nail every 3-4". For all the interior seams I didnt use tape because it will all be painted over anyway. Attach it 48\u2033 up from the top of the baseboard. Or if the gaps are too big then use caulk to fill the gaps. I,too, wish I could post a picture!
I had to notch out a rectangle for the outlet on our wall. This past weekend we installed a classic, DIY board and batten wall in our soon to be nursery! Board and batten may seem intimidating, but by following simple instructions you can add this striking statement to your bedroom or any other room in your home.'
Trim is sold in 8-12' lengths, so you'll need to cut it to fit in your car. Then, we made the final exact cut with our miter saw at home. So, living in a home that I love plays a huge role in my happiness. The last option is to do an accent wall and replace the trim with something simple like a 1x4 or 1x6 on just that wall. Interior board and batten trim is much easier to install, however, because less work is involved, so its better suited to the newbie do-it-yourselfer. With the arrival of sawmills to 18th Century America, home construction began moving away from whole logs (as in cabins) and masonry towards lumber. So, to figure out the math and see about how many battens that would be, I took our total wall length of 123.5 and divided by 17, which equaled roughly 7 boards.
Once you know your measurements, its time to make your design plan. how do you deal with existing baseboard that may be thinner at the top, the vertical boards will sit on thop of the base board and look a little weird, I dont want to have to change the baseboard in the whole house just to make one or two walls look good any ideas?
The large flat boards had a tendency to warp, however, and by the late 1800s, horizontal lapped siding (narrow horizontal boards installed from the bottom up, with each subsequent board lapping the one below) proved more efficient at shedding rain and so became the norm. A skeletal frame would be constructed, over which long flat boards were attached to form a weather-resistant barrier. He was a one man show when doing this part of the process. Helpful tip: if you are doing this by yourself, put one nail in the middle, make sure its level, and then nail up and down the board. Please refresh the page and try again. Get a vertical measurement from the baseboard to the top board (all of your vertical boards may have slightly different measurements).
","position":2,"name":"Install the new baseboard with a 1x4 cut","url":"https:\/\/angelamariemade.com\/diy-board-and-batten-wall\/#mv_create_9_2"},{"@type":"HowToStep","text":"Attach the middle 1x4 board to the wall into the wall studs. If you have basic carpentry skills, including the ability to measure and cut the boards precisely, and youre comfortable using a circular saw, a caulking gun, and a nail gun or screw gun, you can install either type of board and battenthe exterior siding or the interior trim. Use a good amount of liquid nails on the back of your 1/8 hardboard, place it on the wall and distribute weight all over the panel so the glue adheres. ","position":1,"name":"Remove existing baseboards from the wall using a","url":"https:\/\/angelamariemade.com\/diy-board-and-batten-wall\/#mv_create_9_1"},{"@type":"HowToStep","text":"Install the new baseboard with a 1x4 cut to size and 1 1\/4\" brad nails into the wall studs. Which we just talked about over in their construction update blog. STEP 8:Youre ready for painting! I had Home Depot cut my hardboard panels to size. Use your level to make sure the panels are level on your wall.
I love it because is an affordable way (only$150!) If you're using bare wood as I did, you'll want to prime your wood first. 1 hour Then, youll want to border your edges with the wood. A good rule of thumb is to space them roughly 18" apart, give or take a few inches depending on the dimensions of your wall and the look you're going for. For this statement wall, we painted it in Graphic Charcoal by Behr. Install with 1 1/4 brad nails and some construction adhesive. Also, we added our original shoe molding (quarter round) back to the baseboard to match our other side wall molding and cover flooring gaps. We did it on four small walls, and it looks incredible (if I do say so myself). This wall was 133" wide and 108" tall. What TO do, and what NOT to do for the most professional-looking board and batten wall! This may have been the, I wanted to share another angle of the coffee tabl, I took a little break from the dining table projec, I spent HOuRs trying to find the perfect dinnerwar, This view will never get old.. and now its even, 1 x 3 x 8 (Vertical supports/top horizontal trim & ledge), 1/8 Hardboard 4 x 8 sheet (To cover textured walls), @ 131 1/2 (Baseboard-put two boards together to make 131 1/2), @ 131 1/2 (Top horizontal trim & ledge-put two boards together to make 131 1/2), @ 58 (7 vertical boards, I utilized all of my scrap wood to minimize cost). Attach it 48 up from the top of the baseboard.
To remove the existing baseboard, score the top and corner caulk lines with a utility knife. Level However, he measured twice before running out into the garage, on the job site, to cut before putting into place. Start by installing a piece of vertical trim at each of the far edges (or in the corners) of the wall (see image below). Check out my board and batten bathroom DIY tutorial for photos and details on how to cut around outlets, pipes, light switches, etc! ****If you have smooth walls, SKIP TO STEP 5*****.
Make sure they are level, and attach with liquid nails and finishing nails. I now want one in every room in my house :). Remove existing baseboards from the wall using a utility knife, prybar and hammer.Install the new baseboard with a 1x4 cut to size and 1 1/4" brad nails into the wall studs.Attach the middle 1x4 board to the wall into the wall studs. wall. Then, add a squiggly line of liquid nails to the back of the trim, and stick it on the wall, using a level to make sure the trim is even. This wall was 133 wide and 108 tall. Paint your wall, and you're done. Its totally up to you on what you prefer to do though for the baseboard! Common spacing includes anywhere between 12 20. Cut your 12 board to size (this will be the top board) and install it on top of the middle 14 board with 1 1/4 brad nails and some construction adhesive to create a top ledge. says Drew Scott aka Lone Fox (opens in new tab). ","position":9,"name":"Paint the board and batten with two coats","url":"https:\/\/angelamariemade.com\/diy-board-and-batten-wall\/#mv_create_9_9"}],"video":{"@type":"VideoObject","name":"Easy DIY Board and Batten Wall | How to Install Wainscoting","description":"Learn how to easily install a DIY board and batten wall in any room! Future Publishing Limited Quay House, The Ambury, Bath BA1 1UA.
Im a professional DIYer, full time YouTuber and wannabe interior designer. The 4 x 8 hardboard panels were only about $8 each from Home Depot. The wall turned out so smooth, and I was very happy with the sprayer. Another option is to do an angled cut with the thicker baseboard, but I am not a huge fan of but you may like the look. )\n\nSUBSCRIBE TO MY CHANNEL:\nhttps:\/\/www.youtube.com\/c\/AngelaMarieMade\n\nFOLLOW ME AT:\nBlog - https:\/\/angelamariemade.com\nInstagram - https:\/\/instagram.com\/angelamariemade\nPinterest - https:\/\/www.pinterest.com\/angelamariemade\/\nFacebook - https:\/\/www.facebook.com\/AngelaMarieMade\n\n#boardandbatten #homeimprovement #diy #wainscoting","thumbnailUrl":"https:\/\/i.ytimg.com\/vi\/1iEc_wRmuy4\/hqdefault.jpg","contentUrl":"https:\/\/www.youtube.com\/watch?v=1iEc_wRmuy4","duration":"PT7M2S","uploadDate":"2020-04-17T14:03:07.000Z"},"keywords":"diy board and batten, board and batten wall, board and batten wainscoting, board and batten accent wall, how to install board and batten, DIY wainscoting, board and batten, ","aggregateRating":{"@type":"AggregateRating","ratingValue":"4.9","reviewCount":14},"url":"https:\/\/angelamariemade.com\/diy-board-and-batten-wall\/"} Make sense? If you have baseboards like us that are thinner than the molding being used, you can technically cut the battens with a mitered angle at the bottom if you dont want to remove the original baseboard. He was a one-man show when doing this part of the process. Stud finder Use a level and mark 48 up from the top of the baseboard on each side of the wall. Caulk around every square inside and out. That price includes the boards, caulk, and 1 gallon of paint.
Today, board and batten siding is kiln-dried to reduce warping, and its installed over framing, sheathing, and a vapor barrier to lend greater structural integrity. Prime the board and batten if boards aren't pre-primed. With a smooth wall it very easily shows imperfections, so this sprayer solved all of my problems and gave me a professional look. Once all of the boards are in place it's time to sand using an electric power sander. The resulting number is how far apart you'll space your trim pieces from edge to edge. to give a space character, add a focal point, and elevate your space. Trim work of any kind adds visual interest and gives a space character in a way not many other design elements can.
Get your level out and pencil in your design. We decided to do a board and batten accent wall and make it a very classic board and batten wainscoting style since we plan on adding wallpaper above it and making the wall a statement feature! Prime and paint your board and batten wall your color of choice and enjoy!!
Get the best home decor ideas, DIY advice and project inspiration straight to your inbox! Find trusted local pros for any home project. The verdict: I'm not sure what took me so long. Optional: I used this $99 paint sprayer that made the finish soooooo smooth! Here are the measurements for our wall design.
Going off of the design plan, he knew the accurate measurement of the length of each board should be cut too. First you would determine how far apart you want the battens (common spacing includes anywhere between 12 20 and I did 16.5 between each board) and then follow the equation in step 4 to determine your spacing! Mark on the wall where they should go, and make sure they are level. Kaitlin Madden Armon is a writer and editor covering all things home.
Add another $1.00 to $1.50 per linear foot for paint or enamel, plus the nails and glue required toinstall the boards. Once the horizontal boards were all in place, he moved on to cut, fill, and nail the vertical boards into place. Make sure to remove any leftover nails as well. 'Many people have asked the question, Is board and batten out of style? To which my response is, never.,' says Sarah Symonds aka @graceinmyspace (opens in new tab). I used wood boards for my board and batten bathroom. I found it easiest to get even spacing by measuring and marking on the top trim pieces where our vertical boards should go.
This ensures a smooth to the touch finish. Its all here! Grey board and batten with white walls adds a fun decor twist on traditional board and batten wainscoting!\n\nGET THE FULL TUTORIAL & MATERIALS HERE:\nhttps:\/\/angelamariemade.com\/diy-board-and-batten-wall\/\n\nSEE THE FINAL NURSERY REVEAL WITH THE BOARD & BATTEN WALL HERE:\nhttps:\/\/angelamariemade.com\/blue-and-gray-nursery-reveal\/\n\n\nMATERIAL & TOOL LIST:\nThis post contains affiliate links, which means I make a small commission at no extra cost to you.
You also can cut a board to your desired spacing, and use it as a spacer between vertical boards to get even spacing. This was such a fun, quick and easy project and were excited to share the full process of how to DIY a board and batten wall. Let the caulk dry, then sand the caulked spots smooth. Determine how high up you want your DIY board and batten wall to be. That said, any type of wood used outdoors should be resistant to moisture and insect damage. Attach to the wall with constuction adhesive and 1 1/4"brad nails. Next, you add the horizontal batten trim pieces. First, decide how high you want the board and batten to go up the wall (we did ours about 2/3 of the way up). Paintable Caulk Prep Time: ","position":8,"name":"Prime the board and batten if boards aren't","url":"https:\/\/angelamariemade.com\/diy-board-and-batten-wall\/#mv_create_9_8"},{"@type":"HowToStep","text":"Paint the board and batten with two coats of paint. Not sure if that makes sense or not. Discover the best sofas for your living room; stylish, comfortable, and affordable, we've tried and tested bestselling designs from multiple retailers to compile the ultimate guide, Avoid deadheading these flowers, because it won't do your floral display any favors, By Camille Dubuis-Welch You may have to notch around an outlet or light switch. I used pre primed boards, so I only needed to prime the brown hardboard. ), Once you have the height of your vertical trim, you'll want to determine how many trim pieces you'll need for the wall. And then get your painting on! Then, divide by the number of trim pieces you're installing (in our case, again, this was 3). Instructions
Measure your walls from side to side and top to bottom. Once your vertical boards are cut, dry fit them in place to verify they fit. Stay tuned on the blog and Instagram for updates of the Trista, walnut grove home, and heritage valley home, all of which will completed soon! Subtract this number from the width of the wall.
This ensures a smooth touch to finish. By Glenda Taylor and Bob Vila | Updated Oct 20, 2020 11:50 AM. Im giving our guest bedroom a makeover under $500!! *priming first is always a good idea! Before you head to the hardware store, measure your walls so you know how much trim to buy for your feature wall. I also used this coolest tape with plastic attached to make painting prep easier. 1 1/4" brad nails
To make sure your trim pieces are evenly spaced: Again, in our case, we started with a 58" wall, and added two, 2.25" trim pieces in the corners, so: 46.73" 3 = 15.58" of spacing between each trim piece, edge to edge. He also uses that to trace along.
', 'While this decision is largely up to your aesthetic preference, you should definitely take into consideration the scale of the room.'. Once your border edges are nailed in place its time to hang all of your horizontal boards. Our wall was about 10ft long, so we bought the 12ft long pre-primed board and had Lowes cut the board to just a bit longer than 10ft so it would fit in our car. Make sure to remove any outlet or light switch covers. If you want your space to look professional, dont skip this step. Difficulty: You can definitely roller the wall, but I wanted the smoothest finish possible, so I used this paint sprayer. I was not that lucky on the day I went, so I used a hand saw to trim them to a length that would fit in my car.
You may want to replace your baseboard depending on the type of baseboard you have. If you have a really textured wall though (thats super noticeable) and want to make the wall totally smooth for your board and batten spacing, then I would attach a 1/8 panel board (such as hardboard or plywood) cut to size on the wall. Follow your pencil markings and hang and nail them into place. Lightweight Spackle
Locate studs and nail into them if possible for a more secure installation. When you purchase through links on our site, we may earn an affiliate commission.
I installed in my master bedroom and absolutely love the results! If you will be installing trim at the bottom of your board and batten wall as well (I prefer this look whether or not you have a baseboard), you'll want to double the amount of trim you buy. Check out the #runningbrookeshakerstylebedroom to see more of this board and batten wall. If you prefer a DIY shiplap wall, we've got a tutorial for that too. For my backerboard (only if you have textured walls and want a smooth look) I got a 48 sheet of the Eucaboard at Home Depot (see pic of tag below). You'll need both board (the horizontal trim pieces) and batten (the vertical trim pieces).
Repeat for the rest of the walls and/or the bottom trim piece. STEP 7:Tape off walls in preparation for painting. She graduated from Northeastern University with a degree in journalism and currently lives in Connecticut with her husband, two sons, and black lab.
Measure the distance between the top and bottom pieces of trim (or your baseboard/floor) so you know how long your pieces should be. For example, to install a board and batten wainscoting (32 inches high), using 14 boards (spaced 12 inches apart, for instance) and installing a horizontal top board and a baseboard (of the same dimension), youd pay approximately $3.00 to $4.00 per linear foot. If your walls arent as tall or as wide or are even larger, the number of horizontal boxes and the number of vertical boxes do not have to be the same.
This post contains affiliate links. It was a lot thinner than the other trim, about .75".
{"@context":"http:\/\/schema.org","@type":"HowTo","name":"Easy DIY Board and Batten Wall","author":{"@type":"Person","name":"Angela Marie Made"},"datePublished":"2020-04-20","yield":"1","description":"Learn how to easily install a DIY board and batten wall in any room!