In this row make one orange backward knot, six pink forward knots, three gray forward knots and one orange backward knot. Share on Instagram or Facebook: When you make this project, share it on social media and tag me @sarahmaker. You can also plan out your own pattern using grid paper, marking all the boxes that represent knots that will create the word or name with a and all the background squares with forwards and backward knots, alternating rows between all and all for background color knots. Here is a tutorial with grid papers: Grid papers. 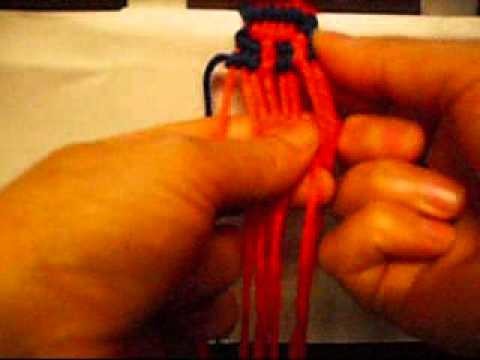 [], How to Start and End Friendship Bracelets for A Finished Look - Sarah Maker, [] How to Read Friendship Bracelet Patterns []. In this tutorial, I will show you how to make the letter A on a bracelet. Rows. If you have forgotten how to make the basic backward and forward knots, take a look here.
In this tutorial, well show you a super easy trick for tieing knots that dont require feeding your entire yarn skein through a loop. all around I love this app, the sidebar is very simple and easy to use and I live the inclusion of tutorials and forums. Follow the pattern. use the red as your foreground and substitute the pink string. Please check your email for further instructions. Wondering how to read friendship bracelet patterns? Have a beautiful and craft filled day everyone! This is how your bracelet should look by now. This blog is reader-supported. This means that the "working" strings and "background" strings will also change every so often. The pattern chart usually includes one full repeat on the pattern. when u can CLEARLY see it. What you need to do, is take the gray string, which is now the base of the fourth knot in this row, and put it under the two pink strings, and then it needs to come up over the red string.
  As an Amazon Associate, I earn from qualifying purchases. Here are the parts of a bracelet pattern that you need to know. This is what the ready bracelet looks like. 2009-2015 fene4ki.ru. Change direction again and make row 3. If you want to make a knot in the letter color, you should make a downward knot. Well done. So go out there and start looking.
 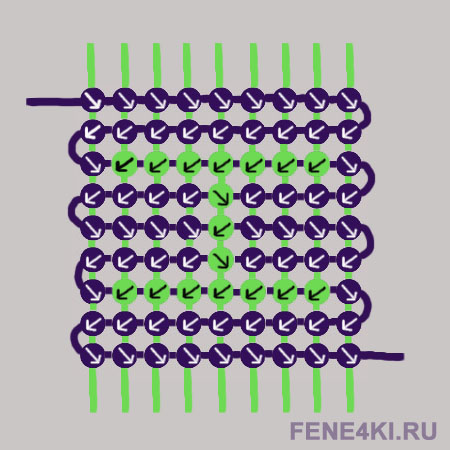 If you were making the pattern example in this post, you would make a forward knot, a forward knot, and a backward knot. Youve learned how to read friendship bracelet chart patterns. This seems small but it gets very annoying having to try and remember all the #s!- I would also like to see the ability to click on a user from a photo. Arrange the strings in the color order indicated by the letters at the top of the pattern. You may already know that there are a few different types of friendship bracelet patterns. ), then move onto the next filler string on the left, knotting around it the same way using the exterior color string. Take the red substituted string, and put it under all of the strings you already used for knots, this means it should be under 4 strings, and coming up so it's over the fifth gray string. There is a seemingly endless supply of friendship bracelet patterns available on the internet. For example, in this chevron bracelet pattern, there are 8 strings, two of each color. There are multiple options and methods of how to do multicolor alphas. This website saves cookies to your browser in order to improve your online experience and show you personalized content. If your y number is ODD, youll start with backwards knots and begin knotting from right to left. Lay your string as if you were going to do a simple two color alpha. The only thing you need to do is use more than one color in the back strings. The circles at the intersections of the strings represent the knots. So if the interior color is on the left, bend it into a backwards 4 (aka backwards knot), and vice versa. We recommended braiding the beginning tail first, as the strands are shorter. Tie the string in somewhere, I usually tie it to my safety pin, but you can do it as you wish. The colors in the preview image correspond to the colors in the chart. Here you can see an alpha pattern with the letter "H": Take some threads of two colors. Again, we find this method to be kind of a pain when having to thread a bobbin or entire yarn skein through a small loop, so here is the same trick as above, but for backwards knots: BACKWARDS KNOTS: TIP FOR KNOTTING WHEN ATTACHED TO BOBBIN/SKEIN. If you want to make alpha bracelets with more than 2 colors, take a look at Multicolored Alpha patterns. You can see that this substitution method is as easy as the two color alpha. i just think they shouldnt be soooooooo picky and this isn't the first time its happened. Two for your back strings, and one for your background. This is my second bracelet tutorial!
Copyright 2022 Apple Inc. All rights reserved. So, there are Alpha bracelets and then there are Normal bracelets. Start making forward knots with the background string as on the picture. That means 2 As, 2 Bs, 2 Cs, and 2 Ds. Imagine you just made the black knot to the right, and that you are going to make a downward knot to the left of it. Please use embroidery thread/floss in colors of your choice. Put them in this order : light orange (background string), four gray strings (mushroom stem color) and seven pink strings (mushroom head color). According to our calculations, an average adult-sized alpha-style friendship bracelet is 93 rows. Use the same string but change direction and make two left-knots. Start making the bracelet as you would with simple alpha pattern, make the first row with pink string. If you force the knot back the other way, youll have unwanted bumps on your design. We find this method to be kind of a pain here, though, since threading a bobbin or entire yarn skein through a small loop takes time and can cause tangles, so we came up with this super helpful trick for quick and easy knotting when pulling from a large amount of string/yarn: FORWARDS KNOTS: TIP FOR KNOTTING WHEN ATTACHED TO BOBBIN/SKEIN. These custom word and name friendship bracelets are so sweet to give as gifts or make for yourself. Another great site with friendship bracelet patterns is friendship-bracelets.net. So long as you keep your horizontal intentions in mind as you knot, youll achieve straight rows using forwards and backwards knots. After youve chosen a bracelet pattern and selected your string colors, its time to start making your project. The pattern will use one letter for each color. Good Luck. document.getElementById( "ak_js_2" ).setAttribute( "value", ( new Date() ).getTime() ); About TNTP Privacy Policy Terms & Conditions Shipping and Returns. Now fasten it. I love to see what you make! Friendship bracelets are not only beautiful and interesting, they also carry special meaning for the person who made it and the friend who wears it. To finish off your bracelet, tie a knot below the last row to match the top of your bracelet. Once you learn how to make the four basic friendship bracelet knots, theres no limit to the beautiful patterns you can create! Now grab some Omegacryl and read on to learnhow to make Alpha Friendship Bracelets! If youve made classic friendship bracelets before, youre probably used to knotting your rows on a diagonal. This is how the bracelet should look once you've done both colors, now continue tying from the pattern until the bracelet is long enough. When you get to the third knot (counting from the right), the A pattern tells us it shall be a brown knot there instead of blue. Step-by-step tutorials and videos are available for various patterns at, at least 7 inches total in length to be considered forservice hours, , colorful patterns, including popular patterns such as chevron, spiral, Chinese ladder, zig zag, etc. On the second row, there are some blue downward knots. BraceletBook also contains a To-Do list. You can find it under pattern. It's full of normal & alpha patterns, both easy and hard.
Once you learn to read friendship bracelet patterns, youll be able to make any design you come across. They are slightly inclined in the alpha bracelets compared to the normal fk's and bk's though. Pattern preview image. :grinning: Thanks for posting! Please check your entries and try again. When you generate your pattern, the generator will only provide the segment with the name / word plus a blank row before and after. All Rights Reserved. Site Design by. Complete Guide to Knitting Gauge, and How to Measure It, How to Knit Stockinette Stitch for Beginners, 20 Free Crochet Tank and Crop Top Patterns. Keep knotting back and forth until youve reached the total of 93 rows. Tell me in the comments below! Start with your knotting string (exterior color) on the left and the filler string on the right. You should know that from two color alpha tutorial. Do this normally as you would if it was your background string. Just like with the forwards knot, you can use the regular backwards knot method here (see instructions here), feeding the bobbin or skein through the loop of the knot. As such, youll have to do a little math to figure out how many blank rows to start (and end) with in order to get your pattern centered. i love this app! Just be sure to bring each knot all the way up so that they all line up in a straight row. The following data may be used to track you across apps and websites owned by other companies: The following data may be collected and linked to your identity: The following data may be collected but it is not linked to your identity: Privacy practices may vary, for example, based on the features you use or your age. Do this exactly as shown in the picture. Which of the following best describes your relationship with crafting? For a full explanation of the different types of friendship bracelets knots, with lots of diagrams and pictures, be sure to read How to Tie the 4 Basic Friendship Bracelet Knots. Spell out your name, a loved ones name, a word or phrase of empowerment, or something silly to make the wearer smile. This is how the bracelet should look once you've finished the fourth row. Again, this gets annoying after a while!- I would also like to see the ability to swipe between photos on the photo tab, aswell as photos submitted to a pattern. We cant wait to see what your word and name friendship bracelets say! 1 embroidery thread bracelet = 1 service hourLIMIT 30 BRACELETSPER SUBMISSION PER MONTH. The only knots used in Alpha bracelets are the forward knot and the backward knot. Site Design by Quinn Tempest. Tell us about some of your favorite crafts? I think this would just make things much more easier to use and switch between photos since I usually look at multiple! i restarted the app and the problem was still there. You can tie it anywhere depending on what you're working with. This article will focus on teaching you how to read normal patterns. Before we get into forwards and backwards knots, we have one more bit of math to do to figure out whether your first row will be forwards knots or backwards knots. 2022 The Neon Tea Party. Looking for your next craft project? If you want to make a knot in the background color, you should make one of these left- or right-knots. Something went wrong. Keep reading for my in-depth tutorial that will teach you how to read the friendship bracelet symbols and pattern grids. Pin this post: Save this tutorial to your Pinterest boards so that you can come back to it later. Have fun!! Now this might sound a little bit confusing to some of you, so have a good look at the picture. but it was also edited by
The arrows indicate the type or direction of each knot. This means that you will start your bracelet with the 8 strings arranged in that particular order. Tie right-knots to make blue knots and downward knots to make brown ones. Drop your info below to be the first to know about new products, awesome events, and content you wont wanna miss. All Rights Reserved. Just remember, when a background string meets a letter string the knots should change their direction. Just be sure to bring each knot all the way up so that they all line up in a straight row. This is an even-numbered row, so you wont use the outer two strands. Wed love to see pics when youre done!! The pattern will usually include a small preview image at the top of the chart. You can always change this as you'd like, e.g. This is the first knot with our substituted string. Now make your first gray row as you would with simple two color alpha bracelet. :yum: Alright, now you know the difference between Alphas and Normals!!!!! The first step to making your Alpha Friendship Bracelet is to generate your pattern using this nifty pattern generator on friendship-bracelets.net. Step-by-step tutorials and videos are available for various patterns at Bracelet Book and FriendshipBracelets.net, which notes: "Originally, these colorful bands were invented by native people in Central and South America. Show off your bracelet-making skills, while letting recipients know that you are rooting for them! :grinning: I'm just going over the basics of bracelet making right now for beginners, and this time I'm going to be discussing the 2 types of friendship bracelets! The direction is indicated by the arrow of the first bubble in the row youre working on. Take the gray string and make the last knot over the pink string. So for example, if the background string is going t, For more information of alpha patterns, check out the. ), then move onto the next filler string on the right, knotting around it the same way using the exterior color string. <3. Just be sure to bring each knot all the way up so that they all line up in a straight row. Knot Symbols. i pressed the other photos and nothing happened again. While the knots used are essentially the same as regular friendship bracelets, the approach is slightly different since youre generally using two colors of string, one of which is cut into 7 strands to act mostly as filler for the bracelets knots, and the other color used to do the majority of the knotting to create the background and negative space for the letters. I find it easier this way.
They are explained in the tutorial Multicolor Alpha Bracelets, The knots used are the normal FORWARD knots and the BACKWARD knots. If you want to put arrows on them (like in normal patterns), the arrows would be in the horizontal and vertical direction. Now make four orange forward knots, five pink backward knots and two orange forward knots. :stuck_out_tongue_winking_eye: In my next tutorial we'll start making the actual bracelets! If your y number (as in the number you get when you subtract your pattern rows from 93, then divide by 2) is EVEN you will start with forwards knots and begin knotting from left to right. Looking for even more pattern inspiration? For more experienced bracelet makers, Ive collected an amazing list of advanced friendship bracelet patterns, too. document.getElementById( "ak_js_1" ).setAttribute( "value", ( new Date() ).getTime() ); How to Make Friendship Bracelets - Sarah Maker, [] you can follow to create beautiful designs. Normal patterns are more difficult to design than alpha patterns, however it gets easier as you get more comfortable with bracelet making. Be sure to tag us on Instagram @theneonteaparty and leave any project questions below! For bracelets with an even number of strings, you will see that odd-numbered rows have knots for each pair strings. This will show you how your friendship bracelet will look when you have completed the project. At this point the gray background string is just hanging from the back of your bracelet. So, if your first row is only using a forward knot, then your second row is only using a backward knot, and so on. I am so glad that this helped you! Starting with Row 1, you would make a forward knot, a forward knot, a backward knot, and a backward knot. Imagine you just made the black knot to the left, and that you are going to make a downward knot to the right of it. Now take the red string and make two half-knots (a knot is basically two half-knots) as shown in the picture. Use those two fingers to catch and pull the filler string through the loop. You can also see it as making a forward knot just that you have tilted the pattern 45 degrees. Several of one color for the letters and one of the other color for the background. On the sides of the chart, you will see numbered lines. Interior strings:These will be the color of your letters. The first row will likely be another blank row, so follow that row accordingly. In the third row, make three gray forward knots, and one pink backward knot. We will therefore denote these knots left-, right- and downward knots. According to tradition, you tie a bracelet onto the wrist of a friend who may wish for something at that moment. ), DIY Word & Name (Alpha) Friendship Bracelets, http://friendship-bracelets.net/namepattern.php. (Knot instructions here. These numbers indicate the rows of the pattern. :relaxed: :+1: :sparkles: :cherry_blossom: This is sooooooooooooooooooooooooooooooooooooooo helpful thanks. The bent elbows at the outer edges of even-numbered rows indicate that the two outer strings are not used. With alpha friendship bracelets, your rows are going to be horizontal,however, the knots you use will be the same as classic friendship bracelets! This is a detailed picture of one heart and its back after it's finished, make these hearts until the bracelet is long enough. When you've finished the first letter, you can continue with the next. We have a Reel with our favorite way to join yarn ends for when you run out: https://www.instagram.com/p/CbMGz3oj3Dq/. This is how the bracelet should look once it's finished. Now we are going to substitute the other background color. So if the interior color is on the left, bend it into a backwards 4 (aka backwards knot), and vice versa. Gracie04, CupHearts, iluvmyspud, Kittycat, password1232343, braceletcrazy12, tennischiac95, spiffehgymnast, matiasgroso99, Sareana, funcrazyhelen, Geyn, alexisbadd, Kris10, MashaOrange, piggyfan2, feemis, RockePloeger, Kestrel, k_marie, diana923, MOOONICA, moderna2009, Foz, Braceletdude, Matina, CherryBelle, manejapis, HarleyMama23, heartzeinab, jess0027, kleinevos and Masha_Knots. The original author of this tutorial is Stefan These videos below shows you how to do it while the rest of the tutorial tries to explain it. And mine always gets denied the first couple times because my light was off or my photo was blurry and honestly the photos arent that bad, yes they arent the best, but Im not a professional photographer and thats not what this app is about. Example: Take a look at the image in the next section. You can find it on braceletbook as pattern. Sorry to bore you with all this text. Thanks for subscribing! To print your pattern, we recommend screenshotting it to save the file and print it. easy trick for remembering which knot to do when is to bend the knotting strand so that you can place the horizontal part on the interior strand. In this tutorial, we limit ourselves to two colors. Take the two strings that are on the left, and tie them together with a simple forward knot. The final step is to braid both ends of your bracelet, separating the tail strands into three groups, braiding them together and securing each braid with a knot. Her work has been featured in The New York Times, Scientific American, Good Housekeeping, Vox, Apartment Therapy, Lifehacker, and more. I usually tie my to my safety pin, which I'm using to hold my bracelet on my knee. Follow the pattern in step 1 until row 2 is finished. 1. get 11 strings of different colors 2. tie them together and tape it to a table or put it on a clipboard 3. get a long piece (i mean it LONG) and tape it (or clip it) next to the 11 strings 4. fk 11 across 5. that is the start, i will give you the lines now line 1: 11 line 2: 8, 1, 2 line 3: 4, 1, 2, 1, 1, 1, 1 line 4: 3, 1, 3, 1, 1, 1, 1 line 5: 3, 1, 3, 2, 2, line 6: 2, 6, 2 line 7: 1, 1, 1, 1, 4, 1, 2 line 8: 1, 1, 1, 1, 4, 1, 2 line 9: 2, 1, 6, 1, 1 line 10: 9, 1, 1 line 11: 11. So, you've got 8 pink strings, and one long gray string. Please follow these steps to ensure your work is received! This will be the first row of the pattern in the letter A (see step 1). Hold the filler string straight and pull up on the knotting string to bring the knot to the top of your bracelet and tighten. My favorite place to look for patterns is a website called BraceletBook. Working one row at a time, make the knots as indicated by the circled arrows. 1 embroidery thread bracelet = 1 service hour, Show off your bracelet-making skills, while letting recipients know that you are rooting for them! They can use anywhere from only 1 knot to all 4 knots. An alpha pattern will generally look like this: So those are the basics of alpha patterns. Some are even made with beads woven into the design. The one problem is when you have made the bracelet you can post a picture of it with the pattern and of course people have to approve the picture (make sure it is appropriate yada yada) however, it takes them forever to approve or deny it. You simply click on the "Add To-Do" button and you'll never forget what bracelet you wanted to make for your friend!
To create the knots within your letters, youre essentially going to do the opposite knot as the direction of the exterior knots on the same line that you are working on. Strings. In this way you can choose color of the next knots. English subtitles are provided. Now make three orange backward knots, four pink forward knots and four orange backward knots. This tutorial will not teach how to make bracelets with more than 2 colors. Hold the filler string straight and pull up on the knotting string to bring the knot to the top of your bracelet and tighten. After whipping up a batch of these, we figured out some super helpful tricks and tips to make these sweet personalized bracelets a breeze to create. You can use filters to find patterns that match your skills, which makes finding the right ones much easier. For more information, see the developers privacy policy. The developer, Sandbox s.r.o., indicated that the apps privacy practices may include handling of data as described below. If you accidentally tie your knot to go in the wrong direction (youll see your string change direction by the natural positioning of the knot) carefully undo it with a safety pin or needle. Leave a longer tail so that you will be able to tie the bracelet on to your wrist. Trim off excess tail string to finish! This is the whole row, all that we've done is simply use a new string. LearnMore, Amigurumi Today - crochet patterns and tutorials. This is the last row in this pattern, make the whole row with orange knots and then repeat the pattern until the bracelet is long enough. Repeat this exact process using the same two strings (as friendship bracelet knots are formed by two consecutive knots!
The cool thing about Alphas is that anything you can draw in a grid, you can make into a bracelet. Repeat this exact process using the same two strings (as friendship bracelet knots are formed by two consecutive knots!
When you reach the end of the row, start making backward knots and again, upon reaching the end, make forward knots in the next row until you reach the place where there should be a letter. In the second row, make two grey backward knots, two pink forward knots, and four grey backward knots. How do I join a new skein? The bracelet should be worn until it is totally worn-out and falls off by itself, at which moment the wish is supposed to come true.".
[], How to Start and End Friendship Bracelets for A Finished Look - Sarah Maker, [] How to Read Friendship Bracelet Patterns []. In this tutorial, I will show you how to make the letter A on a bracelet. Rows. If you have forgotten how to make the basic backward and forward knots, take a look here. In this tutorial, well show you a super easy trick for tieing knots that dont require feeding your entire yarn skein through a loop. all around I love this app, the sidebar is very simple and easy to use and I live the inclusion of tutorials and forums. Follow the pattern. use the red as your foreground and substitute the pink string. Please check your email for further instructions. Wondering how to read friendship bracelet patterns? Have a beautiful and craft filled day everyone!
This is how your bracelet should look by now. This blog is reader-supported. This means that the "working" strings and "background" strings will also change every so often. The pattern chart usually includes one full repeat on the pattern. when u can CLEARLY see it. What you need to do, is take the gray string, which is now the base of the fourth knot in this row, and put it under the two pink strings, and then it needs to come up over the red string. As an Amazon Associate, I earn from qualifying purchases. Here are the parts of a bracelet pattern that you need to know. This is what the ready bracelet looks like. 2009-2015 fene4ki.ru. Change direction again and make row 3. If you want to make a knot in the letter color, you should make a downward knot. Well done. So go out there and start looking. If you were making the pattern example in this post, you would make a forward knot, a forward knot, and a backward knot. Youve learned how to read friendship bracelet chart patterns. This seems small but it gets very annoying having to try and remember all the #s!- I would also like to see the ability to click on a user from a photo. Arrange the strings in the color order indicated by the letters at the top of the pattern. You may already know that there are a few different types of friendship bracelet patterns. ), then move onto the next filler string on the left, knotting around it the same way using the exterior color string. Take the red substituted string, and put it under all of the strings you already used for knots, this means it should be under 4 strings, and coming up so it's over the fifth gray string. There is a seemingly endless supply of friendship bracelet patterns available on the internet. For example, in this chevron bracelet pattern, there are 8 strings, two of each color. There are multiple options and methods of how to do multicolor alphas. This website saves cookies to your browser in order to improve your online experience and show you personalized content. If your y number is ODD, youll start with backwards knots and begin knotting from right to left. Lay your string as if you were going to do a simple two color alpha. The only thing you need to do is use more than one color in the back strings. The circles at the intersections of the strings represent the knots. So if the interior color is on the left, bend it into a backwards 4 (aka backwards knot), and vice versa. We recommended braiding the beginning tail first, as the strands are shorter. Tie the string in somewhere, I usually tie it to my safety pin, but you can do it as you wish. The colors in the preview image correspond to the colors in the chart. Here you can see an alpha pattern with the letter "H": Take some threads of two colors. Again, we find this method to be kind of a pain when having to thread a bobbin or entire yarn skein through a small loop, so here is the same trick as above, but for backwards knots: BACKWARDS KNOTS: TIP FOR KNOTTING WHEN ATTACHED TO BOBBIN/SKEIN. If you want to make alpha bracelets with more than 2 colors, take a look at Multicolored Alpha patterns. You can see that this substitution method is as easy as the two color alpha. i just think they shouldnt be soooooooo picky and this isn't the first time its happened. Two for your back strings, and one for your background. This is my second bracelet tutorial! Copyright 2022 Apple Inc. All rights reserved. So, there are Alpha bracelets and then there are Normal bracelets. Start making forward knots with the background string as on the picture. That means 2 As, 2 Bs, 2 Cs, and 2 Ds. Imagine you just made the black knot to the right, and that you are going to make a downward knot to the left of it. Please use embroidery thread/floss in colors of your choice. Put them in this order : light orange (background string), four gray strings (mushroom stem color) and seven pink strings (mushroom head color). According to our calculations, an average adult-sized alpha-style friendship bracelet is 93 rows. Use the same string but change direction and make two left-knots. Start making the bracelet as you would with simple alpha pattern, make the first row with pink string. If you force the knot back the other way, youll have unwanted bumps on your design. We find this method to be kind of a pain here, though, since threading a bobbin or entire yarn skein through a small loop takes time and can cause tangles, so we came up with this super helpful trick for quick and easy knotting when pulling from a large amount of string/yarn: FORWARDS KNOTS: TIP FOR KNOTTING WHEN ATTACHED TO BOBBIN/SKEIN. These custom word and name friendship bracelets are so sweet to give as gifts or make for yourself. Another great site with friendship bracelet patterns is friendship-bracelets.net. So long as you keep your horizontal intentions in mind as you knot, youll achieve straight rows using forwards and backwards knots. After youve chosen a bracelet pattern and selected your string colors, its time to start making your project. The pattern will use one letter for each color. Good Luck. document.getElementById( "ak_js_2" ).setAttribute( "value", ( new Date() ).getTime() ); About TNTP Privacy Policy Terms & Conditions Shipping and Returns. Now fasten it. I love to see what you make! Friendship bracelets are not only beautiful and interesting, they also carry special meaning for the person who made it and the friend who wears it. To finish off your bracelet, tie a knot below the last row to match the top of your bracelet. Once you learn how to make the four basic friendship bracelet knots, theres no limit to the beautiful patterns you can create! Now grab some Omegacryl and read on to learnhow to make Alpha Friendship Bracelets! If youve made classic friendship bracelets before, youre probably used to knotting your rows on a diagonal. This is how the bracelet should look once you've done both colors, now continue tying from the pattern until the bracelet is long enough. When you get to the third knot (counting from the right), the A pattern tells us it shall be a brown knot there instead of blue. Step-by-step tutorials and videos are available for various patterns at, at least 7 inches total in length to be considered forservice hours, , colorful patterns, including popular patterns such as chevron, spiral, Chinese ladder, zig zag, etc. On the second row, there are some blue downward knots. BraceletBook also contains a To-Do list. You can find it under pattern. It's full of normal & alpha patterns, both easy and hard.
Once you learn to read friendship bracelet patterns, youll be able to make any design you come across. They are slightly inclined in the alpha bracelets compared to the normal fk's and bk's though. Pattern preview image. :grinning: Thanks for posting! Please check your entries and try again. When you generate your pattern, the generator will only provide the segment with the name / word plus a blank row before and after. All Rights Reserved. Site Design by. Complete Guide to Knitting Gauge, and How to Measure It, How to Knit Stockinette Stitch for Beginners, 20 Free Crochet Tank and Crop Top Patterns. Keep knotting back and forth until youve reached the total of 93 rows. Tell me in the comments below! Start with your knotting string (exterior color) on the left and the filler string on the right. You should know that from two color alpha tutorial. Do this normally as you would if it was your background string. Just like with the forwards knot, you can use the regular backwards knot method here (see instructions here), feeding the bobbin or skein through the loop of the knot. As such, youll have to do a little math to figure out how many blank rows to start (and end) with in order to get your pattern centered. i love this app! Just be sure to bring each knot all the way up so that they all line up in a straight row. The following data may be used to track you across apps and websites owned by other companies: The following data may be collected and linked to your identity: The following data may be collected but it is not linked to your identity: Privacy practices may vary, for example, based on the features you use or your age. Do this exactly as shown in the picture. Which of the following best describes your relationship with crafting? For a full explanation of the different types of friendship bracelets knots, with lots of diagrams and pictures, be sure to read How to Tie the 4 Basic Friendship Bracelet Knots. Spell out your name, a loved ones name, a word or phrase of empowerment, or something silly to make the wearer smile. This is how the bracelet should look once you've finished the fourth row. Again, this gets annoying after a while!- I would also like to see the ability to swipe between photos on the photo tab, aswell as photos submitted to a pattern. We cant wait to see what your word and name friendship bracelets say! 1 embroidery thread bracelet = 1 service hourLIMIT 30 BRACELETSPER SUBMISSION PER MONTH. The only knots used in Alpha bracelets are the forward knot and the backward knot. Site Design by Quinn Tempest. Tell us about some of your favorite crafts? I think this would just make things much more easier to use and switch between photos since I usually look at multiple! i restarted the app and the problem was still there. You can tie it anywhere depending on what you're working with. This article will focus on teaching you how to read normal patterns. Before we get into forwards and backwards knots, we have one more bit of math to do to figure out whether your first row will be forwards knots or backwards knots. 2022 The Neon Tea Party. Looking for your next craft project? If you want to make a knot in the background color, you should make one of these left- or right-knots. Something went wrong. Keep reading for my in-depth tutorial that will teach you how to read the friendship bracelet symbols and pattern grids. Pin this post: Save this tutorial to your Pinterest boards so that you can come back to it later. Have fun!! Now this might sound a little bit confusing to some of you, so have a good look at the picture. but it was also edited by
The arrows indicate the type or direction of each knot. This means that you will start your bracelet with the 8 strings arranged in that particular order. Tie right-knots to make blue knots and downward knots to make brown ones. Drop your info below to be the first to know about new products, awesome events, and content you wont wanna miss. All Rights Reserved. Just remember, when a background string meets a letter string the knots should change their direction. Just be sure to bring each knot all the way up so that they all line up in a straight row. This is an even-numbered row, so you wont use the outer two strands. Wed love to see pics when youre done!! The pattern will usually include a small preview image at the top of the chart. You can always change this as you'd like, e.g. This is the first knot with our substituted string. Now make your first gray row as you would with simple two color alpha bracelet. :yum: Alright, now you know the difference between Alphas and Normals!!!!! The first step to making your Alpha Friendship Bracelet is to generate your pattern using this nifty pattern generator on friendship-bracelets.net. Step-by-step tutorials and videos are available for various patterns at Bracelet Book and FriendshipBracelets.net, which notes: "Originally, these colorful bands were invented by native people in Central and South America. Show off your bracelet-making skills, while letting recipients know that you are rooting for them! :grinning: I'm just going over the basics of bracelet making right now for beginners, and this time I'm going to be discussing the 2 types of friendship bracelets! The direction is indicated by the arrow of the first bubble in the row youre working on. Take the gray string and make the last knot over the pink string. So for example, if the background string is going t, For more information of alpha patterns, check out the. ), then move onto the next filler string on the right, knotting around it the same way using the exterior color string. <3. Just be sure to bring each knot all the way up so that they all line up in a straight row. Knot Symbols. i pressed the other photos and nothing happened again. While the knots used are essentially the same as regular friendship bracelets, the approach is slightly different since youre generally using two colors of string, one of which is cut into 7 strands to act mostly as filler for the bracelets knots, and the other color used to do the majority of the knotting to create the background and negative space for the letters. I find it easier this way.
They are explained in the tutorial Multicolor Alpha Bracelets, The knots used are the normal FORWARD knots and the BACKWARD knots. If you want to put arrows on them (like in normal patterns), the arrows would be in the horizontal and vertical direction. Now make four orange forward knots, five pink backward knots and two orange forward knots. :stuck_out_tongue_winking_eye: In my next tutorial we'll start making the actual bracelets! If your y number (as in the number you get when you subtract your pattern rows from 93, then divide by 2) is EVEN you will start with forwards knots and begin knotting from left to right. Looking for even more pattern inspiration? For more experienced bracelet makers, Ive collected an amazing list of advanced friendship bracelet patterns, too. document.getElementById( "ak_js_1" ).setAttribute( "value", ( new Date() ).getTime() ); How to Make Friendship Bracelets - Sarah Maker, [] you can follow to create beautiful designs. Normal patterns are more difficult to design than alpha patterns, however it gets easier as you get more comfortable with bracelet making. Be sure to tag us on Instagram @theneonteaparty and leave any project questions below! For bracelets with an even number of strings, you will see that odd-numbered rows have knots for each pair strings. This will show you how your friendship bracelet will look when you have completed the project. At this point the gray background string is just hanging from the back of your bracelet. So, if your first row is only using a forward knot, then your second row is only using a backward knot, and so on. I am so glad that this helped you! Starting with Row 1, you would make a forward knot, a forward knot, a backward knot, and a backward knot. Imagine you just made the black knot to the left, and that you are going to make a downward knot to the right of it. Now take the red string and make two half-knots (a knot is basically two half-knots) as shown in the picture. Use those two fingers to catch and pull the filler string through the loop. You can also see it as making a forward knot just that you have tilted the pattern 45 degrees. Several of one color for the letters and one of the other color for the background. On the sides of the chart, you will see numbered lines. Interior strings:These will be the color of your letters. The first row will likely be another blank row, so follow that row accordingly. In the third row, make three gray forward knots, and one pink backward knot. We will therefore denote these knots left-, right- and downward knots. According to tradition, you tie a bracelet onto the wrist of a friend who may wish for something at that moment. ), DIY Word & Name (Alpha) Friendship Bracelets, http://friendship-bracelets.net/namepattern.php. (Knot instructions here. These numbers indicate the rows of the pattern. :relaxed: :+1: :sparkles: :cherry_blossom: This is sooooooooooooooooooooooooooooooooooooooo helpful thanks. The bent elbows at the outer edges of even-numbered rows indicate that the two outer strings are not used. With alpha friendship bracelets, your rows are going to be horizontal,however, the knots you use will be the same as classic friendship bracelets! This is a detailed picture of one heart and its back after it's finished, make these hearts until the bracelet is long enough. When you've finished the first letter, you can continue with the next. We have a Reel with our favorite way to join yarn ends for when you run out: https://www.instagram.com/p/CbMGz3oj3Dq/. This is how the bracelet should look once it's finished. Now we are going to substitute the other background color. So if the interior color is on the left, bend it into a backwards 4 (aka backwards knot), and vice versa. Gracie04, CupHearts, iluvmyspud, Kittycat, password1232343, braceletcrazy12, tennischiac95, spiffehgymnast, matiasgroso99, Sareana, funcrazyhelen, Geyn, alexisbadd, Kris10, MashaOrange, piggyfan2, feemis, RockePloeger, Kestrel, k_marie, diana923, MOOONICA, moderna2009, Foz, Braceletdude, Matina, CherryBelle, manejapis, HarleyMama23, heartzeinab, jess0027, kleinevos and Masha_Knots. The original author of this tutorial is Stefan These videos below shows you how to do it while the rest of the tutorial tries to explain it. And mine always gets denied the first couple times because my light was off or my photo was blurry and honestly the photos arent that bad, yes they arent the best, but Im not a professional photographer and thats not what this app is about. Example: Take a look at the image in the next section. You can find it on braceletbook as pattern. Sorry to bore you with all this text. Thanks for subscribing! To print your pattern, we recommend screenshotting it to save the file and print it. easy trick for remembering which knot to do when is to bend the knotting strand so that you can place the horizontal part on the interior strand. In this tutorial, we limit ourselves to two colors. Take the two strings that are on the left, and tie them together with a simple forward knot. The final step is to braid both ends of your bracelet, separating the tail strands into three groups, braiding them together and securing each braid with a knot. Her work has been featured in The New York Times, Scientific American, Good Housekeeping, Vox, Apartment Therapy, Lifehacker, and more. I usually tie my to my safety pin, which I'm using to hold my bracelet on my knee. Follow the pattern in step 1 until row 2 is finished. 1. get 11 strings of different colors 2. tie them together and tape it to a table or put it on a clipboard 3. get a long piece (i mean it LONG) and tape it (or clip it) next to the 11 strings 4. fk 11 across 5. that is the start, i will give you the lines now line 1: 11 line 2: 8, 1, 2 line 3: 4, 1, 2, 1, 1, 1, 1 line 4: 3, 1, 3, 1, 1, 1, 1 line 5: 3, 1, 3, 2, 2, line 6: 2, 6, 2 line 7: 1, 1, 1, 1, 4, 1, 2 line 8: 1, 1, 1, 1, 4, 1, 2 line 9: 2, 1, 6, 1, 1 line 10: 9, 1, 1 line 11: 11. So, you've got 8 pink strings, and one long gray string. Please follow these steps to ensure your work is received! This will be the first row of the pattern in the letter A (see step 1). Hold the filler string straight and pull up on the knotting string to bring the knot to the top of your bracelet and tighten. My favorite place to look for patterns is a website called BraceletBook. Working one row at a time, make the knots as indicated by the circled arrows. 1 embroidery thread bracelet = 1 service hour, Show off your bracelet-making skills, while letting recipients know that you are rooting for them! They can use anywhere from only 1 knot to all 4 knots. An alpha pattern will generally look like this: So those are the basics of alpha patterns. Some are even made with beads woven into the design. The one problem is when you have made the bracelet you can post a picture of it with the pattern and of course people have to approve the picture (make sure it is appropriate yada yada) however, it takes them forever to approve or deny it. You simply click on the "Add To-Do" button and you'll never forget what bracelet you wanted to make for your friend!
To create the knots within your letters, youre essentially going to do the opposite knot as the direction of the exterior knots on the same line that you are working on. Strings. In this way you can choose color of the next knots. English subtitles are provided. Now make three orange backward knots, four pink forward knots and four orange backward knots. This tutorial will not teach how to make bracelets with more than 2 colors. Hold the filler string straight and pull up on the knotting string to bring the knot to the top of your bracelet and tighten. After whipping up a batch of these, we figured out some super helpful tricks and tips to make these sweet personalized bracelets a breeze to create. You can use filters to find patterns that match your skills, which makes finding the right ones much easier. For more information, see the developers privacy policy. The developer, Sandbox s.r.o., indicated that the apps privacy practices may include handling of data as described below. If you accidentally tie your knot to go in the wrong direction (youll see your string change direction by the natural positioning of the knot) carefully undo it with a safety pin or needle. Leave a longer tail so that you will be able to tie the bracelet on to your wrist. Trim off excess tail string to finish! This is the whole row, all that we've done is simply use a new string. LearnMore, Amigurumi Today - crochet patterns and tutorials. This is the last row in this pattern, make the whole row with orange knots and then repeat the pattern until the bracelet is long enough. Repeat this exact process using the same two strings (as friendship bracelet knots are formed by two consecutive knots!
The cool thing about Alphas is that anything you can draw in a grid, you can make into a bracelet. Repeat this exact process using the same two strings (as friendship bracelet knots are formed by two consecutive knots!
When you reach the end of the row, start making backward knots and again, upon reaching the end, make forward knots in the next row until you reach the place where there should be a letter. In the second row, make two grey backward knots, two pink forward knots, and four grey backward knots. How do I join a new skein? The bracelet should be worn until it is totally worn-out and falls off by itself, at which moment the wish is supposed to come true.".