For gross removal of paint and rust you may want maximum pressure on the blaster (do not exceed 125 psi safe pressure limit). All rights reserved.No portion of this manual or any artwork contained herein may be reproduced in any shape or form without the express written consent of Harbor Freight Tools. Step2: Slide the HANDLE GRIPS onto the HANDLE BARS.  At 60 psi it will work to remove paint and mild rust, but it works much better (more aggressively) with 75-psi or higher pressure. Do not reach over or across running machines. One hour with the shop vac and a few paper towels had it almost back to just normally dusty and acceptable for more restoration work. The grit goes everywhere, so don't have an open engine or gearbox in the room when doing this. TO PREVENT SERIOUSINJURY FROM ACCIDENTAL OPERATION:close all Valves, detach the air supply, safely discharge any residual air pressure in the Soda Blaster, and close all Valves again before performing any procedure in this section. If you disconnect the supply hose, then open the shut-off valve, tank pressure will force backflow of air at the input coupling. Likewise, always open the air control valve before opening the media control valve.
Drain the moisture filter regularly. Exposure to crystalline silica may cause silicosis (a serious lung disease), cancer and death. A rather LARGE air compressor is best to run the blaster. It is used to alert you to potential personal injury hazards. But then I was pleasantly surprised to discover how easy it was to clean up, at least in the areas I could reach and touch. Let the tool do the work. Then store the Soda Blaster indoors out of childrens reach. Personal Equipment, Dirt and Cleanup:
If our inspection verifies the defect, we will either repair or replace the product at our election or we may elect to refund the purchase price if we cannot readily and quickly provide you with a replacement. Pull back on the blue Air Hose Connector collar and insert the Air Hose deep into the fitting. Hints for use:
If you find the blaster to work well at 80-90 psi, you may want to reduce the input supply pressure not to exceed 90 psi, as higher pressure will consume more air than necessary and reduce productivity (available trigger time).
But then I was pleasantly surprised to discover how easy it was to clean up, at least in the areas I could reach and touch. Let the tool do the work. Then store the Soda Blaster indoors out of childrens reach. Personal Equipment, Dirt and Cleanup:
If our inspection verifies the defect, we will either repair or replace the product at our election or we may elect to refund the purchase price if we cannot readily and quickly provide you with a replacement. Pull back on the blue Air Hose Connector collar and insert the Air Hose deep into the fitting. Hints for use:
If you find the blaster to work well at 80-90 psi, you may want to reduce the input supply pressure not to exceed 90 psi, as higher pressure will consume more air than necessary and reduce productivity (available trigger time).  NEITHER THE MANUFACTURER OR DISTRIBUTOR MAKES ANY REPRESENTATION OR WARRANTY OF ANY KIND TO THE BUYER THAT HE OR SHE IS QUALIFIED TO MAKE ANY REPAI THE PRODUCT, OR THAT HE OR SHE IS QUALIFIED TO REPLACE ANY PARTS OF THE PRODUCT.
The shop vac will clean a smooth floor in a single pass. Always use a NIOSH (National Institute for Occupational Safety and Health) approved respirator and safety goggles. If abnormal vibration occurs, stop immediately.
I was walking around in the grit and not wanting to touch anything. There will be no attempt here to turn an amateur blast operator into a skilled professional by words alone. blaster pressure alc allsource Turn on the air compressor according to the manufacturers directions and allow it to build up pressure until it cycles off. This unit does not otherwise have its own input pressure regulator. )4I|}$-U~J)UDs UVrGAk?zT&fTBAx kfxj~# . Hy(g)GILS>*+t# Keep proper footing and balance at all times. When unpacking, make sure that the product is intact and undamaged. This O-ring must be in place before the cap is installed and tightened. At time of this writing the canvas hood and filling funnel are missing. The fine grade is good for light paint and rust removal. 40 LB.
  Specify UPC number when ordering:40 lb. abrasive capacity for big jobs. Proof of purchase date and an explanation of the complaint must accompany the merchandise. Install an in-line shutoff valve to allow immediate control over the air supply in an emergency, even if a hose is ruptured. Do not carry tools by the cord. Intake Manifold Refer to Figure 1.
 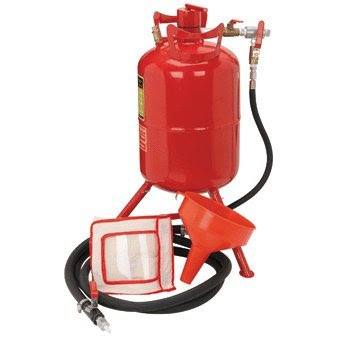 60-125 PSI 6-25 CFM 33.5" x 18.75" x 13" 57 lbs. -----------------
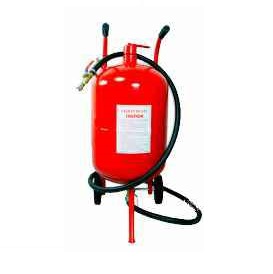
Air consumption for the blaster will be nearly proportional to the pressure being used. This unit is on the larger end of the scale for a home shop blaster. Due to continuing improvements, actual product may differ slightly from the product described herein. Overall dimensions: 40''H x 24''L x 15''W
60-125 PSI 6-25 CFM 33.5" x 18.75" x 13" 57 lbs. -----------------
Air consumption for the blaster will be nearly proportional to the pressure being used. This unit is on the larger end of the scale for a home shop blaster. Due to continuing improvements, actual product may differ slightly from the product described herein. Overall dimensions: 40''H x 24''L x 15''W
 To minimize damage to the work surface use the least pressure necessary to get the job done, or more pressure to work faster. The SAND HOSE needs replacing when its side walls develop leaks or show blisters in the surface. Available in multiple grit grades, Utility, Medium, Fine, and Extra Fine. Step 2: Attach the FOOT to the TANK (#1) using one of the COTTER PINS. sand gallon blaster blast gal (plus media fill weight)
central pneumatic blaster abrasive pressurized lb sand pressurized abrasive blaster When I finally take the body off the car for underbody painting there will be more grit on the heater shelf, under and around the engine, and on the suspension parts. Do not set the pressure higher than 90 PSI. After several minutes, remove the abrasive from the newspaper. Otherwise you can open the media control valve a little more to have more media flow to the nozzle. ]ze. Proceed at your own risk. 497A""
A"TD
.j?,\~gO.v ?@&)34q~: e y@2$J B H- 3"Kd P3. To reduce vibration, maintain tool as explained in this manual. Step1: Get out the TANK (#1), the SAND CONTROL VALVE (#18B), two NIPPLE CONNECTORS (#16), and the SAND OUTLET MANIFOLD (#22). Do not use oxygen, carbon dioxide, combustible gases, or any other bottled gas as a power source for this Soda Blaster. Read the ENTIRE IMPORTANT SAFETY INFORMATION section at the beginning of this manual including all text under subheadings therein before set up or use of this product. The blast spot on the work surface will be 1/8 to 1/4 inch diameter depending on distance of the blast nozzle from the surface.
To minimize damage to the work surface use the least pressure necessary to get the job done, or more pressure to work faster. The SAND HOSE needs replacing when its side walls develop leaks or show blisters in the surface. Available in multiple grit grades, Utility, Medium, Fine, and Extra Fine. Step 2: Attach the FOOT to the TANK (#1) using one of the COTTER PINS. sand gallon blaster blast gal (plus media fill weight)
central pneumatic blaster abrasive pressurized lb sand pressurized abrasive blaster When I finally take the body off the car for underbody painting there will be more grit on the heater shelf, under and around the engine, and on the suspension parts. Do not set the pressure higher than 90 PSI. After several minutes, remove the abrasive from the newspaper. Otherwise you can open the media control valve a little more to have more media flow to the nozzle. ]ze. Proceed at your own risk. 497A""
A"TD
.j?,\~gO.v ?@&)34q~: e y@2$J B H- 3"Kd P3. To reduce vibration, maintain tool as explained in this manual. Step1: Get out the TANK (#1), the SAND CONTROL VALVE (#18B), two NIPPLE CONNECTORS (#16), and the SAND OUTLET MANIFOLD (#22). Do not use oxygen, carbon dioxide, combustible gases, or any other bottled gas as a power source for this Soda Blaster. Read the ENTIRE IMPORTANT SAFETY INFORMATION section at the beginning of this manual including all text under subheadings therein before set up or use of this product. The blast spot on the work surface will be 1/8 to 1/4 inch diameter depending on distance of the blast nozzle from the surface.  Use Media Regulator Knob to adjust the media flow rate. The warnings and precautions discussed in this manual cannot cover all possible conditions and situations that may occur. Remove entire media discharge assembly slowly, being careful with the Pickup Tube (11) as it may contain residual media which can spill when removed. My expedient repair was to apply a couple turns of vinyl tape to the hose and switch ends to put a clean part of the hose under the shut-off pin. NOTE: For additional information regarding the parts listed in the following pages, refer to the Assembly Diagram near the end of this manual. sand abrasive Use tools with the lowest vibration when there is a choice. Somewhat expensive at $19.95 for 20-25 pounds. Can be found for about $9 for 25#. Anyone using vibrating tools regularly or for an extended period should first be examined by a doctor and then have regular medical check-ups to ensure medical problems are not being caused or worsened from use. If you disconnect the air supply and relieve the tank pressure, then re-pressurizing the tank will require some air flow from the compressor before continuing operation. This is the safety alert symbol. Trouble shooting:
Obey the manual for the air compressor used to power this Soda Blaster. Route the air hose along a safe route to reach the work area without creating a tripping hazard or exposing the air hose to possible damage. IN FACT, THE MANUFACTURER AND/OR DISTRIBUTOR EXPRESSLY STATES THAT ALL REPAIRS AND PARTS REPLACEMENTS SHOULD BE UNDERTAKEN BY CERTIFIED AND LICENSED TECHNICIANS, AND NOT BY THE BUYER. Use respiratory protection when source controls cannot keep silica exposures below the NIOSH REL.
Use Media Regulator Knob to adjust the media flow rate. The warnings and precautions discussed in this manual cannot cover all possible conditions and situations that may occur. Remove entire media discharge assembly slowly, being careful with the Pickup Tube (11) as it may contain residual media which can spill when removed. My expedient repair was to apply a couple turns of vinyl tape to the hose and switch ends to put a clean part of the hose under the shut-off pin. NOTE: For additional information regarding the parts listed in the following pages, refer to the Assembly Diagram near the end of this manual. sand abrasive Use tools with the lowest vibration when there is a choice. Somewhat expensive at $19.95 for 20-25 pounds. Can be found for about $9 for 25#. Anyone using vibrating tools regularly or for an extended period should first be examined by a doctor and then have regular medical check-ups to ensure medical problems are not being caused or worsened from use. If you disconnect the air supply and relieve the tank pressure, then re-pressurizing the tank will require some air flow from the compressor before continuing operation. This is the safety alert symbol. Trouble shooting:
Obey the manual for the air compressor used to power this Soda Blaster. Route the air hose along a safe route to reach the work area without creating a tripping hazard or exposing the air hose to possible damage. IN FACT, THE MANUFACTURER AND/OR DISTRIBUTOR EXPRESSLY STATES THAT ALL REPAIRS AND PARTS REPLACEMENTS SHOULD BE UNDERTAKEN BY CERTIFIED AND LICENSED TECHNICIANS, AND NOT BY THE BUYER. Use respiratory protection when source controls cannot keep silica exposures below the NIOSH REL.
Post signs to warn workers about the hazard and to inform them about required protective equipment. All rights reserved. blaster abrasive pressurized harborfreight I didn't like the heavy spring loaded blast control valve. Inspect compressors cord periodically and, if damaged, have them repaired by an authorized technician.
Do not smoke during use. Tool weight: 57 lbs.
hbbd```b`` D(HT x4DDT@d "YK&HI@|=[`3Fg` x&
endstream
endobj
startxref
0
%%EOF
104 0 obj
<>stream
It will work with a smaller compressor, but with a shortened duty cycle.
I didn't like the heavy spring loaded blast control valve. Inspect compressors cord periodically and, if damaged, have them repaired by an authorized technician.
Do not smoke during use. Tool weight: 57 lbs.
hbbd```b`` D(HT x4DDT@d "YK&HI@|=[`3Fg` x&
endstream
endobj
startxref
0
%%EOF
104 0 obj
<>stream
It will work with a smaller compressor, but with a shortened duty cycle.  Record products Serial number Here: _______________________, Note: If product has no serial number, record month and year of purchase instead.Note: Some parts are listed and shown for illustration purposes only, and are not available individually as replacement parts. Pull back on the blue Air Hose Connector (8) collar and pull out Air Hose (15). DO NOT ABUSE THE POWER CORD. Read and understand the 10 recommended measures below to reduce crystalline silica exposures in the workplace and prevent silicosis and silicosis related deaths. When removing paint or light rust from sheet metal you may need to reduce air pressure and use finer grain blast media to prevent excess damage to the work piece. ?,)rD&7hgq/X~s(8$b+>gT ?iadZgg[%C'Btt;LL|D( IEZT{%"F$Z)D?DCS*NEB('TF8*Du1@!d$4 Using a funnel, pour media into the Tank. I would say read the entire user's manual, except that it is missing, so my best advice now is to read this entire memo before using the sand blaster. With pressure still on the blast head you may poke a wire into the ceramic nozzle, and with luck this may clear the clog. PRESSURIZED SANDBLASTER ASSEMBLY and OPERATING INSTRUCTIONS 3491 Mission Oaks Blvd. Prohibit silica sand (or other substances containing more than 1% crystalline silica) as an abrasive blasting material and substitute less hazardous materials. cabinet blast pneumatic central floor lb sandblast capacity sand blasting sandblasting grizzly benchtop cheap tools coating powder At 50 psi this unit stops supplying abrasive material. When the lever is pressed the pin is retracted so the hose can open up to full bore for clear passage of air and media grit to the blast nozzle. allsource blaster abrasive pressure deadman lb capacity handle roll number On the chance that a clog may still persist in the head or hose, you may have to disconnect the blast head from the hose to blow out the hose. That pressure is non functional with this unit, but it indicates a rough air consumption figure of 9.0-scfm @ 45-psi. This may be enough media flow to do your job. If you want to sweep up and recycle the abrasive media you would need to sift it through a window screen to remove any large trash particles that would clog up the blast nozzle. Efficient pressurized blaster moves abrasives at 80 to 90 percent of air speed for real blasting power. Excess moisture will cause the abrasive to slow or stop flowing through the Abrasive Outlet Pipe. 3 2 3 5 2 4 3 Figure 8 - Wheel and Foot Attachment Step 1: Get out the two WHEELS (#2), the three COTTER PINS (#3), the FOOT (#4) and the AXLE (#5). Remove the Compression Nut (2) from the Air Regulator (9).
  Sand Control Valve (#18B) Step3: Attach the SAND CONTROL VALVE to the other end of the NIPPLE CONNECTOR. sandblaster abrasives There must not be hazardous objects (such as utility lines or foreign objects) nearby that will present a hazard while working. Step 1: Check to insure the abrasives are dry and clean so that they do not clog the unit. shape or form without the express written consent of Harbor Freight Tools. Empty the Tank, and clean external surfaces of the Soda Blaster with clean, dry cloth. 22.
  For fine finishing work there are lots of alternate media types available such as glass or plastic beads or ground walnut shells. For technical questions and replacement parts, please call 1-800-444-3353. The fill neck has a fat O-ring seal on a depressed shoulder at the base of the thread. Sand Hose Sand Control Valve Assembly Hose Clamp (#23) Nozzle Shut Off Valve Assembly Figure 5 Sand Control Valve / Shut Off Valve Assembly Step1: Get out the Sand Control Valve & Nozzle Shut Off Valve Assemblies, the SAND HOSE (#24), and the two HOSE CLAMPS (#23).
  If you close all the valves and walk away it is likely to lose tank pressure through the media control valve and blast head.
The media control valve at the bottom of the tank seems to leak a little when shut off, probably due to being constantly exposed to the abrasive material.
if any problems are found, do not use Soda Blaster until repaired. To correct: To prevent accidents, close the Valves on the Soda Blaster, detach the air supply, safely discharge any residual air pressure in the Soda Blaster, and close the Valves again. Attach Bracket (3) to the Tank (1) using the two Socket Head Screws (4) and wrench tighten. Harbor freight tools central pneumatic series 40 lb pressurized sandblaster model 34202 assembly and operating instructions, 3491 Mission Oaks Blvd. Step2: Slide the HOSE CLAMPS over either side of the SAND HOSE. Keep tools sharp and clean for better and safer performance. sandblaster hopper gun I bought Aluminum Oxide abrasive blast media from Harbor Freight. Do not allow pressure to exceed 125 PSI. Indicates a hazardous situation which, if not avoided,will result in death or serious injury. Exposure to aluminum oxide (a dust generated from material removing processes) can result in eye, skin and breathing irritation. Designate a work area that is clean and well-lit. cabinet blast homak abrasive table gallon sandblaster blasting blaster sand tank industrial air To reduce the risk of vibration-related injury: Read theENTIRE IMPORTANT SAFETY INFORMATION section at the beginning of this manual including all text under subheadings therein before set up or use of this product. It works well for general use, but for lots of heavy rust removal I might prefer something more coarse. Change the nozzle as needed to suit the abrasive. This setup had a problem when I first used it, as the blast head would sometimes clog easily and repeatedly. Even then you would have your hair and ears full of gritty dust. Do not use the abrasive if the newspaper is moist. Do not use if any of these problems are present. Coarser material tends to clog up the nozzle on smaller blaster units (including this one).
"Black Beauty" (a registered trademark of Harsco Corporation): A coal slag abrasive material for use in removing paint and rust from steel and concrete. If the clog persists, then you may need to shut off the blast air and remove the nozzle for cleaning. For grit and dust on or inside the car, doing it outdoors may not make much difference (but it would keep the shop clean). Do not yank compressors cord to disconnect it from the receptacle.
As such it will work with 50%-60% duty cycle with my compressor, giving one minute of trigger time Notice the pressure rating and air flow requirements. If excessive air pressure is used, or Media Regulator becomes clogged, the Safety Valve may open, releasing air pressure.
 If you want to disconnect the air supply coupling, close the input air valve before disconnecting to retain air pressure in the tank. Conduct air monitoring to measure worker exposures. Description and air requirements:
When you release the control lever a spring loaded blunt nose pin crushes the hose to shut off air flow. Spray the abrasive media onto the work material, moving the Nozzle from side to side. angle sander polisher angle sander polisher angle sander polisher (10 pages), 6" self-vacuuming air palm sander (16 pages), Heavy duty air oscillating sander (11 pages), Manual will be automatically added to "My Manuals", Assembly and operating instructions manual, Sand Control Valve/ Nozzle Shut off Valve, Sander Central Pneumatic 35245 Assembly And Operating Instructions Manual, Sander Central Pneumatic CENTRAL PNEUMATIC 91773 Owner's Manual, Sander Central Pneumatic 66881 Set Up And Operating Instructions Manual, Sander Central Pneumatic 68152 Owner's Manual And Safety Instructions, Sander Central Pneumatic 93629 Assembly And Operating Instructions Manual, Sander Central Pneumatic 93742 Assembly And Operating Instructions Manual, Sander Central Pneumatic 42966 Assembly And Operating Instructions Manual, Sander Central Pneumatic 97055 Set Up And Operating Instructions Manual, Sander Central Pneumatic 91773 Set Up And Operating Instructions Manual, Sander Central Pneumatic 65173 Set Up And Operating Instructions Manual, Sander Central Pneumatic 93050 Assembly And Operating Instructions Manual, Sander Central Pneumatic 98895 Owner's Manual & Safety Instructions, Sander Central Pneumatic 96989 Set Up And Operating Instructions Manual, Sander Central Pneumatic 96445 Operation Instructions Manual, Sander Central Pneumatic 96573 Set Up And Operating Instructions Manual. Turn on the compressor and set the regulator to the pressure recommended for this Soda Blaster (90 PSI). blaster abrasive pressurized central lb pneumatic freight harbor sand tools sandblasting sandblaster kit blast portable deals pressure kx paint housewares Otherwise, isolate the workpiece to make sure no damage can occur to nearby personal property. Always disconnect the air supply and relieve tank pressure before attempting to remove the top fill cap from the media tank. Water Trap Refer to Figure 2. The grit was mostly limited to areas below shoulder level where it's not hard to reach, except it gets underneath things that need to be moved for clean up. pressurized abrasive lb pneumatic itc coupons valid Addresses practices not related to personal injury. DO NOT OVERREACH. MAINTENANCE 1. I haven't found a user manual or parts list yet, but this unit is nearly identical to a Central Pneumatic pressurized sand blaster #38375 from Harbor Freight. Cautions and Warnings first:
Wheels and Foot See Figure 8. Nipple Connector (#16) Joint Pipe (#13) Air Cap (#12) Gasket (#11) Tank (#1) Nipple Connector (#16) Air Hose (#21) Figure 6 Top Assembly Step1: Get the Intake Valve Assembly, the Water Trap Assembly, the Tank Assembly, the TANK CAP (#12), the O-RING (#11), and the AIR HOSE (#21). Follow instructions for lubricating and changing accessories. THE MANUFACTURER AND/OR DISTRIBUTOR HAS PROVIDED THE PARTS LIST AND ASSEMBLY DIAGRAM IN THIS MANUAL AS A REFERENCE TOOL ONLY. They had 80 grit and 70 grit. blaster sand homemade homemadetools advertisement Pregnant women or people who have impaired blood circulation to the hand, past hand injuries, nervous system disorders, diabetes, or Raynauds Disease should not use this tool. Be nice and clean any grit away from the O-ring gland to preserve life of the seal. 23n`H`3`0c`0u#"2W/
3f@4.
If you want to disconnect the air supply coupling, close the input air valve before disconnecting to retain air pressure in the tank. Conduct air monitoring to measure worker exposures. Description and air requirements:
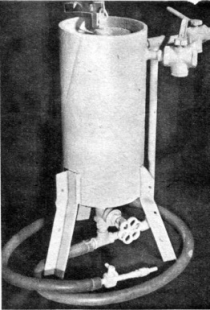
When you release the control lever a spring loaded blunt nose pin crushes the hose to shut off air flow. Spray the abrasive media onto the work material, moving the Nozzle from side to side. angle sander polisher angle sander polisher angle sander polisher (10 pages), 6" self-vacuuming air palm sander (16 pages), Heavy duty air oscillating sander (11 pages), Manual will be automatically added to "My Manuals", Assembly and operating instructions manual, Sand Control Valve/ Nozzle Shut off Valve, Sander Central Pneumatic 35245 Assembly And Operating Instructions Manual, Sander Central Pneumatic CENTRAL PNEUMATIC 91773 Owner's Manual, Sander Central Pneumatic 66881 Set Up And Operating Instructions Manual, Sander Central Pneumatic 68152 Owner's Manual And Safety Instructions, Sander Central Pneumatic 93629 Assembly And Operating Instructions Manual, Sander Central Pneumatic 93742 Assembly And Operating Instructions Manual, Sander Central Pneumatic 42966 Assembly And Operating Instructions Manual, Sander Central Pneumatic 97055 Set Up And Operating Instructions Manual, Sander Central Pneumatic 91773 Set Up And Operating Instructions Manual, Sander Central Pneumatic 65173 Set Up And Operating Instructions Manual, Sander Central Pneumatic 93050 Assembly And Operating Instructions Manual, Sander Central Pneumatic 98895 Owner's Manual & Safety Instructions, Sander Central Pneumatic 96989 Set Up And Operating Instructions Manual, Sander Central Pneumatic 96445 Operation Instructions Manual, Sander Central Pneumatic 96573 Set Up And Operating Instructions Manual. Turn on the compressor and set the regulator to the pressure recommended for this Soda Blaster (90 PSI). blaster abrasive pressurized central lb pneumatic freight harbor sand tools sandblasting sandblaster kit blast portable deals pressure kx paint housewares Otherwise, isolate the workpiece to make sure no damage can occur to nearby personal property. Always disconnect the air supply and relieve tank pressure before attempting to remove the top fill cap from the media tank. Water Trap Refer to Figure 2. The grit was mostly limited to areas below shoulder level where it's not hard to reach, except it gets underneath things that need to be moved for clean up. pressurized abrasive lb pneumatic itc coupons valid Addresses practices not related to personal injury. DO NOT OVERREACH. MAINTENANCE 1. I haven't found a user manual or parts list yet, but this unit is nearly identical to a Central Pneumatic pressurized sand blaster #38375 from Harbor Freight. Cautions and Warnings first:
Wheels and Foot See Figure 8. Nipple Connector (#16) Joint Pipe (#13) Air Cap (#12) Gasket (#11) Tank (#1) Nipple Connector (#16) Air Hose (#21) Figure 6 Top Assembly Step1: Get the Intake Valve Assembly, the Water Trap Assembly, the Tank Assembly, the TANK CAP (#12), the O-RING (#11), and the AIR HOSE (#21). Follow instructions for lubricating and changing accessories. THE MANUFACTURER AND/OR DISTRIBUTOR HAS PROVIDED THE PARTS LIST AND ASSEMBLY DIAGRAM IN THIS MANUAL AS A REFERENCE TOOL ONLY. They had 80 grit and 70 grit. blaster sand homemade homemadetools advertisement Pregnant women or people who have impaired blood circulation to the hand, past hand injuries, nervous system disorders, diabetes, or Raynauds Disease should not use this tool. Be nice and clean any grit away from the O-ring gland to preserve life of the seal. 23n`H`3`0c`0u#"2W/
3f@4.
 A possible short use alternative is a pillow case with a site hole cut out and fully closed goggles. Keep the input valve and air control valve wide open at all times when blasting. Step1: Get out the INTAKE MANIFOLD (#14), PRESSURE GAUGE (#15), BRASS THROTTLING VALVE (#18A), 3/8" 1/4" NIPPLE CONNECTOR (#20), and JOINT PIPE (#13). WARNING! Screw the Pressure Gauge into the opening in the face of the Air Regulator (9). 110 lb. --------------
Step2: Attach the 3/8" NIPPLE CONNECTORS to either side of the WATER TRAP. pneumatic blaster central abrasive pressurized lb sand If the nozzle control valve does not shut off completely, then close the air control valve before removing the nozzle. Make sure all joints are securely tighten. WARNING When using tools, basic precautions should always be followed, including the following: To reduce the risks of electric shock, fire, and injury to persons, read all the instructions before using the tool. We will return repaired products at our expense, but if we determine there is no defect, or that the defect resulted from causes not within the scope of our warranty, then you must bear the cost of returning the product. There is an air supply shut-off valve at the input air coupler, followed by a water separator filter and pressure gauge. Provide workers with training that includes information about health effects, work practices and protective equipment for crystalline silica. MAINTAIN CORRECT AIR PRESSURE WHENEVER WORKING. Turn PRESSURE GAUGE so that its face is over the lower side hold of the INTAKE MANIFOLD. Report all cases of silicosis to State health departments and to OSHA or the Mine Safety and Health Administration (MSHA). Other components, such as a coupler plug and quick coupler, will make operation more efficient, but are not required.
A possible short use alternative is a pillow case with a site hole cut out and fully closed goggles. Keep the input valve and air control valve wide open at all times when blasting. Step1: Get out the INTAKE MANIFOLD (#14), PRESSURE GAUGE (#15), BRASS THROTTLING VALVE (#18A), 3/8" 1/4" NIPPLE CONNECTOR (#20), and JOINT PIPE (#13). WARNING! Screw the Pressure Gauge into the opening in the face of the Air Regulator (9). 110 lb. --------------
Step2: Attach the 3/8" NIPPLE CONNECTORS to either side of the WATER TRAP. pneumatic blaster central abrasive pressurized lb sand If the nozzle control valve does not shut off completely, then close the air control valve before removing the nozzle. Make sure all joints are securely tighten. WARNING When using tools, basic precautions should always be followed, including the following: To reduce the risks of electric shock, fire, and injury to persons, read all the instructions before using the tool. We will return repaired products at our expense, but if we determine there is no defect, or that the defect resulted from causes not within the scope of our warranty, then you must bear the cost of returning the product. There is an air supply shut-off valve at the input air coupler, followed by a water separator filter and pressure gauge. Provide workers with training that includes information about health effects, work practices and protective equipment for crystalline silica. MAINTAIN CORRECT AIR PRESSURE WHENEVER WORKING. Turn PRESSURE GAUGE so that its face is over the lower side hold of the INTAKE MANIFOLD. Report all cases of silicosis to State health departments and to OSHA or the Mine Safety and Health Administration (MSHA). Other components, such as a coupler plug and quick coupler, will make operation more efficient, but are not required.
 If the Soda Blaster requires more force to accomplish the task, verify that the Soda Blaster receives sufficient, unobstructed airflow (CFM) and increase the pressure (PSI) output of the regulator up to the maximum air pressure rating of this Soda Blaster. The grit and dirt does get into everything, but it does not stick firmly to anything (except grease or oily items). WARNING! hb```"3 Ab@Oa{$TXRZM
w(2OLyT0kWG;DW
O',s8V,a0If"m^"[=%$raD1CbE A
+b-|u!n p2wT,BYu.;R^~P\ -`J{tqeojJS+Aj4KAjP Pressure in the tank is normally somewhat offset by pressure in the venturi supply circuit. Removing heavy rust from steel parts is a cinch, as it can ultimately remove steel from steel parts. The hose is contained in a close fitting bore of the valve housing, so the tape repair may survive for a long time. Hold collar on Tank (1) with a wrench and use another wrench to loosen Bushing (10). Step 5: Remove the TANK CAP (#12). 1. Always wear your hood, dust mask, and heavy-duty canvas Step 2: Close the AIR SUPPLY VALVE (#18) by turning it to gloves when operating the the horizontal position. If the blast nozzle becomes clogged during use, immediately close the media control valve at bottom of the tank. SPECIFICATIONS Capacity: Working Pressure Delivery Rate Overall Dimensions Weight: 40 lbs. Equipped with a nozzle end shut-off valve, pressure gauge, ceramic nozzle, 9 foot hose, filling funnel, water trap, 6" rubber wheels, and canvas hood. Practice good personal hygiene to avoid unnecessary exposure to silica dust. The nozzle control valve on this unit has a thin wall rubber hose inside of a heavy plastic housing. *qrV
myU6L3hK>(cBeLgthF2Wjj}4UFH
/ *
endstream
endobj
80 0 obj
<>stream
Obey all safety messages that follow this symbol to avoid possible injury or death. followed by one minute of pressure recovery time for the compressor.
If the Soda Blaster requires more force to accomplish the task, verify that the Soda Blaster receives sufficient, unobstructed airflow (CFM) and increase the pressure (PSI) output of the regulator up to the maximum air pressure rating of this Soda Blaster. The grit and dirt does get into everything, but it does not stick firmly to anything (except grease or oily items). WARNING! hb```"3 Ab@Oa{$TXRZM
w(2OLyT0kWG;DW
O',s8V,a0If"m^"[=%$raD1CbE A
+b-|u!n p2wT,BYu.;R^~P\ -`J{tqeojJS+Aj4KAjP Pressure in the tank is normally somewhat offset by pressure in the venturi supply circuit. Removing heavy rust from steel parts is a cinch, as it can ultimately remove steel from steel parts. The hose is contained in a close fitting bore of the valve housing, so the tape repair may survive for a long time. Hold collar on Tank (1) with a wrench and use another wrench to loosen Bushing (10). Step 5: Remove the TANK CAP (#12). 1. Always wear your hood, dust mask, and heavy-duty canvas Step 2: Close the AIR SUPPLY VALVE (#18) by turning it to gloves when operating the the horizontal position. If the blast nozzle becomes clogged during use, immediately close the media control valve at bottom of the tank. SPECIFICATIONS Capacity: Working Pressure Delivery Rate Overall Dimensions Weight: 40 lbs. Equipped with a nozzle end shut-off valve, pressure gauge, ceramic nozzle, 9 foot hose, filling funnel, water trap, 6" rubber wheels, and canvas hood. Practice good personal hygiene to avoid unnecessary exposure to silica dust. The nozzle control valve on this unit has a thin wall rubber hose inside of a heavy plastic housing. *qrV
myU6L3hK>(cBeLgthF2Wjj}4UFH
/ *
endstream
endobj
80 0 obj
<>stream
Obey all safety messages that follow this symbol to avoid possible injury or death. followed by one minute of pressure recovery time for the compressor.
More notes on media type below. If you have a smaller compressor (less than 15-scfm supply), there may be large swings in system pressure during use. Instructions with the sand blaster call for using a hood, which is a canvas full head cover with a clear shield in front. The fuzzy round brush attachment for the shop vac did a nice job of cleaning out the car interior and all over the car body and everything I could reach in the boot and engine bay (and anything else I could reach on the work bench and shelves. Performing routine air supply maintenance will allow the Soda Blaster to operate more safely and will also reduce wear on the Soda Blaster. Allow time for the trapped aggregate to safely discharge back into the Tank. It may be appropriate to order a replacement hose for the inside of this control head, along with a few spare ceramic nozzles. Blasting technique should become readily apparent with only a little use.
Repair any leaks found. If you buy it without knowing the grit grade you are likely to get the coarser grade. Attach all accessories properly to the Soda Blaster before connecting the air supply.
At 60 psi it will work to remove paint and mild rust, but it works much better (more aggressively) with 75-psi or higher pressure. Do not reach over or across running machines. One hour with the shop vac and a few paper towels had it almost back to just normally dusty and acceptable for more restoration work. The grit goes everywhere, so don't have an open engine or gearbox in the room when doing this. TO PREVENT SERIOUSINJURY FROM ACCIDENTAL OPERATION:close all Valves, detach the air supply, safely discharge any residual air pressure in the Soda Blaster, and close all Valves again before performing any procedure in this section. If you disconnect the supply hose, then open the shut-off valve, tank pressure will force backflow of air at the input coupling. Likewise, always open the air control valve before opening the media control valve. Drain the moisture filter regularly. Exposure to crystalline silica may cause silicosis (a serious lung disease), cancer and death. A rather LARGE air compressor is best to run the blaster. It is used to alert you to potential personal injury hazards.
But then I was pleasantly surprised to discover how easy it was to clean up, at least in the areas I could reach and touch. Let the tool do the work. Then store the Soda Blaster indoors out of childrens reach. Personal Equipment, Dirt and Cleanup:
If our inspection verifies the defect, we will either repair or replace the product at our election or we may elect to refund the purchase price if we cannot readily and quickly provide you with a replacement. Pull back on the blue Air Hose Connector collar and insert the Air Hose deep into the fitting. Hints for use:
If you find the blaster to work well at 80-90 psi, you may want to reduce the input supply pressure not to exceed 90 psi, as higher pressure will consume more air than necessary and reduce productivity (available trigger time). NEITHER THE MANUFACTURER OR DISTRIBUTOR MAKES ANY REPRESENTATION OR WARRANTY OF ANY KIND TO THE BUYER THAT HE OR SHE IS QUALIFIED TO MAKE ANY REPAI THE PRODUCT, OR THAT HE OR SHE IS QUALIFIED TO REPLACE ANY PARTS OF THE PRODUCT. The shop vac will clean a smooth floor in a single pass. Always use a NIOSH (National Institute for Occupational Safety and Health) approved respirator and safety goggles. If abnormal vibration occurs, stop immediately.
I was walking around in the grit and not wanting to touch anything. There will be no attempt here to turn an amateur blast operator into a skilled professional by words alone. blaster pressure alc allsource Turn on the air compressor according to the manufacturers directions and allow it to build up pressure until it cycles off. This unit does not otherwise have its own input pressure regulator. )4I|}$-U~J)UDs UVrGAk?zT&fTBAx kfxj~# . Hy(g)GILS>*+t# Keep proper footing and balance at all times. When unpacking, make sure that the product is intact and undamaged.
This O-ring must be in place before the cap is installed and tightened. At time of this writing the canvas hood and filling funnel are missing. The fine grade is good for light paint and rust removal. 40 LB. Specify UPC number when ordering:40 lb. abrasive capacity for big jobs. Proof of purchase date and an explanation of the complaint must accompany the merchandise. Install an in-line shutoff valve to allow immediate control over the air supply in an emergency, even if a hose is ruptured. Do not carry tools by the cord. Intake Manifold Refer to Figure 1. 60-125 PSI 6-25 CFM 33.5" x 18.75" x 13" 57 lbs. -----------------
Air consumption for the blaster will be nearly proportional to the pressure being used. This unit is on the larger end of the scale for a home shop blaster. Due to continuing improvements, actual product may differ slightly from the product described herein. Overall dimensions: 40''H x 24''L x 15''W
To minimize damage to the work surface use the least pressure necessary to get the job done, or more pressure to work faster. The SAND HOSE needs replacing when its side walls develop leaks or show blisters in the surface. Available in multiple grit grades, Utility, Medium, Fine, and Extra Fine. Step 2: Attach the FOOT to the TANK (#1) using one of the COTTER PINS. sand gallon blaster blast gal (plus media fill weight)
central pneumatic blaster abrasive pressurized lb sand pressurized abrasive blaster When I finally take the body off the car for underbody painting there will be more grit on the heater shelf, under and around the engine, and on the suspension parts. Do not set the pressure higher than 90 PSI. After several minutes, remove the abrasive from the newspaper. Otherwise you can open the media control valve a little more to have more media flow to the nozzle. ]ze. Proceed at your own risk. 497A""
A"TD
.j?,\~gO.v ?@&)34q~: e y@2$J B H- 3"Kd P3. To reduce vibration, maintain tool as explained in this manual. Step1: Get out the TANK (#1), the SAND CONTROL VALVE (#18B), two NIPPLE CONNECTORS (#16), and the SAND OUTLET MANIFOLD (#22). Do not use oxygen, carbon dioxide, combustible gases, or any other bottled gas as a power source for this Soda Blaster. Read the ENTIRE IMPORTANT SAFETY INFORMATION section at the beginning of this manual including all text under subheadings therein before set up or use of this product. The blast spot on the work surface will be 1/8 to 1/4 inch diameter depending on distance of the blast nozzle from the surface. 
 Use Media Regulator Knob to adjust the media flow rate. The warnings and precautions discussed in this manual cannot cover all possible conditions and situations that may occur. Remove entire media discharge assembly slowly, being careful with the Pickup Tube (11) as it may contain residual media which can spill when removed. My expedient repair was to apply a couple turns of vinyl tape to the hose and switch ends to put a clean part of the hose under the shut-off pin. NOTE: For additional information regarding the parts listed in the following pages, refer to the Assembly Diagram near the end of this manual. sand abrasive Use tools with the lowest vibration when there is a choice. Somewhat expensive at $19.95 for 20-25 pounds. Can be found for about $9 for 25#. Anyone using vibrating tools regularly or for an extended period should first be examined by a doctor and then have regular medical check-ups to ensure medical problems are not being caused or worsened from use. If you disconnect the air supply and relieve the tank pressure, then re-pressurizing the tank will require some air flow from the compressor before continuing operation. This is the safety alert symbol. Trouble shooting:
Obey the manual for the air compressor used to power this Soda Blaster. Route the air hose along a safe route to reach the work area without creating a tripping hazard or exposing the air hose to possible damage. IN FACT, THE MANUFACTURER AND/OR DISTRIBUTOR EXPRESSLY STATES THAT ALL REPAIRS AND PARTS REPLACEMENTS SHOULD BE UNDERTAKEN BY CERTIFIED AND LICENSED TECHNICIANS, AND NOT BY THE BUYER. Use respiratory protection when source controls cannot keep silica exposures below the NIOSH REL.
Use Media Regulator Knob to adjust the media flow rate. The warnings and precautions discussed in this manual cannot cover all possible conditions and situations that may occur. Remove entire media discharge assembly slowly, being careful with the Pickup Tube (11) as it may contain residual media which can spill when removed. My expedient repair was to apply a couple turns of vinyl tape to the hose and switch ends to put a clean part of the hose under the shut-off pin. NOTE: For additional information regarding the parts listed in the following pages, refer to the Assembly Diagram near the end of this manual. sand abrasive Use tools with the lowest vibration when there is a choice. Somewhat expensive at $19.95 for 20-25 pounds. Can be found for about $9 for 25#. Anyone using vibrating tools regularly or for an extended period should first be examined by a doctor and then have regular medical check-ups to ensure medical problems are not being caused or worsened from use. If you disconnect the air supply and relieve the tank pressure, then re-pressurizing the tank will require some air flow from the compressor before continuing operation. This is the safety alert symbol. Trouble shooting:
Obey the manual for the air compressor used to power this Soda Blaster. Route the air hose along a safe route to reach the work area without creating a tripping hazard or exposing the air hose to possible damage. IN FACT, THE MANUFACTURER AND/OR DISTRIBUTOR EXPRESSLY STATES THAT ALL REPAIRS AND PARTS REPLACEMENTS SHOULD BE UNDERTAKEN BY CERTIFIED AND LICENSED TECHNICIANS, AND NOT BY THE BUYER. Use respiratory protection when source controls cannot keep silica exposures below the NIOSH REL. Post signs to warn workers about the hazard and to inform them about required protective equipment. All rights reserved. blaster abrasive pressurized harborfreight
 I didn't like the heavy spring loaded blast control valve. Inspect compressors cord periodically and, if damaged, have them repaired by an authorized technician.
Do not smoke during use. Tool weight: 57 lbs.
hbbd```b`` D(HT x4DDT@d "YK&HI@|=[`3Fg` x&
endstream
endobj
startxref
0
%%EOF
104 0 obj
<>stream
It will work with a smaller compressor, but with a shortened duty cycle. Record products Serial number Here: _______________________, Note: If product has no serial number, record month and year of purchase instead.Note: Some parts are listed and shown for illustration purposes only, and are not available individually as replacement parts. Pull back on the blue Air Hose Connector (8) collar and pull out Air Hose (15). DO NOT ABUSE THE POWER CORD. Read and understand the 10 recommended measures below to reduce crystalline silica exposures in the workplace and prevent silicosis and silicosis related deaths. When removing paint or light rust from sheet metal you may need to reduce air pressure and use finer grain blast media to prevent excess damage to the work piece. ?,)rD&7hgq/X~s(8$b+>gT ?iadZgg[%C'Btt;LL|D( IEZT{%"F$Z)D?DCS*NEB('TF8*Du1@!d$4 Using a funnel, pour media into the Tank. I would say read the entire user's manual, except that it is missing, so my best advice now is to read this entire memo before using the sand blaster. With pressure still on the blast head you may poke a wire into the ceramic nozzle, and with luck this may clear the clog. PRESSURIZED SANDBLASTER ASSEMBLY and OPERATING INSTRUCTIONS 3491 Mission Oaks Blvd. Prohibit silica sand (or other substances containing more than 1% crystalline silica) as an abrasive blasting material and substitute less hazardous materials. cabinet blast pneumatic central floor lb sandblast capacity sand blasting sandblasting grizzly benchtop cheap tools coating powder At 50 psi this unit stops supplying abrasive material. When the lever is pressed the pin is retracted so the hose can open up to full bore for clear passage of air and media grit to the blast nozzle. allsource blaster abrasive pressure deadman lb capacity handle roll number On the chance that a clog may still persist in the head or hose, you may have to disconnect the blast head from the hose to blow out the hose. That pressure is non functional with this unit, but it indicates a rough air consumption figure of 9.0-scfm @ 45-psi. This may be enough media flow to do your job. If you want to sweep up and recycle the abrasive media you would need to sift it through a window screen to remove any large trash particles that would clog up the blast nozzle. Efficient pressurized blaster moves abrasives at 80 to 90 percent of air speed for real blasting power. Excess moisture will cause the abrasive to slow or stop flowing through the Abrasive Outlet Pipe. 3 2 3 5 2 4 3 Figure 8 - Wheel and Foot Attachment Step 1: Get out the two WHEELS (#2), the three COTTER PINS (#3), the FOOT (#4) and the AXLE (#5). Remove the Compression Nut (2) from the Air Regulator (9). Sand Control Valve (#18B) Step3: Attach the SAND CONTROL VALVE to the other end of the NIPPLE CONNECTOR. sandblaster abrasives There must not be hazardous objects (such as utility lines or foreign objects) nearby that will present a hazard while working. Step 1: Check to insure the abrasives are dry and clean so that they do not clog the unit. shape or form without the express written consent of Harbor Freight Tools. Empty the Tank, and clean external surfaces of the Soda Blaster with clean, dry cloth. 22. For fine finishing work there are lots of alternate media types available such as glass or plastic beads or ground walnut shells. For technical questions and replacement parts, please call 1-800-444-3353. The fill neck has a fat O-ring seal on a depressed shoulder at the base of the thread. Sand Hose Sand Control Valve Assembly Hose Clamp (#23) Nozzle Shut Off Valve Assembly Figure 5 Sand Control Valve / Shut Off Valve Assembly Step1: Get out the Sand Control Valve & Nozzle Shut Off Valve Assemblies, the SAND HOSE (#24), and the two HOSE CLAMPS (#23). If you close all the valves and walk away it is likely to lose tank pressure through the media control valve and blast head.
I didn't like the heavy spring loaded blast control valve. Inspect compressors cord periodically and, if damaged, have them repaired by an authorized technician.
Do not smoke during use. Tool weight: 57 lbs.
hbbd```b`` D(HT x4DDT@d "YK&HI@|=[`3Fg` x&
endstream
endobj
startxref
0
%%EOF
104 0 obj
<>stream
It will work with a smaller compressor, but with a shortened duty cycle. Record products Serial number Here: _______________________, Note: If product has no serial number, record month and year of purchase instead.Note: Some parts are listed and shown for illustration purposes only, and are not available individually as replacement parts. Pull back on the blue Air Hose Connector (8) collar and pull out Air Hose (15). DO NOT ABUSE THE POWER CORD. Read and understand the 10 recommended measures below to reduce crystalline silica exposures in the workplace and prevent silicosis and silicosis related deaths. When removing paint or light rust from sheet metal you may need to reduce air pressure and use finer grain blast media to prevent excess damage to the work piece. ?,)rD&7hgq/X~s(8$b+>gT ?iadZgg[%C'Btt;LL|D( IEZT{%"F$Z)D?DCS*NEB('TF8*Du1@!d$4 Using a funnel, pour media into the Tank. I would say read the entire user's manual, except that it is missing, so my best advice now is to read this entire memo before using the sand blaster. With pressure still on the blast head you may poke a wire into the ceramic nozzle, and with luck this may clear the clog. PRESSURIZED SANDBLASTER ASSEMBLY and OPERATING INSTRUCTIONS 3491 Mission Oaks Blvd. Prohibit silica sand (or other substances containing more than 1% crystalline silica) as an abrasive blasting material and substitute less hazardous materials. cabinet blast pneumatic central floor lb sandblast capacity sand blasting sandblasting grizzly benchtop cheap tools coating powder At 50 psi this unit stops supplying abrasive material. When the lever is pressed the pin is retracted so the hose can open up to full bore for clear passage of air and media grit to the blast nozzle. allsource blaster abrasive pressure deadman lb capacity handle roll number On the chance that a clog may still persist in the head or hose, you may have to disconnect the blast head from the hose to blow out the hose. That pressure is non functional with this unit, but it indicates a rough air consumption figure of 9.0-scfm @ 45-psi. This may be enough media flow to do your job. If you want to sweep up and recycle the abrasive media you would need to sift it through a window screen to remove any large trash particles that would clog up the blast nozzle. Efficient pressurized blaster moves abrasives at 80 to 90 percent of air speed for real blasting power. Excess moisture will cause the abrasive to slow or stop flowing through the Abrasive Outlet Pipe. 3 2 3 5 2 4 3 Figure 8 - Wheel and Foot Attachment Step 1: Get out the two WHEELS (#2), the three COTTER PINS (#3), the FOOT (#4) and the AXLE (#5). Remove the Compression Nut (2) from the Air Regulator (9). Sand Control Valve (#18B) Step3: Attach the SAND CONTROL VALVE to the other end of the NIPPLE CONNECTOR. sandblaster abrasives There must not be hazardous objects (such as utility lines or foreign objects) nearby that will present a hazard while working. Step 1: Check to insure the abrasives are dry and clean so that they do not clog the unit. shape or form without the express written consent of Harbor Freight Tools. Empty the Tank, and clean external surfaces of the Soda Blaster with clean, dry cloth. 22. For fine finishing work there are lots of alternate media types available such as glass or plastic beads or ground walnut shells. For technical questions and replacement parts, please call 1-800-444-3353. The fill neck has a fat O-ring seal on a depressed shoulder at the base of the thread. Sand Hose Sand Control Valve Assembly Hose Clamp (#23) Nozzle Shut Off Valve Assembly Figure 5 Sand Control Valve / Shut Off Valve Assembly Step1: Get out the Sand Control Valve & Nozzle Shut Off Valve Assemblies, the SAND HOSE (#24), and the two HOSE CLAMPS (#23). If you close all the valves and walk away it is likely to lose tank pressure through the media control valve and blast head. The media control valve at the bottom of the tank seems to leak a little when shut off, probably due to being constantly exposed to the abrasive material.
if any problems are found, do not use Soda Blaster until repaired. To correct: To prevent accidents, close the Valves on the Soda Blaster, detach the air supply, safely discharge any residual air pressure in the Soda Blaster, and close the Valves again. Attach Bracket (3) to the Tank (1) using the two Socket Head Screws (4) and wrench tighten. Harbor freight tools central pneumatic series 40 lb pressurized sandblaster model 34202 assembly and operating instructions, 3491 Mission Oaks Blvd. Step2: Slide the HOSE CLAMPS over either side of the SAND HOSE. Keep tools sharp and clean for better and safer performance. sandblaster hopper gun I bought Aluminum Oxide abrasive blast media from Harbor Freight. Do not allow pressure to exceed 125 PSI. Indicates a hazardous situation which, if not avoided,will result in death or serious injury. Exposure to aluminum oxide (a dust generated from material removing processes) can result in eye, skin and breathing irritation. Designate a work area that is clean and well-lit. cabinet blast homak abrasive table gallon sandblaster blasting blaster sand tank industrial air To reduce the risk of vibration-related injury: Read theENTIRE IMPORTANT SAFETY INFORMATION section at the beginning of this manual including all text under subheadings therein before set up or use of this product. It works well for general use, but for lots of heavy rust removal I might prefer something more coarse. Change the nozzle as needed to suit the abrasive. This setup had a problem when I first used it, as the blast head would sometimes clog easily and repeatedly. Even then you would have your hair and ears full of gritty dust. Do not use the abrasive if the newspaper is moist. Do not use if any of these problems are present. Coarser material tends to clog up the nozzle on smaller blaster units (including this one).
"Black Beauty" (a registered trademark of Harsco Corporation): A coal slag abrasive material for use in removing paint and rust from steel and concrete. If the clog persists, then you may need to shut off the blast air and remove the nozzle for cleaning. For grit and dust on or inside the car, doing it outdoors may not make much difference (but it would keep the shop clean). Do not yank compressors cord to disconnect it from the receptacle.
As such it will work with 50%-60% duty cycle with my compressor, giving one minute of trigger time Notice the pressure rating and air flow requirements. If excessive air pressure is used, or Media Regulator becomes clogged, the Safety Valve may open, releasing air pressure.
If you want to disconnect the air supply coupling, close the input air valve before disconnecting to retain air pressure in the tank. Conduct air monitoring to measure worker exposures. Description and air requirements:
When you release the control lever a spring loaded blunt nose pin crushes the hose to shut off air flow. Spray the abrasive media onto the work material, moving the Nozzle from side to side. angle sander polisher angle sander polisher angle sander polisher (10 pages), 6" self-vacuuming air palm sander (16 pages), Heavy duty air oscillating sander (11 pages), Manual will be automatically added to "My Manuals", Assembly and operating instructions manual, Sand Control Valve/ Nozzle Shut off Valve, Sander Central Pneumatic 35245 Assembly And Operating Instructions Manual, Sander Central Pneumatic CENTRAL PNEUMATIC 91773 Owner's Manual, Sander Central Pneumatic 66881 Set Up And Operating Instructions Manual, Sander Central Pneumatic 68152 Owner's Manual And Safety Instructions, Sander Central Pneumatic 93629 Assembly And Operating Instructions Manual, Sander Central Pneumatic 93742 Assembly And Operating Instructions Manual, Sander Central Pneumatic 42966 Assembly And Operating Instructions Manual, Sander Central Pneumatic 97055 Set Up And Operating Instructions Manual, Sander Central Pneumatic 91773 Set Up And Operating Instructions Manual, Sander Central Pneumatic 65173 Set Up And Operating Instructions Manual, Sander Central Pneumatic 93050 Assembly And Operating Instructions Manual, Sander Central Pneumatic 98895 Owner's Manual & Safety Instructions, Sander Central Pneumatic 96989 Set Up And Operating Instructions Manual, Sander Central Pneumatic 96445 Operation Instructions Manual, Sander Central Pneumatic 96573 Set Up And Operating Instructions Manual. Turn on the compressor and set the regulator to the pressure recommended for this Soda Blaster (90 PSI). blaster abrasive pressurized central lb pneumatic freight harbor sand tools sandblasting sandblaster kit blast portable deals pressure kx paint housewares Otherwise, isolate the workpiece to make sure no damage can occur to nearby personal property. Always disconnect the air supply and relieve tank pressure before attempting to remove the top fill cap from the media tank. Water Trap Refer to Figure 2. The grit was mostly limited to areas below shoulder level where it's not hard to reach, except it gets underneath things that need to be moved for clean up. pressurized abrasive lb pneumatic itc coupons valid Addresses practices not related to personal injury. DO NOT OVERREACH. MAINTENANCE 1. I haven't found a user manual or parts list yet, but this unit is nearly identical to a Central Pneumatic pressurized sand blaster #38375 from Harbor Freight. Cautions and Warnings first:
Wheels and Foot See Figure 8. Nipple Connector (#16) Joint Pipe (#13) Air Cap (#12) Gasket (#11) Tank (#1) Nipple Connector (#16) Air Hose (#21) Figure 6 Top Assembly Step1: Get the Intake Valve Assembly, the Water Trap Assembly, the Tank Assembly, the TANK CAP (#12), the O-RING (#11), and the AIR HOSE (#21). Follow instructions for lubricating and changing accessories. THE MANUFACTURER AND/OR DISTRIBUTOR HAS PROVIDED THE PARTS LIST AND ASSEMBLY DIAGRAM IN THIS MANUAL AS A REFERENCE TOOL ONLY. They had 80 grit and 70 grit. blaster sand homemade homemadetools advertisement Pregnant women or people who have impaired blood circulation to the hand, past hand injuries, nervous system disorders, diabetes, or Raynauds Disease should not use this tool. Be nice and clean any grit away from the O-ring gland to preserve life of the seal. 23n`H`3`0c`0u#"2W/
3f@4.
 A possible short use alternative is a pillow case with a site hole cut out and fully closed goggles. Keep the input valve and air control valve wide open at all times when blasting. Step1: Get out the INTAKE MANIFOLD (#14), PRESSURE GAUGE (#15), BRASS THROTTLING VALVE (#18A), 3/8" 1/4" NIPPLE CONNECTOR (#20), and JOINT PIPE (#13). WARNING! Screw the Pressure Gauge into the opening in the face of the Air Regulator (9). 110 lb. --------------
Step2: Attach the 3/8" NIPPLE CONNECTORS to either side of the WATER TRAP. pneumatic blaster central abrasive pressurized lb sand If the nozzle control valve does not shut off completely, then close the air control valve before removing the nozzle. Make sure all joints are securely tighten. WARNING When using tools, basic precautions should always be followed, including the following: To reduce the risks of electric shock, fire, and injury to persons, read all the instructions before using the tool. We will return repaired products at our expense, but if we determine there is no defect, or that the defect resulted from causes not within the scope of our warranty, then you must bear the cost of returning the product. There is an air supply shut-off valve at the input air coupler, followed by a water separator filter and pressure gauge. Provide workers with training that includes information about health effects, work practices and protective equipment for crystalline silica. MAINTAIN CORRECT AIR PRESSURE WHENEVER WORKING. Turn PRESSURE GAUGE so that its face is over the lower side hold of the INTAKE MANIFOLD. Report all cases of silicosis to State health departments and to OSHA or the Mine Safety and Health Administration (MSHA). Other components, such as a coupler plug and quick coupler, will make operation more efficient, but are not required. If the Soda Blaster requires more force to accomplish the task, verify that the Soda Blaster receives sufficient, unobstructed airflow (CFM) and increase the pressure (PSI) output of the regulator up to the maximum air pressure rating of this Soda Blaster. The grit and dirt does get into everything, but it does not stick firmly to anything (except grease or oily items). WARNING! hb```"3 Ab@Oa{$TXRZM
w(2OLyT0kWG;DW
O',s8V,a0If"m^"[=%$raD1CbE A
+b-|u!n p2wT,BYu.;R^~P\ -`J{tqeojJS+Aj4KAjP Pressure in the tank is normally somewhat offset by pressure in the venturi supply circuit. Removing heavy rust from steel parts is a cinch, as it can ultimately remove steel from steel parts. The hose is contained in a close fitting bore of the valve housing, so the tape repair may survive for a long time. Hold collar on Tank (1) with a wrench and use another wrench to loosen Bushing (10). Step 5: Remove the TANK CAP (#12). 1. Always wear your hood, dust mask, and heavy-duty canvas Step 2: Close the AIR SUPPLY VALVE (#18) by turning it to gloves when operating the the horizontal position. If the blast nozzle becomes clogged during use, immediately close the media control valve at bottom of the tank. SPECIFICATIONS Capacity: Working Pressure Delivery Rate Overall Dimensions Weight: 40 lbs. Equipped with a nozzle end shut-off valve, pressure gauge, ceramic nozzle, 9 foot hose, filling funnel, water trap, 6" rubber wheels, and canvas hood. Practice good personal hygiene to avoid unnecessary exposure to silica dust. The nozzle control valve on this unit has a thin wall rubber hose inside of a heavy plastic housing. *qrV
myU6L3hK>(cBeLgthF2Wjj}4UFH
/ *
endstream
endobj
80 0 obj
<>stream
Obey all safety messages that follow this symbol to avoid possible injury or death. followed by one minute of pressure recovery time for the compressor.
A possible short use alternative is a pillow case with a site hole cut out and fully closed goggles. Keep the input valve and air control valve wide open at all times when blasting. Step1: Get out the INTAKE MANIFOLD (#14), PRESSURE GAUGE (#15), BRASS THROTTLING VALVE (#18A), 3/8" 1/4" NIPPLE CONNECTOR (#20), and JOINT PIPE (#13). WARNING! Screw the Pressure Gauge into the opening in the face of the Air Regulator (9). 110 lb. --------------
Step2: Attach the 3/8" NIPPLE CONNECTORS to either side of the WATER TRAP. pneumatic blaster central abrasive pressurized lb sand If the nozzle control valve does not shut off completely, then close the air control valve before removing the nozzle. Make sure all joints are securely tighten. WARNING When using tools, basic precautions should always be followed, including the following: To reduce the risks of electric shock, fire, and injury to persons, read all the instructions before using the tool. We will return repaired products at our expense, but if we determine there is no defect, or that the defect resulted from causes not within the scope of our warranty, then you must bear the cost of returning the product. There is an air supply shut-off valve at the input air coupler, followed by a water separator filter and pressure gauge. Provide workers with training that includes information about health effects, work practices and protective equipment for crystalline silica. MAINTAIN CORRECT AIR PRESSURE WHENEVER WORKING. Turn PRESSURE GAUGE so that its face is over the lower side hold of the INTAKE MANIFOLD. Report all cases of silicosis to State health departments and to OSHA or the Mine Safety and Health Administration (MSHA). Other components, such as a coupler plug and quick coupler, will make operation more efficient, but are not required. If the Soda Blaster requires more force to accomplish the task, verify that the Soda Blaster receives sufficient, unobstructed airflow (CFM) and increase the pressure (PSI) output of the regulator up to the maximum air pressure rating of this Soda Blaster. The grit and dirt does get into everything, but it does not stick firmly to anything (except grease or oily items). WARNING! hb```"3 Ab@Oa{$TXRZM
w(2OLyT0kWG;DW
O',s8V,a0If"m^"[=%$raD1CbE A
+b-|u!n p2wT,BYu.;R^~P\ -`J{tqeojJS+Aj4KAjP Pressure in the tank is normally somewhat offset by pressure in the venturi supply circuit. Removing heavy rust from steel parts is a cinch, as it can ultimately remove steel from steel parts. The hose is contained in a close fitting bore of the valve housing, so the tape repair may survive for a long time. Hold collar on Tank (1) with a wrench and use another wrench to loosen Bushing (10). Step 5: Remove the TANK CAP (#12). 1. Always wear your hood, dust mask, and heavy-duty canvas Step 2: Close the AIR SUPPLY VALVE (#18) by turning it to gloves when operating the the horizontal position. If the blast nozzle becomes clogged during use, immediately close the media control valve at bottom of the tank. SPECIFICATIONS Capacity: Working Pressure Delivery Rate Overall Dimensions Weight: 40 lbs. Equipped with a nozzle end shut-off valve, pressure gauge, ceramic nozzle, 9 foot hose, filling funnel, water trap, 6" rubber wheels, and canvas hood. Practice good personal hygiene to avoid unnecessary exposure to silica dust. The nozzle control valve on this unit has a thin wall rubber hose inside of a heavy plastic housing. *qrV
myU6L3hK>(cBeLgthF2Wjj}4UFH
/ *
endstream
endobj
80 0 obj
<>stream
Obey all safety messages that follow this symbol to avoid possible injury or death. followed by one minute of pressure recovery time for the compressor. More notes on media type below. If you have a smaller compressor (less than 15-scfm supply), there may be large swings in system pressure during use. Instructions with the sand blaster call for using a hood, which is a canvas full head cover with a clear shield in front. The fuzzy round brush attachment for the shop vac did a nice job of cleaning out the car interior and all over the car body and everything I could reach in the boot and engine bay (and anything else I could reach on the work bench and shelves. Performing routine air supply maintenance will allow the Soda Blaster to operate more safely and will also reduce wear on the Soda Blaster. Allow time for the trapped aggregate to safely discharge back into the Tank. It may be appropriate to order a replacement hose for the inside of this control head, along with a few spare ceramic nozzles. Blasting technique should become readily apparent with only a little use.
Repair any leaks found. If you buy it without knowing the grit grade you are likely to get the coarser grade. Attach all accessories properly to the Soda Blaster before connecting the air supply.