The paper sizes indicated on the paper guides are abbreviated as follows. Up to approximately 550 sheets of plain paper (80 g/m. In this case, the settings for CASSETTE1 SIZE and CASSETTE2 SIZE are changed to those in the printer driver by pressing [Online], allowing you to continue printing. Select the size and type of the loaded paper in the cassette at Page size, then select Register. Slide the paper guide (C) in front and (D) on the right to open the guides. Select the size of the loaded paper as needed. When this error message is displayed, check and correct the paper settings. Select Plain Paper in Media Type and the size of the loaded paper in Printer Paper Size (or Paper Size) in the printer driver. If the paper guides are too loose or too tight, this may result in misfeeds or paper jams. All rights reserved. Set the paper cassette in the printer. 2. Hak Cipta 2022 Canon Singapore Pte. Align the edges of paper. For more details on the usable paper, see "Usable paper" in Related Information at the end of this page. Make sure that there is sufficient space between the hooks of the paper guides and the paper stack. Operational requirements and restrictions are indicated at the end of this page. Make sure that the Cassette is pushed all the way into the printer. When changing the size of the paper to be loaded, change the positions of the paper guides. There was an error with your submission. This may. If the paper stack is in contact with the protrusion (G), the paper may not be fed properly. You can load only plain paper in the Manual Feed Slot of the Front Tray. 3. However, when printing custom size paper of its long edges 215.9 mm or less, load the paper in landscape orientation. When the Manual Feed Slot is not used, slide the Manual Feed Paper Guides to the far edge of the Front Tray. Load the paper stack so that the rear edge is aligned with the paper guide. Align the position of (A) with the mark for the size of the paper to be loaded. in the Rear Tray. Slide frontpaper guideto align it with paper stack. This may result in paper jams or damage to the printer. Loading paper without aligning the edges may cause paper jams. Hold down the paper as shown in the figures, make sure that the paper stack does not exceed the load limit marks (A), and then set it under the hooks (B) on the paper guides. 4. Align the edges of paper. Loading Standard Size Paper in Cassette 2, 3, or 4, Loading Custom Size Paper or Paper at a Size of 8K or 16K in Cassette 2, 3, or 4, [Precautions for Handling the Multi-purpose Tray or Paper Cassette, [Specifying the Type of the Paper in the Paper Cassette, A3, B4, A4, B5, A5, Ledger (11 x 17), Legal, Letter, Executive, See "Loading Paper in Cassette 1" or "Loading Standard Size Paper in Cassette 2, 3, or 4"*, See "Loading Custom Size Paper or Paper at a Size of 8K or 16K in Cassette 2, 3, or 4", Paper Size Setting Switch of a Paper Cassette. Always load paper in the portrait orientation (B). b. 2. If Cassette is not selected in Paper Source, select Cassette. The side paper guides move together. Loading paper in the landscape orientation (F) can cause paper jams.
9. Select the type and size of the loaded paper in Media Type and Printer Paper Size (or Paper Size) in the printer driver. The printer may stop, disabling printing. If you are using B5 size paper (182 mm x 257 mm), set the paper guide to "JIS B5". However, if SPECIAL MODE J is set to ON, the printer prints without checking the paper size even when the paper size specified in the printer driver and the size of the paper loaded in the cassette do not match.
Be sure to check if the paper guide is at the position of the size of the loaded paper. Load paper when the printer status is in any of the following. If you require assistance, please visit our. Copyright 2022 Canon Singapore Pte. If there is no sufficient space, slightly reduce the amount of paper. Open the Front Tray gently, and pull out the Front Tray Extension. Update Terakhir : Be sure to check if the paper size specified in the printer driver matches the size of the paper loaded in the paper cassette before using the printer. This printer's paper cassette cannot automatically detect the paper size. If paper is curled, hold the curled corners and gently bend them in the opposite direction until the paper becomes completely flat. Next, specify the type of the paper in the paper cassette. Do not load higher than the Load Limit Mark (E). Load paper in Cassette 2 (Only when the optional paper feeder is installed) in the same manner as you load paper in Cassette 1. 8201489200. 5. Sediakan kode pesanan dan email yang digunakan saat registrasi, kami akan mengirim kembali email konfirmasi anda. 8. d. Be sure not to open the covers or paper cassette during printing. g. Do not load paper other than plain paper (64 to 80 g/m2) and heavy paper (90 to 120 g/m2). Align the edges of paper neatly before loading.
If paper is curled, hold the curled corners and gently bend them in the opposite direction until the paper becomes completely flat.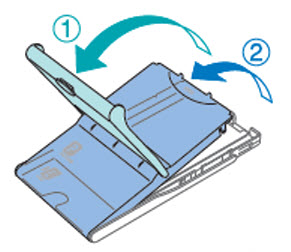 Sign up for our emails to get the latest updates on new products, inspiration, and more. Align the edges of paper neatly before loading. Issue Number : If you want to print custom size paper of its long edges 297.0 mm or less when CASSETTE(n) SIZE (n = 2, 3, 4) in the FEEDER MENU options in the SETUP is set to MIXED SIZES, specify the settings according to the printer driver you are using as follows. When the Job indicator is blinking, the printer is printing. You can load photo paper or envelope in the Rear Tray. Precautionary measures against COVID-19, Loading Paper in the Manual Feed Slot of the Front Tray, Paper Is Smudged/Printed Surface Is Scratched. Align the position of (A) with the mark for the size of the paper to be loaded. #10, and DL Env. Open theoperation panel(K), pull out thepaper output tray(L) andpaper output support(M), and open theoutput tray extension(N). Heavy Paper (91 - 120 g/m2) can also be loaded in the paper cassette. If the paper guide is set at a wrong position, this may result in misfeeds. All rights reserved. Make sure that the paper size setting switch is set to "CUSTOM" before setting the paper cassette in the printer. Load the paper so that the edge of the paper is aligned with the front side of the paper cassette. 200 sheets (When heavy paper that weighs 91 g/m2 is used). Last Updated : 08-Mar-2012 Therefore, you need to register the size of the paper loaded in the paper cassette. when you load paper in the Auto Sheet Feeder. (1) Pinch the Paper Guide (C) and slide it to align with the mark of page size. If paper is curled, flatten it. Operational requirements and restrictions are indicated at the end of this page. After lifting the front of the paper cassette up a little (2), pull it out while supporting the cassette with your left hand until the handle (A) on the right side of the paper cassette appears completely (3). Push thecassetteinto theprinteruntil it stops. Hold down the paper as shown in the figure, make sure that the paper stack does not exceed the load limit marks (A), and then set it under the hooks (B) on the paper guides. The paper loading methods are different between standard size paper and custom size paper. Select the paper size of the document created by an application. 3. The paper may not be fed properly. Attach the label for the size of the loaded paper to the paper size indicator, and then insert the indicator into the paper size slot at the front of the paper cassette. This printer's paper cassette cannot automatically detect the paper size. Loading paper in the landscape orientation (F) can cause paper jams.
  For details on how to load paper in each paper source, see [ Loading Paper in the Cassette ], [ Loading Paper in the Rear Tray ], or [ Loading Paper in the Manual Feed Slot of the Front Tray ]. 6. Align the paper guide (I) in front with the paper stack. Do not extend thecassettewhen loading other than A4 sized paper in thecassette. Load paper when the printer status is in any of the following. 5. For more details on using the printer driver, see Help of the printer driver. Make sure that the size of the loaded paper is aligned with the mark of paper size. 15-Feb-2008 Provide your booking code and email address you used for the registration, we will re-send the confirmation email to you. Align the edges of paper. Here you will find service loaner, rental and test drive equipment lists, and application forms.
To avoid this, load paper in the Auto Sheet Feeder. Load paper in the paper cassette using the following procedure. Leave the setting at [Match Page Size] when the page size and the size of the paper loaded in the paper cassette are the same, since there is no need to change the setting. If you print from Cassette 2 when Cassette 1 is not set, this will cause paper jams. e. For more details on the usable paper, see "Usable paper" in Related Information at the end of this page. - Make sure that the size of the loaded paper matches the paper size specified in the printer driver before printing. Refill the cassette. (2) Load the paper all the way in the Manual Feed Slot WITH THE PRINT SIDE FACING DOWN.
Be sure to check if the paper size specified in the printer driver matches the size of the paper loaded in the cassette before using the printer. Load custom size paper in the paper cassette using the following procedure. If you select the wrong media type, the printer may feed paper from the wrong paper source, or may not print with the proper print quality. 2. Be sure to turn the printer ON once when loading paper in the paper cassette for the first time after installing the paper feeder. If not, selectChangeto change the setting in accordance with the size of the loaded paper. If you cut plain paper into small size such as 4" x 6" / 10 x 15 cm, 4" x 8" / 101.6 x 203.2 mm, 5" x 7" / 13 x 18 cm, or 2.16" x 3.58" / 55.0 x 91.0 mm (Card size) to perform trial print, it can cause paper jams. 250 sheets (When plain paper that weighs 64 g/m2 is used), - Heavy paper: Approx. Select Plain Paper in Media Type and Manual Feed in Paper Source in the printer driver setting when printing from the Front Tray. You can load A4, B5, A5, or Letter-sized plain paper in thecassette. After lifting the front of the paper cassette up a little (2), push the paper cassette into the printer firmly until the front side of the paper cassette is flush with the front surface of the printer (3). When paper at a size of 8K or 16K is loaded, set CASSETTE(n) SIZE (n = 2, 3, 4) in the control panel to 8K or 16K. When the paper cassette runs out of paper, <11 NO "size" PAPER> appears in the display, or the Paper Source indicator blinks indicating the status. If the paper stack is in contact with the protrusion (H), the paper may not be fed properly. Loading paper in the landscape orientation (C) can cause paper jams. When you change the orientation of the custom size paper loaded in a paper cassette frequently, it is convenient if you set CASSETTE(n) SIZE (n = 2, 3, 4) in the control panel to MIXED SIZES. You have been directed to this answer based on an ID match. If the paper guide is set at a wrong position, this may result in misfeeds. Select Plain Paper in Media Type in the printer driver setting when printing from the Cassette. If you are printing from Cassette 2, make sure that Cassette 1 is set before printing. Be sure to fan the labels thoroughly before loading them. (1) Pull the Cassette out slowly with both hands until it stops, and pull it out from the printer while lifting the near side of the Cassette slightly. a. Always load paper in the portrait orientation (E). 9. For details on the Canon genuine paper, see [, You can use general copy paper. If you print from Cassette 2 when Cassette 1 is not set, this will cause paper jams. This may result in paper jams or damage to the printer. For the page size and paper weight you can use for this printer, see Supported Media Types. Hold down the paper as shown in the figures, make sure that the paper stack does not exceed the load limit marks (A), and then set it under the hooks (B) on the paper guides. Press down the paper stack so that it is loaded under the hooks on the side paper guides (A). The following shows the abbreviations of paper sizes that are marked on the paper cassette. Push the Cassette all the way into the printer. c. Be sure to turn the printer ON once when loading paper in the paper cassette for the first time after installing the paper feeder. - Plain paper: Approx. Select the paper source. When loading paper in landscape orientation, such as when loading A4, B5, A5, Letter, or Executive size paper, shorten the paper cassette. When you do not perform 2-sided printing, simply click [OK]. The paper cassette can be loaded with plain paper (64 to 80 g/m2), heavy paper (90 to 120 g/m2) at sizes of A4, B5, A5, Legal, Letter, Executive, and Custom Size. 6. (2) Pinch the Paper Guides (D) on the both sides and slide them to align with the mark of paper size. The side paper guides move together. - When a message that informs you of a paper-out condition or requests paper replacement is displayed. Make sure that the size of the loaded paper matches that of the paper size setting switch before setting the paper cassette in the printer. Make sure that there is sufficient space between the hooks and paper stack. Be sure to check if the paper guide is at the position of the size of the loaded paper. If you are using B5 size paper (182 mm x 257 mm), set the paper guide to "JIS B5". Always load paper in the portrait orientation (E). 8200036100. For more details on the usable paper, see, For details on handling the paper cassette, see. (1) Slide the Manual Feed Paper Guides (A) to align them with the mark of paper size. Be sure to load standard size paper in portrait orientation when loading it in the paper cassette. Because the paper cassette is heavy, hold it with your both hands securely. on page 16. Align the edges of paper neatly before loading. When this function is enabled, an error message is displayed if these settings do not match to prevent incorrect printing. While holding the paper cassette with both hands, pull it out completely (4) as shown in the figure. Select CASSETTE(n) SIZE (n = 2, 3, 4) using [. You can load other plain paper here while loading the paper in the Cassette. Loading paper without aligning the edges may cause paper jams. Select Plain Paper in Media Type and the size of the loaded paper in Printer Paper Size (or Paper Size) then select Manual Feed in Paper Source in the printer driver. n. Be sure to align the paper guides with the width of the paper.
When printing custom size paper from UFR II Printer Driver, you can load the paper either in portrait or landscape orientation. Ltd. All rights reserved. This may result in multiple sheets of paper fed at once or paper jams. 8. 8200530100. Do not load paper in the manual feed slot during printing from the paper cassette. While holding the lock release lever of the rear paper guide, slide the guide to the size mark for the paper to be loaded. After lifting the front of the paper cassette up a little (3), push the paper cassette into the printer firmly until the front side of the paper cassette is flush with the front surface of the paper feeder (4). Open the Front Tray gently, and pull out the Front Tray Extension. Loading paper without aligning the edges may cause paper jams. If there is no sufficient space, slightly reduce the amount of paper. If the paper guide is set at a wrong position, this may result in misfeeds. 3. Your browser either does not have JavaScript enabled or does not appear to support enough features of JavaScript to be used well on this site. For details on methods for displaying the Printer Status Window, see "Displaying the Printer Status Window" in Related Information at the end of this page. Specify the paper settings in the printer driver. If Cassette is not selected in Paper Source, Select cassette as the Paper Source. Slide rightpaper guideto align it with paper stack. When changing the size of the paper to be loaded, adjust the length of the paper cassette and change the positions of the paper guides. While holding the tab (B) on the paper size setting switch (A) (1), align the triangular mark on the paper size setting switch with "CUSTOM" (2). If theoperation panelis close, theprinterdoes not start printing. (4) Extend the Cassette and lock the tabs (B). While holding the lock release lever of the rear paper guide, slide the guide to the size mark for the loaded paper. The following shows the paper capacity of the paper cassette. When A4, Letter, or Legal size is selected, the following screen appears. Click here to learn more about Canon Frame Lab and get 30% off your purchase. When CASSETTE1 SIZE and/or CASSETTE2 SIZE is set to MIXED SIZES, you do not need to specify the setting for CASSETTE1 SIZE and/or CASSETTE2 SIZE each time the paper orientation is changed. For details on settings in each menu, see "Changing the Paper and Print Settings" on.
(3) Load the paper stack WITH THE PRINT SIDE FACING DOWN and LEADING EDGE TO THE FAR SIDE of the Cassette. Slidepaper guides(D) in front and (E) on right to open guides. Align the paper guide (I) with where it clicks into place. When changing the size of the paper to be loaded, adjust the length of the paper cassette and change the positions of the paper guides. Select the size of the paper loaded in the paper cassette, then click [OK]. 9. Last Updated : When any paper is in the manual feed slot, you cannot feed paper from the paper cassette. If the paper guides are too loose or too tight, this may result in misfeeds or paper jams. When CASSETTE(n) SIZE (n = 2, 3, 4) is set to MIXED SIZES, you do not need to specify the setting for CASSETTE(n) SIZE (n = 2, 3, 4) each time you change the paper orientation. For details on how to flatten curled paper, see, Load the paper stack WITH THE PRINT SIDE FACING DOWN, and place it in the center of the. To use custom size paper for printing, click [Custom Paper Size] in the [Page Setup] sheet, and then specify the custom paper size. b. a. 4. To print letterhead paper or paper printed with a logo when loading paper in landscape orientation, load the paper so that the printing side is facing down as shown in the following figures. The Paper Guides (D) will stop when they align with the corresponding mark of paper size. Do not pull out the paper cassette. You can load paper of the following custom sizes. Canon pixma mp160: product brochure (2 pages), Canon pixma mp600r: quick start (484 pages), Canon pixma mp600r: install guide (740 pages), Wireless photo all-in-one printer (74 pages), Manual will be automatically added to "My Manuals", Canon Powershot A480 Supplementary Manual, All in One Printer Canon PIXMA MP600 Start Here, All in One Printer Canon PIXMA MP160 Brochure, All in One Printer Canon PIXMA MP600R Quick Start Manual, All in One Printer Canon PIXMA MP600R Setup Manual, All in One Printer Canon PIXMA MP600R Technical Specifications, All in One Printer Canon PIXMA MP640 Network Setup Manual, All in One Printer Canon MP640 - PIXMA Color Inkjet Parts Catalog, All in One Printer Canon PIXMA MP640 series Getting Started Manual, All in One Printer Canon Pixma MP640 series Getting Started Manual, All in One Printer Canon MP610 Service Manual, All in One Printer Canon PIXMA MP610 Series Quick Start Manual, All in One Printer Canon PIXMA MP620 Series Getting Started, MB5400 Series Set Cassette Paper Information After Loading Paper, MB5000 series Be Sure To Set Cassette Paper Information After Loading Paper, MB5000 Series Be Sure To Set Cassette Paper Information After Loading Paper, TS6000 series Loading Paper In The Cassette, MB2100 SERIES Set Cassette Paper Information After Loading Paper, MB5100 Series Set Cassette Paper Information After Loading Paper, MB2100 Series Set Cassette Paper Information After Loading Paper, TS8000 series Loading Paper In The Cassette, MB2700 series Set Cassette Paper Information After Loading Paper, PIXMA TS6000 Series Loading Paper In The Cassette, MG5700 series Set Cassette Paper Information After Loading Paper, MG7500 series Be Sure To Set Cassette Paper Information After Loading Paper, MG5700 Series Set Cassette Paper Information After Loading Paper, MB2300 series Be Sure To Set Cassette Paper Information After Loading Paper, MB2000 series Be Sure To Set Cassette Paper Information After Loading Paper, MX490 series Be Sure To Set Cassette Paper Information After Loading Paper.
9. Select the type and size of the loaded paper in Media Type and Printer Paper Size (or Paper Size) in the printer driver. The printer may stop, disabling printing. If you are using B5 size paper (182 mm x 257 mm), set the paper guide to "JIS B5". However, if SPECIAL MODE J is set to ON, the printer prints without checking the paper size even when the paper size specified in the printer driver and the size of the paper loaded in the cassette do not match.
Be sure to check if the paper guide is at the position of the size of the loaded paper. Load paper when the printer status is in any of the following. If you require assistance, please visit our. Copyright 2022 Canon Singapore Pte. If there is no sufficient space, slightly reduce the amount of paper. Open the Front Tray gently, and pull out the Front Tray Extension. Update Terakhir : Be sure to check if the paper size specified in the printer driver matches the size of the paper loaded in the paper cassette before using the printer. This printer's paper cassette cannot automatically detect the paper size. If paper is curled, hold the curled corners and gently bend them in the opposite direction until the paper becomes completely flat. Next, specify the type of the paper in the paper cassette. Do not load higher than the Load Limit Mark (E). Load paper in Cassette 2 (Only when the optional paper feeder is installed) in the same manner as you load paper in Cassette 1. 8201489200. 5. Sediakan kode pesanan dan email yang digunakan saat registrasi, kami akan mengirim kembali email konfirmasi anda. 8. d. Be sure not to open the covers or paper cassette during printing. g. Do not load paper other than plain paper (64 to 80 g/m2) and heavy paper (90 to 120 g/m2). Align the edges of paper neatly before loading.
If paper is curled, hold the curled corners and gently bend them in the opposite direction until the paper becomes completely flat.
Sign up for our emails to get the latest updates on new products, inspiration, and more. Align the edges of paper neatly before loading. Issue Number : If you want to print custom size paper of its long edges 297.0 mm or less when CASSETTE(n) SIZE (n = 2, 3, 4) in the FEEDER MENU options in the SETUP is set to MIXED SIZES, specify the settings according to the printer driver you are using as follows. When the Job indicator is blinking, the printer is printing. You can load photo paper or envelope in the Rear Tray. Precautionary measures against COVID-19, Loading Paper in the Manual Feed Slot of the Front Tray, Paper Is Smudged/Printed Surface Is Scratched. Align the position of (A) with the mark for the size of the paper to be loaded. #10, and DL Env. Open theoperation panel(K), pull out thepaper output tray(L) andpaper output support(M), and open theoutput tray extension(N). Heavy Paper (91 - 120 g/m2) can also be loaded in the paper cassette. If the paper guide is set at a wrong position, this may result in misfeeds. All rights reserved. Make sure that the paper size setting switch is set to "CUSTOM" before setting the paper cassette in the printer. Load the paper so that the edge of the paper is aligned with the front side of the paper cassette. 200 sheets (When heavy paper that weighs 91 g/m2 is used). Last Updated : 08-Mar-2012 Therefore, you need to register the size of the paper loaded in the paper cassette. when you load paper in the Auto Sheet Feeder. (1) Pinch the Paper Guide (C) and slide it to align with the mark of page size. If paper is curled, flatten it. Operational requirements and restrictions are indicated at the end of this page. After lifting the front of the paper cassette up a little (2), pull it out while supporting the cassette with your left hand until the handle (A) on the right side of the paper cassette appears completely (3). Push thecassetteinto theprinteruntil it stops. Hold down the paper as shown in the figure, make sure that the paper stack does not exceed the load limit marks (A), and then set it under the hooks (B) on the paper guides. The paper loading methods are different between standard size paper and custom size paper. Select the paper size of the document created by an application. 3. The paper may not be fed properly. Attach the label for the size of the loaded paper to the paper size indicator, and then insert the indicator into the paper size slot at the front of the paper cassette. This printer's paper cassette cannot automatically detect the paper size. Loading paper in the landscape orientation (F) can cause paper jams. For details on how to load paper in each paper source, see [ Loading Paper in the Cassette ], [ Loading Paper in the Rear Tray ], or [ Loading Paper in the Manual Feed Slot of the Front Tray ]. 6. Align the paper guide (I) in front with the paper stack. Do not extend thecassettewhen loading other than A4 sized paper in thecassette. Load paper when the printer status is in any of the following. 5. For more details on using the printer driver, see Help of the printer driver. Make sure that the size of the loaded paper is aligned with the mark of paper size. 15-Feb-2008 Provide your booking code and email address you used for the registration, we will re-send the confirmation email to you. Align the edges of paper. Here you will find service loaner, rental and test drive equipment lists, and application forms. To avoid this, load paper in the Auto Sheet Feeder. Load paper in the paper cassette using the following procedure. Leave the setting at [Match Page Size] when the page size and the size of the paper loaded in the paper cassette are the same, since there is no need to change the setting. If you print from Cassette 2 when Cassette 1 is not set, this will cause paper jams. e. For more details on the usable paper, see "Usable paper" in Related Information at the end of this page. - Make sure that the size of the loaded paper matches the paper size specified in the printer driver before printing. Refill the cassette. (2) Load the paper all the way in the Manual Feed Slot WITH THE PRINT SIDE FACING DOWN.
Be sure to check if the paper size specified in the printer driver matches the size of the paper loaded in the cassette before using the printer. Load custom size paper in the paper cassette using the following procedure. If you select the wrong media type, the printer may feed paper from the wrong paper source, or may not print with the proper print quality. 2. Be sure to turn the printer ON once when loading paper in the paper cassette for the first time after installing the paper feeder. If not, selectChangeto change the setting in accordance with the size of the loaded paper. If you cut plain paper into small size such as 4" x 6" / 10 x 15 cm, 4" x 8" / 101.6 x 203.2 mm, 5" x 7" / 13 x 18 cm, or 2.16" x 3.58" / 55.0 x 91.0 mm (Card size) to perform trial print, it can cause paper jams. 250 sheets (When plain paper that weighs 64 g/m2 is used), - Heavy paper: Approx. Select Plain Paper in Media Type and Manual Feed in Paper Source in the printer driver setting when printing from the Front Tray. You can load A4, B5, A5, or Letter-sized plain paper in thecassette. After lifting the front of the paper cassette up a little (2), push the paper cassette into the printer firmly until the front side of the paper cassette is flush with the front surface of the printer (3). When paper at a size of 8K or 16K is loaded, set CASSETTE(n) SIZE (n = 2, 3, 4) in the control panel to 8K or 16K. When the paper cassette runs out of paper, <11 NO "size" PAPER> appears in the display, or the Paper Source indicator blinks indicating the status. If the paper stack is in contact with the protrusion (H), the paper may not be fed properly. Loading paper in the landscape orientation (C) can cause paper jams. When you change the orientation of the custom size paper loaded in a paper cassette frequently, it is convenient if you set CASSETTE(n) SIZE (n = 2, 3, 4) in the control panel to MIXED SIZES. You have been directed to this answer based on an ID match. If the paper guide is set at a wrong position, this may result in misfeeds. Select Plain Paper in Media Type in the printer driver setting when printing from the Cassette. If you are printing from Cassette 2, make sure that Cassette 1 is set before printing. Be sure to fan the labels thoroughly before loading them. (1) Pull the Cassette out slowly with both hands until it stops, and pull it out from the printer while lifting the near side of the Cassette slightly. a. Always load paper in the portrait orientation (E). 9. For details on the Canon genuine paper, see [, You can use general copy paper. If you print from Cassette 2 when Cassette 1 is not set, this will cause paper jams. This may result in paper jams or damage to the printer. For the page size and paper weight you can use for this printer, see Supported Media Types. Hold down the paper as shown in the figures, make sure that the paper stack does not exceed the load limit marks (A), and then set it under the hooks (B) on the paper guides. Press down the paper stack so that it is loaded under the hooks on the side paper guides (A). The following shows the abbreviations of paper sizes that are marked on the paper cassette. Push the Cassette all the way into the printer. c. Be sure to turn the printer ON once when loading paper in the paper cassette for the first time after installing the paper feeder. - Plain paper: Approx. Select the paper source. When loading paper in landscape orientation, such as when loading A4, B5, A5, Letter, or Executive size paper, shorten the paper cassette. When you do not perform 2-sided printing, simply click [OK]. The paper cassette can be loaded with plain paper (64 to 80 g/m2), heavy paper (90 to 120 g/m2) at sizes of A4, B5, A5, Legal, Letter, Executive, and Custom Size. 6. (2) Pinch the Paper Guides (D) on the both sides and slide them to align with the mark of paper size. The side paper guides move together. - When a message that informs you of a paper-out condition or requests paper replacement is displayed. Make sure that the size of the loaded paper matches that of the paper size setting switch before setting the paper cassette in the printer. Make sure that there is sufficient space between the hooks and paper stack. Be sure to check if the paper guide is at the position of the size of the loaded paper. If you are using B5 size paper (182 mm x 257 mm), set the paper guide to "JIS B5". Always load paper in the portrait orientation (E). 8200036100. For more details on the usable paper, see, For details on handling the paper cassette, see.
(1) Slide the Manual Feed Paper Guides (A) to align them with the mark of paper size. Be sure to load standard size paper in portrait orientation when loading it in the paper cassette. Because the paper cassette is heavy, hold it with your both hands securely. on page 16. Align the edges of paper neatly before loading. When this function is enabled, an error message is displayed if these settings do not match to prevent incorrect printing. While holding the paper cassette with both hands, pull it out completely (4) as shown in the figure. Select CASSETTE(n) SIZE (n = 2, 3, 4) using [. You can load other plain paper here while loading the paper in the Cassette. Loading paper without aligning the edges may cause paper jams. Select Plain Paper in Media Type and the size of the loaded paper in Printer Paper Size (or Paper Size) then select Manual Feed in Paper Source in the printer driver. n. Be sure to align the paper guides with the width of the paper. When printing custom size paper from UFR II Printer Driver, you can load the paper either in portrait or landscape orientation. Ltd. All rights reserved. This may result in multiple sheets of paper fed at once or paper jams. 8. 8200530100. Do not load paper in the manual feed slot during printing from the paper cassette. While holding the lock release lever of the rear paper guide, slide the guide to the size mark for the paper to be loaded. After lifting the front of the paper cassette up a little (3), push the paper cassette into the printer firmly until the front side of the paper cassette is flush with the front surface of the paper feeder (4). Open the Front Tray gently, and pull out the Front Tray Extension. Loading paper without aligning the edges may cause paper jams. If there is no sufficient space, slightly reduce the amount of paper. If the paper guide is set at a wrong position, this may result in misfeeds. 3. Your browser either does not have JavaScript enabled or does not appear to support enough features of JavaScript to be used well on this site. For details on methods for displaying the Printer Status Window, see "Displaying the Printer Status Window" in Related Information at the end of this page. Specify the paper settings in the printer driver. If Cassette is not selected in Paper Source, Select cassette as the Paper Source. Slide rightpaper guideto align it with paper stack. When changing the size of the paper to be loaded, adjust the length of the paper cassette and change the positions of the paper guides. While holding the tab (B) on the paper size setting switch (A) (1), align the triangular mark on the paper size setting switch with "CUSTOM" (2). If theoperation panelis close, theprinterdoes not start printing. (4) Extend the Cassette and lock the tabs (B). While holding the lock release lever of the rear paper guide, slide the guide to the size mark for the loaded paper. The following shows the paper capacity of the paper cassette. When A4, Letter, or Legal size is selected, the following screen appears. Click here to learn more about Canon Frame Lab and get 30% off your purchase. When CASSETTE1 SIZE and/or CASSETTE2 SIZE is set to MIXED SIZES, you do not need to specify the setting for CASSETTE1 SIZE and/or CASSETTE2 SIZE each time the paper orientation is changed. For details on settings in each menu, see "Changing the Paper and Print Settings" on.
(3) Load the paper stack WITH THE PRINT SIDE FACING DOWN and LEADING EDGE TO THE FAR SIDE of the Cassette. Slidepaper guides(D) in front and (E) on right to open guides. Align the paper guide (I) with where it clicks into place. When changing the size of the paper to be loaded, adjust the length of the paper cassette and change the positions of the paper guides. Select the size of the paper loaded in the paper cassette, then click [OK]. 9. Last Updated : When any paper is in the manual feed slot, you cannot feed paper from the paper cassette. If the paper guides are too loose or too tight, this may result in misfeeds or paper jams. When CASSETTE(n) SIZE (n = 2, 3, 4) is set to MIXED SIZES, you do not need to specify the setting for CASSETTE(n) SIZE (n = 2, 3, 4) each time you change the paper orientation. For details on how to flatten curled paper, see, Load the paper stack WITH THE PRINT SIDE FACING DOWN, and place it in the center of the. To use custom size paper for printing, click [Custom Paper Size] in the [Page Setup] sheet, and then specify the custom paper size. b. a. 4. To print letterhead paper or paper printed with a logo when loading paper in landscape orientation, load the paper so that the printing side is facing down as shown in the following figures. The Paper Guides (D) will stop when they align with the corresponding mark of paper size. Do not pull out the paper cassette. You can load paper of the following custom sizes. Canon pixma mp160: product brochure (2 pages), Canon pixma mp600r: quick start (484 pages), Canon pixma mp600r: install guide (740 pages), Wireless photo all-in-one printer (74 pages), Manual will be automatically added to "My Manuals", Canon Powershot A480 Supplementary Manual, All in One Printer Canon PIXMA MP600 Start Here, All in One Printer Canon PIXMA MP160 Brochure, All in One Printer Canon PIXMA MP600R Quick Start Manual, All in One Printer Canon PIXMA MP600R Setup Manual, All in One Printer Canon PIXMA MP600R Technical Specifications, All in One Printer Canon PIXMA MP640 Network Setup Manual, All in One Printer Canon MP640 - PIXMA Color Inkjet Parts Catalog, All in One Printer Canon PIXMA MP640 series Getting Started Manual, All in One Printer Canon Pixma MP640 series Getting Started Manual, All in One Printer Canon MP610 Service Manual, All in One Printer Canon PIXMA MP610 Series Quick Start Manual, All in One Printer Canon PIXMA MP620 Series Getting Started, MB5400 Series Set Cassette Paper Information After Loading Paper, MB5000 series Be Sure To Set Cassette Paper Information After Loading Paper, MB5000 Series Be Sure To Set Cassette Paper Information After Loading Paper, TS6000 series Loading Paper In The Cassette, MB2100 SERIES Set Cassette Paper Information After Loading Paper, MB5100 Series Set Cassette Paper Information After Loading Paper, MB2100 Series Set Cassette Paper Information After Loading Paper, TS8000 series Loading Paper In The Cassette, MB2700 series Set Cassette Paper Information After Loading Paper, PIXMA TS6000 Series Loading Paper In The Cassette, MG5700 series Set Cassette Paper Information After Loading Paper, MG7500 series Be Sure To Set Cassette Paper Information After Loading Paper, MG5700 Series Set Cassette Paper Information After Loading Paper, MB2300 series Be Sure To Set Cassette Paper Information After Loading Paper, MB2000 series Be Sure To Set Cassette Paper Information After Loading Paper, MX490 series Be Sure To Set Cassette Paper Information After Loading Paper.