 Houzz is the new Internet. Saved my bacon. Thanks Rich and ALL for the information and advice.
 If you are ready to transform your home with crown moldings and you are not a professional contractor or woodworker , you may need our tips that how to cut a 90 degree crown molding corner , inside corner and outside corner .
 I had an old Bosch 10 slider for a lot of years before I gave it to my BIL.
 With the miter saw set to 0 degrees, make a straight cut to create the butt joint where the end of the moulding will be flush against the wall in the corner. Use it for your project, then bring it back no maintenance required, and you wont need to store it.
Placetrim molding on a miter saw in the position it will go when installed. Then using a coping saw follow the profile of the cut.
The second piece will then be cut to fit over it . 14 Things You Need to Start Doing Now for Your Spouses Sake. Cut a miter angle on the adjoining length of molding, then apply a bead of acrylic latex caulk to miter joints. Select output Fraction Precision, Decimal Inch or Metric mm. "I have learned so much thanks to the searchable articles on the FHB website. I'll be using crown molding with a 52/38 degree wall angle.
Molding position placed on the saw is same as cutting inside corner, molding in the saw with the lip that touch the ceiling pressed flat on the saw up against the fence.
2000-2022 Home Depot. 7 Ecofriendly Gardening Ideas That Also Cut Chore Time, Quiet, Please!
I plan to use the laser level to give me a line to set blocks cut to match the spring angle, and then secure the crown to the blocking. They won't just pop off in one piece. Even if you cope the joint you must have the relationships (wall/ceiling/saw fence/angle)right or the cope will be open in its own way.Of course, it will be easier to caulk the h3ll out of an open coped joint than that open miter.Casey. I know exactly what he is talking about. and hit Get End Angle to calculate the angle between walls. Using the "old" bosch miter finder (not the new one that's out now) use the reciprocal angle.
I agree with above but he left out what your problem is, the corner not at a 90 degree angle. We position our saw to the right at the 45 degree miter angle ,hold molding up into place and we make our cut. Turn the blade to 45 degrees outward.
Knowledge of the four types of crown moulding cuts makes your DIY room improvement project easier. A power miter saw is the best way to cut crown moulding once you measure the angles.
If you discover that your corners arent exactly 90 degrees apart, then you need to use an angle finding tool to bisect the angle and get the exact measurement. Make sure it's pointing away from the section of the trim you measured. Somos un fabricante de 10 aos de molduras de cornisa, zcalo, rosetones, molduras de iluminacin indirecta,Perfiles para iluminacin,panel de piedra decorativa, panel de ladrillo, No.2 Huashan Road,Gaoyou City,Jiangsu,China, Copyright 2012 - 2021 Myfulldecor.com | All Rights Reserved | Powered by, How to Cut An 90 Degree Crown Molding Corner.
PVC Composite Inside Corner Molding, #16-1/2 x 1-5/8 in. If you have a 92 degree wall set the saw at 1 degree from 45 and cut an inside miter. Measure the angle. You should be cutting the crown upside down at the angle it would be as if installed, this is will be in the nested position. What looks wrong and how do I fix it? For the right side of an outside miter, swing the blade to the right and keep the left. My question is..What is the approximate angle should I cut on the miter box for a better fit? Space the clips 12 inches apart.
#M200-6 Oxide Flat Low Odor Interior Paint & Primer.
For the molding coming from right side of the corner ,we will make a miter cut on the left side. Black Floating or FLush House Number 2 30726, Shop ANSI Grade 1 (Best) Modern Passage Door Handles, Silver Single Hose Portable Air Conditioners, Overload protection Mini Split Heat Pumps, Shop Botanical Grass Cloth Wallpaper Rolls, Shop Art Deco Ceiling Fans Without Lights, Buy LONGKING 12 in. in
Slide the adjoining length of molding tightly against the first piece, then tap it into the clips.
Make sure they cover the floor and counters and just ball it all up and take away with them. While cutting crown moulding is still necessary, using corner blocks will eliminate the need for any angle cuts with a miter saw. Measure the wall to determine how long to cut the crown, then cut another compound angle on the opposite end of the molding. Copyright 2022 This Old House Ventures, LLC. I have two corners which are about 1/8 and the other 1/4 off when measured with a square at the 24 inch side. But plunge pools fill the middle ground, give a splash of fun, and offer relaxation in smaller yards. Local store prices may vary from those displayed. White Vinyl Subway Peel and Stick Decorative Wall Tile Backsplash (10-Pack) LKA2300B0, Prime-Line Sliding Closet Door Bottom Guide, 4-3/16 in., Plastic, White (2-pack), Daltile Restore Green 3 in. Crown moulding can enhance the appearance of a room and give it an overall finished look. Barely out of square (probably 89.5 degrees). Glazed Ceramic Subway Wall Tile (12.5 sq.
What coping blade fine or course? :-) I've also become quite skilled at glopping on the caulk (double :-)). If you help us with a definition of the FEELING you want, all the rest will flow easily. Those angle detents are for cutting crown on the flat. We may receive a commission from sales referred by our links; however, we have carefully selected these products for their usefulness and quality.
If you cannot do that, you need to alter the orientation at the saw; the upside-down crown needs to be less on the table, more on the fence; taller, not flatter, if you follow.I always ascertain the wall/ceiling coordinates of a crown by placing a piece in the angle of a framing square and taking its measure. But first, here are a couple of common questions wed like to answer about this project: Use a layout square to check and see if your corners are equidistant. I just finished with crown in my family room.
The saw can be set to 45 degrees to the left or 45 degrees to the right. We position our saw to the left at the 45 degree miter angle and then make a cut. Once you have the right cuts for each corner, apply caulk to join the edges together. Crown Molding: Is It Right for Your Home? Those who say it cannot be done shouldn't interrupt the people doing it. No it is not. It looks as though the tiles are glass. Why are the joints of my crown molding ending up like this? Then, make the cope to fit into it. I still like a nice coping saw and a coarse sanding sponge for the fine tuning.
Fasten the plastic installation clips to the wall using 2-inch drywall screws. The crown is too far up the wall by the looks of it. It has nearly all the information you'll need. Test fit your coped piece using a scrap piece of moulding and check for a tight seam. I think that's called the spring angle.
By choosing I Accept, you consent to our use of cookies and other tracking technologies. Far from perfect but close enough. By submitting your email, you agree to our. If learning how to cut crown moulding to get the angles right seems too difficult, you can reduce any frustration with your DIY crown moulding project by using crown moulding corner blocks. Mark the measurement on a piece of trim molding with a pencil. I looked at the charts that detail all the different angles for my compound miter saw. The Fora platform includes forum software by XenForo, http://www.woodweb.com/knowledge_base/Crown_moulding_along_cathedral_ceilngs.html, http://www.garymkatz.com/TrimTechniques/cutting_crown_transitions.html, VerticalScope Inc., 111 Peter Street, Suite 600, Toronto, Ontario, M5V 2H1, Canada. Thanks for all your help and suggestions.
as kaschmi mentioned, you can bring the crown out further from the wall with a 1x added behind the crown. Then it will fit snug to your other crown. With a measuring tape, measure from the outside edge of the corner, back along the wall to the end.
How to create wood detail around bathroom mirror. I would cut the piece on my left (you could use either side, just my preference) to the correct length and normal angle. Cut it upside down and cope your inside corners. Please call us at: 1-800-HOME-DEPOT (1-800-466-3337), Please enter in your email address in the following format: you@domain.com.
on "My greatest creation wasn't made with my hands. Drywall compound was the saving grace. I agree with craftsman jay.
Step Two: Set the bevel to 33.9 degrees. For the molding coming from left side of the corner ,we are going to make a miter cut on the right side. Cutting molding on a miter saw can be tricky business. The position will automatically give you the compounding bevel. Finishing is 3 parts chemistry and 1 part VooDoo :shifty: The Fora platform includes forum software by XenForo, VerticalScope Inc., 111 Peter Street, Suite 600, Toronto, Ontario, M5V 2H1, Canada. I always use the vertically nested method so that you only have to adjust the miter angle. We use cookies and other tracking technologies to improve your browsing experience on our site, show personalized content and targeted ads, analyze site traffic, and understand where our audiences come from. This is a dialog window which overlays the main content of the page. identify wood flooring- red or white oak?
JavaScript is disabled. Any advice will be greatly appre.
Coping is what I see most pros doing.
Make this cut exactly like we did for the mitered corner by moving the saw to the left 45 degree miter angle and we make our cut . One room has a fireplace which juts out 8" and the "outside" corners are not 90 degrees. Scarf joints are used to connect two pieces of crown moulding when the wall is longer than a single piece of the trim. They actually know each other. This Old House general contractor Tom Silva shows how to enhance a room with easy-to-install crown molding using plastic clips and caulking to finish.
Put the first end of the molding under the blade. Putty and paint make a carpenter what he ain't!!
Using a dremel or a file make the cut real purty. I wouldn't be so concerned about the wall to ceiling angle as much as wall to wall. Looked like it needed a lot of caulk. All I had was two sharp crayola's. They are all inside corners.
These dimensions can be drawn onto the ceiling/wall, and used at the saw to make each cut in the same plane.Casey. Adjust the power miter saw's blade angle using the bisecting adjustable square.
Crown moulding enhances the decor of any room. For a better experience, please enable JavaScript in your browser before proceeding. DIY Take your time.
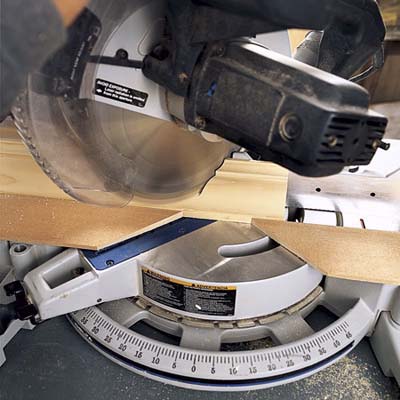
JavaScript is disabled. Now lets take a look at the profile of this molding we are installing it .Each crown molding profile has two flat edges , Ceiling flat edgewhich go up against the ceiling and wall flat edgewhich will go up against the wall . Wear a dust mask and appropriate ear and eye protection when using the power miter saw. 2022 The Taunton Press, Inc. All rights reserved. Corners usually are not very crisp and tend to be slightly rounded where the points of the molding cant go all the way in. A forum community dedicated to professional woodworkers and enthusiasts. To help you with orientation, remember that the more decorative part of crown moulding is usually on the bottom, so keep it against the fence when cutting. The modal window is a 'site map' of the most critical areas of the site.
Houzz Pro: One simple solution for contractors and design pros. I did ok cutting smaller crown, and had thought I had finally figured it out. Step Four: Reverse the settings and repeat. As you learn how to cut crown moulding, practice with smaller scrap pieces to save frustration later.
Thanks so much. They're matching at the bottom of the joint, but there's a gap at the top. And I don't like the corner blocks because IMO they're for people who can't cut proper miters. But even coping is a learned technique. All you need to cut is the miter. Doing this eliminates the need for a bevel cut because the slope of the crown moulding when installed is mirrored. Outside corners are a different beast of course. The Polite House: Do I Have to Display Decor Given to Me as a Gift? Inside corners should be coped.
I tried to cope one but did not come out very well and did not have a good rasp to fine tune it.
Here is how to cut the types of moulding that rest true against a wall. Got an idea for a new calculator, or improvements / additions to existing ones? A solar generator gives you backup energy from the sun should your electricity fail.
Looked at Amazon but still did not find a good rasp set. All rights reserved. Experiment not only with changing the angle slightly on your saw, but compounding may help too. We are no longer supporting IE (Internet Explorer) as we strive to provide site experiences for browsers that support new web standards and security practices. There are also many different pattern options, ranging from bold to more conservative.
The angles were so close to the standard 90 angles (that are preset in saw) that I cut my first cut as if the ceiling/wall were a true 90. Your wall is 92?
While learning how to cut crown moulding, remember: Square cuts are the simplest and are used to create a butt joint, where the cut end of the moulding fits flush in a corner. If theyre not at a perfect 90 degree angle, use an angle finding tool (aka bisecting adjustable square) to find the exact degrees (see next question). I would then use a piece of scrap to determine the angle needed to give a good fit.
5:00 AM
Brace the flat top of the moulding on the base of the saw and the flat bottom of the moulding against the saws fence. For the left side of an outside corner, swing the blade to the left and keep the right end of the cut. Worst thing they can do is cook ya and eat ya. On most saws, 31.6 is specially marked. Its this butt joint that a piece of coped moulding will fit against.
Step Three: Lay the crown flat and cut. Then cope off the cut following the line between the face of the crown and that 45 degree excess. Use a wood file or sandpaper for fine-tuning the edge to remove any wood that prevents the two pieces from matching snugly. Hi there, I am putting in some 3-1/4" standard crown molding.
Were here to tell you, See how to find the right trim for the height of your ceilings and style of your room, Landscape Architects & Landscape Designers, Outdoor Lighting & Audio/Visual Specialists, Why Marble Might Be Wrong for Your Bathroom, You Said It: Every Room Should Have the Right Wrong Thing and More, You Said It: The Wrong Sink Can Make You Hate Your Kitchen. Brace the moulding as you did before and make a cut near the end of the moulding.
Why not give it a try?
I've given it to a lot of people, that way wherever the saw is, the diagram for crown is with you too.
The way I've seen the experts cope crown is to,first, make a 45 degree cut on it. And corners are not usually completely square because there is so much tape and drywall mud in a corner and that changes its relationship to the walls on each side of it. To compensate for this ,it is helpful to remove a small amount from the unexposed part at the bottom of the molding using a utility knife .
These precut decorative blocks can be used where the ceiling meets a wall corner. There is a wealth of knowledge on the Internet.
- M.K. You might have a talent for it.
Backsplash turned out to be the wrong color! We position our saw to the left at the 45 degree miter angle ,hold our molding up into position and we make our cut. IOW, if you push the crown down the wall, the open joint @ ceiling will close.
The color does not look bad. Maybe try a warmer bulb in your lights. Don't worry if you need the tools for this DIY project. The reason the molding went up first was because I was planning to tear out the full builder grade fireplace mantle, and fabricate a new one.
The most of common inner corner in the room is standard inside 90 degree corner. Some are more and some are less. Create and Print Full Scale PDFs with diagrams on this page (templates). Take a handsaw and cut out the unexposed profile of this molding, this yellow part and slide this copped piece over the molding that runs into the wall. Crown molding, unlike other types of moldings that can be any trim in a building, runs along the area where the wall and ceiling meet, hiding the seam. x 96 in. this would give the necessary void behind crown to allow lighting to work. If you've benefited from this free service please consider helping us support: Rest bottom of molding against the fence and top of molding against table.
More than 10 Year of Polyurethane/PU Cornice Mouldings, Crown Molding ,Chair Rail Molding, Baseboard Molding, Ceiling Medallions ect decorative mouldings manufacturing, professional and reliable polyurethane Faux Stone Panels, Decorative Stone Siding, Faux Brick Panels partner in China.
White Steel Panel Board Nails (192 per Pack), How to Conceal Electrical Wires with Crown Moulding, Best Practices for Cutting Crown Moulding, Standoff Column Base Wood to Concrete Post Brackets, Post Cap Simpson Strong-Tie Post Brackets, Buy Everbilt 5 in. Keep the moulding steady by holding it against your miter saw or workbench.
Come join the discussion about shop safety, wood, carpentry, lumber, finishing, tools, machinery, woodworking related topics, styles, scales, reviews, accessories, classifieds, and more!