Here's how to do it in our application. Nginx (engine-x) is an open source HTTP web server framework that can play multiple roles like IMAP/POP3 mail proxy server and function as a load balancer. We will test the configuration first with Lets encrypt staging environment! Opening a port is simple. Select. It's a lightweight Linux distribution designed for security and resource efficiency. edit your .env.nginx file and set STAGING=0. Now, we are using the docker-nginx-certbot image. Trademarks: This software listing is packaged by Bitnami. For that goto your Lightsail home.
They can still re-publish the post if they are not suspended. We'll be implementing testing to make sure everything is green before pushing for deployment. And as every article can be made better so your suggestion or questions are welcome in the comment section. Guides to identify and solve common issues, Bitnami's Best Practices for Securing and Hardening Helm Charts, Backup and Restore Cluster Data with Bitnami and Velero, Backup and Restore Apache Kafka Deployments on Kubernetes, Bitnami Infrastructure Stacks for AWS Cloud, Obtain application and server credentials, Understand the default port configuration, Modify the default administrator password, Modify the default MariaDB administrator password. Why use Docker? Add the private key file from the downloaded location. You can follow the same steps for adding multiple site into the same Lightsail instance. After a moment, the yellow colors will turn to green, meaning that the checks have successfully completed. Execute below command for creating the file. So as usual, we are listening on port 443 for HTTPS. code of conduct because it is harassing, offensive or spammy. You can also use this action with a password but it'll require some configurations. 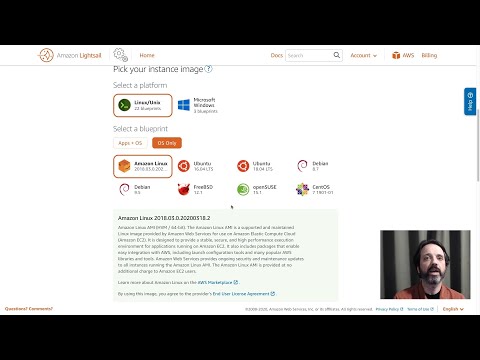 Using this, it will simply clone the content of the repository in the current directory. and only accessible to Mangabo Kolawole. Updated on Sep 26, 2021. Actually, the project is running on sqlite3, which is very good in the local and development environments. Though an option is available for connecting using web browser but for better utilization we will use our system terminal. You should get a similar page. Docker Compose is a great tool (<3). Next step is to create the cosket file that will be used by Nginx for serving request. Next, we create a Postgres service, the database will be used to run our tests. Notice here that STAGING is set to 1. Please follow below steps. Copy below section of code and paste into that file. Once the project folder is uploaded, we can test it in the instance by running Python demo local server. Here, we started with an Alpine-based Docker Image for Python. Based on that data, you can find the most popular open-source packages, Inside that directory, create another directory named workflows and create the django.yml file. We've successfully configured our Django app to use PostgresSQL. It looks like our configuration is clean! Basically, what we are doing here is setting rules for the GitHub action workflow, installing dependencies, and running the tests. Let's start with the authentication tests. Next step is creating Gunicorn service and socket file for letting Nginx connect to gunicorn for delivering out Django application. # SECURITY WARNING: don't run with debug turned on in production! *. Check this documentation for more information. Django is a high-level Python web framework that encourages rapid development and clean, pragmatic design. Below message appears on successful starting of gunicorn. Testing in an application is the first assurance of maintainability and reliability of our Django server. Your Application Dashboard for Kubernetes. First of all, let's install a python package named django-environ. Posted on Aug 31, 2021 It helps you separate your applications from your infrastructure and helps in delivering code faster. And now, let's go back to the settings file and add the env variables configurations as well. Make sure to replace dockerawsdjango.koladev.xyz with your own domain name And no troubles! Let's write tests for our login and refresh endpoints. It is a simpler to understand compute capacity that shares similar benifit as of EC2 but with restricted access. Do not run below command as superuser. Thanks for keeping DEV Community safe. Hit Connect. Make sure that this workflow is triggered only when there is a push or pull_request on the main branch. Next step is uploading the django projefct created locally into Lightsail instance using Filezilla. Although there are already existing solutions like Heroku, to help you deploy your application easily and quickly, it's always good for a developer to know how to deploy an application on a private server. # Checking if the repository is up to date. 1282 days ago, #Django Let's move to the Github Actions to run tests every time there is a push on the main branch. Please reply if you can handle this. If any modification is done to the gunicorn service file, reload the service daemon and restart gunicorn using below command. Declare the environment variables your project will need. Also, notice the needs: [build] line. What we are doing here is pretty straightforward : Now let's move to the Docker configuration. Here are some great resources that helped me: The Dockerfile represents a text document containing all the commands that could call on the command line to create an image. Good! #Nginx. Give a name for the connection to your site. We set the server_tokens to off to not show the server version on error pages. A warning dialog box will appear. And finally, create a .env.nginx file. In this article we will go through creating a Lightsail instance and then demonstrate configuring components on Ubuntu 16.04 to serve Django application. Thanks for your reply. In this article, we've learned how to use Github Actions to deploy a dockerized Django application on an AWS Lightsail server. It will take few seconds to minute before the installation completes. Now we are connected to our instance. Now we can test our project using python test server. Now the instance is created and we can check an item appears in the instance tab of Lightsail. """We set the TESTING setting to True. Save and close the file and enable the site by creating a soft link in the sites-enabled directory of nginx. Next step is to upload our local django project into the virtual environment in Lightsail. You should get Django success window or home page of your project.
So you have written your Django Application and you are ready to deploy it? It will open instance page. You can use it to define and run multi-container Docker applications. We have sucessfully uploaded a Django project into a virtual environment in Lightsail and then we configured Gunicorn to transfer client request to Django for handling them and Nginx to act as a reverse proxy for mapping client request to correct project path. Hi. Gunicorn 'Green Unicorn' is a python Web Server Gateway Interface (WSGI) for HTTP servers in Unix. For refreshing package list and install nginx, pip and venv, execute below commands. Scout APM allows you to find and fix performance issues with no hassle. The port number should be same as the port in which python test server runs. I'll explain what I've done. Login on your server using SSH. Hit Ok, now are connected and you can see your Lightsail home directory listing in the file browser to the right. It helps us make sure that the precedent job is successful before deploying the new version of the app. Now let's install psycopg2 using pip install psycopg2 is a popular PostgreSQL database adapter for Python. I assume you have a django project ready with you. And just paste the content of the precedent script and modify it if necessary. What do we need? You can use it to define and run multi-container Docker applications. If it's your first time working with Docker, I highly recommend you go through a quick tutorial and read some documentation about it. Comparing the old access token and the new obtained access token to make sure they are not equal. To run the tests, open the terminal and enter the following command. For this, we'll be running the migrate command which is responsible for executing the SQL commands specified in the migrations files. Now, let's write the job for deployment in the Github Action. I have given demoProj in below sample. Once it's done, let's create the database we'll be using for this tutorial. Unflagging koladev will restore default visibility to their posts. After that, if you want to link your server to a domain name, make sure to add it to your DNS configuration panel. Here, we'll create a YAML file named django.yml to run some Django tests. Before installing its better to refresh repositories for latest versions. The CREATE USER command lets us create a user for our database along with a password. Once done, Hit Ok. Now the port is opened and ready to listen to the request. In our case it is 8000. Then, with the docker-compose command, we can create and start all those services. Templates let you quickly answer FAQs or store snippets for re-use. Below is the syntax for opening a SSH session with our Lightsail instance. Asit Rout published on This is because there is a limited number of retries to issue the certificate and you dont want to wait till they are reset (once a week). Otherwise you can create a django project in LightSail instance using django-admin command. You can get 